StoreKit 2 Tutorial with SwiftUI - How to add In-App Purchases to your app
With Swift and the new Observation framework, setting up subscriptions for your iOS app is easier than ever. We'll show you how from beginning to end.
Learn StoreKit 2 from top to bottom with our demo app, Caffeine Pal.
StoreKit 2 is Apple's modern approach to handling any sort of purchasing flow in your app. And, that goes for any app in Apple's ecosystem. It works for iOS, iPadOS, tvOS, visionOS, watchOS, macOS and Mac Catalyst. Instead of thinking of delegates and callbacks, StoreKit 2 takes a modern, Swift-first approach and leverages language features such as Swift concurrency.
Whether you want to offer a subscription or any in-app purchase, StoreKit 2 is the right tool for the job. Today, I'll show you how to use it by covering all of the fundamental concepts so that once you're done reading this — you'll be ready to implement in-app purchases on your own. For example, I'll show you how to:
- Purchase products.
- Fetch available products.
- Display localized prices.
- Test out purchasing products.
- How to integrate your existing models with StoreKit, and
- How all of this works in a modern, SwiftUI codebase.
Don't worry if you've never written a line of StoreKit code, I think you'll find it's fairly easy to get started. And, I'll explain everything as we go. First, let me introduce you to the world's finest, most robust (and completely fake) caffeine tracking app; Caffeine Pal!
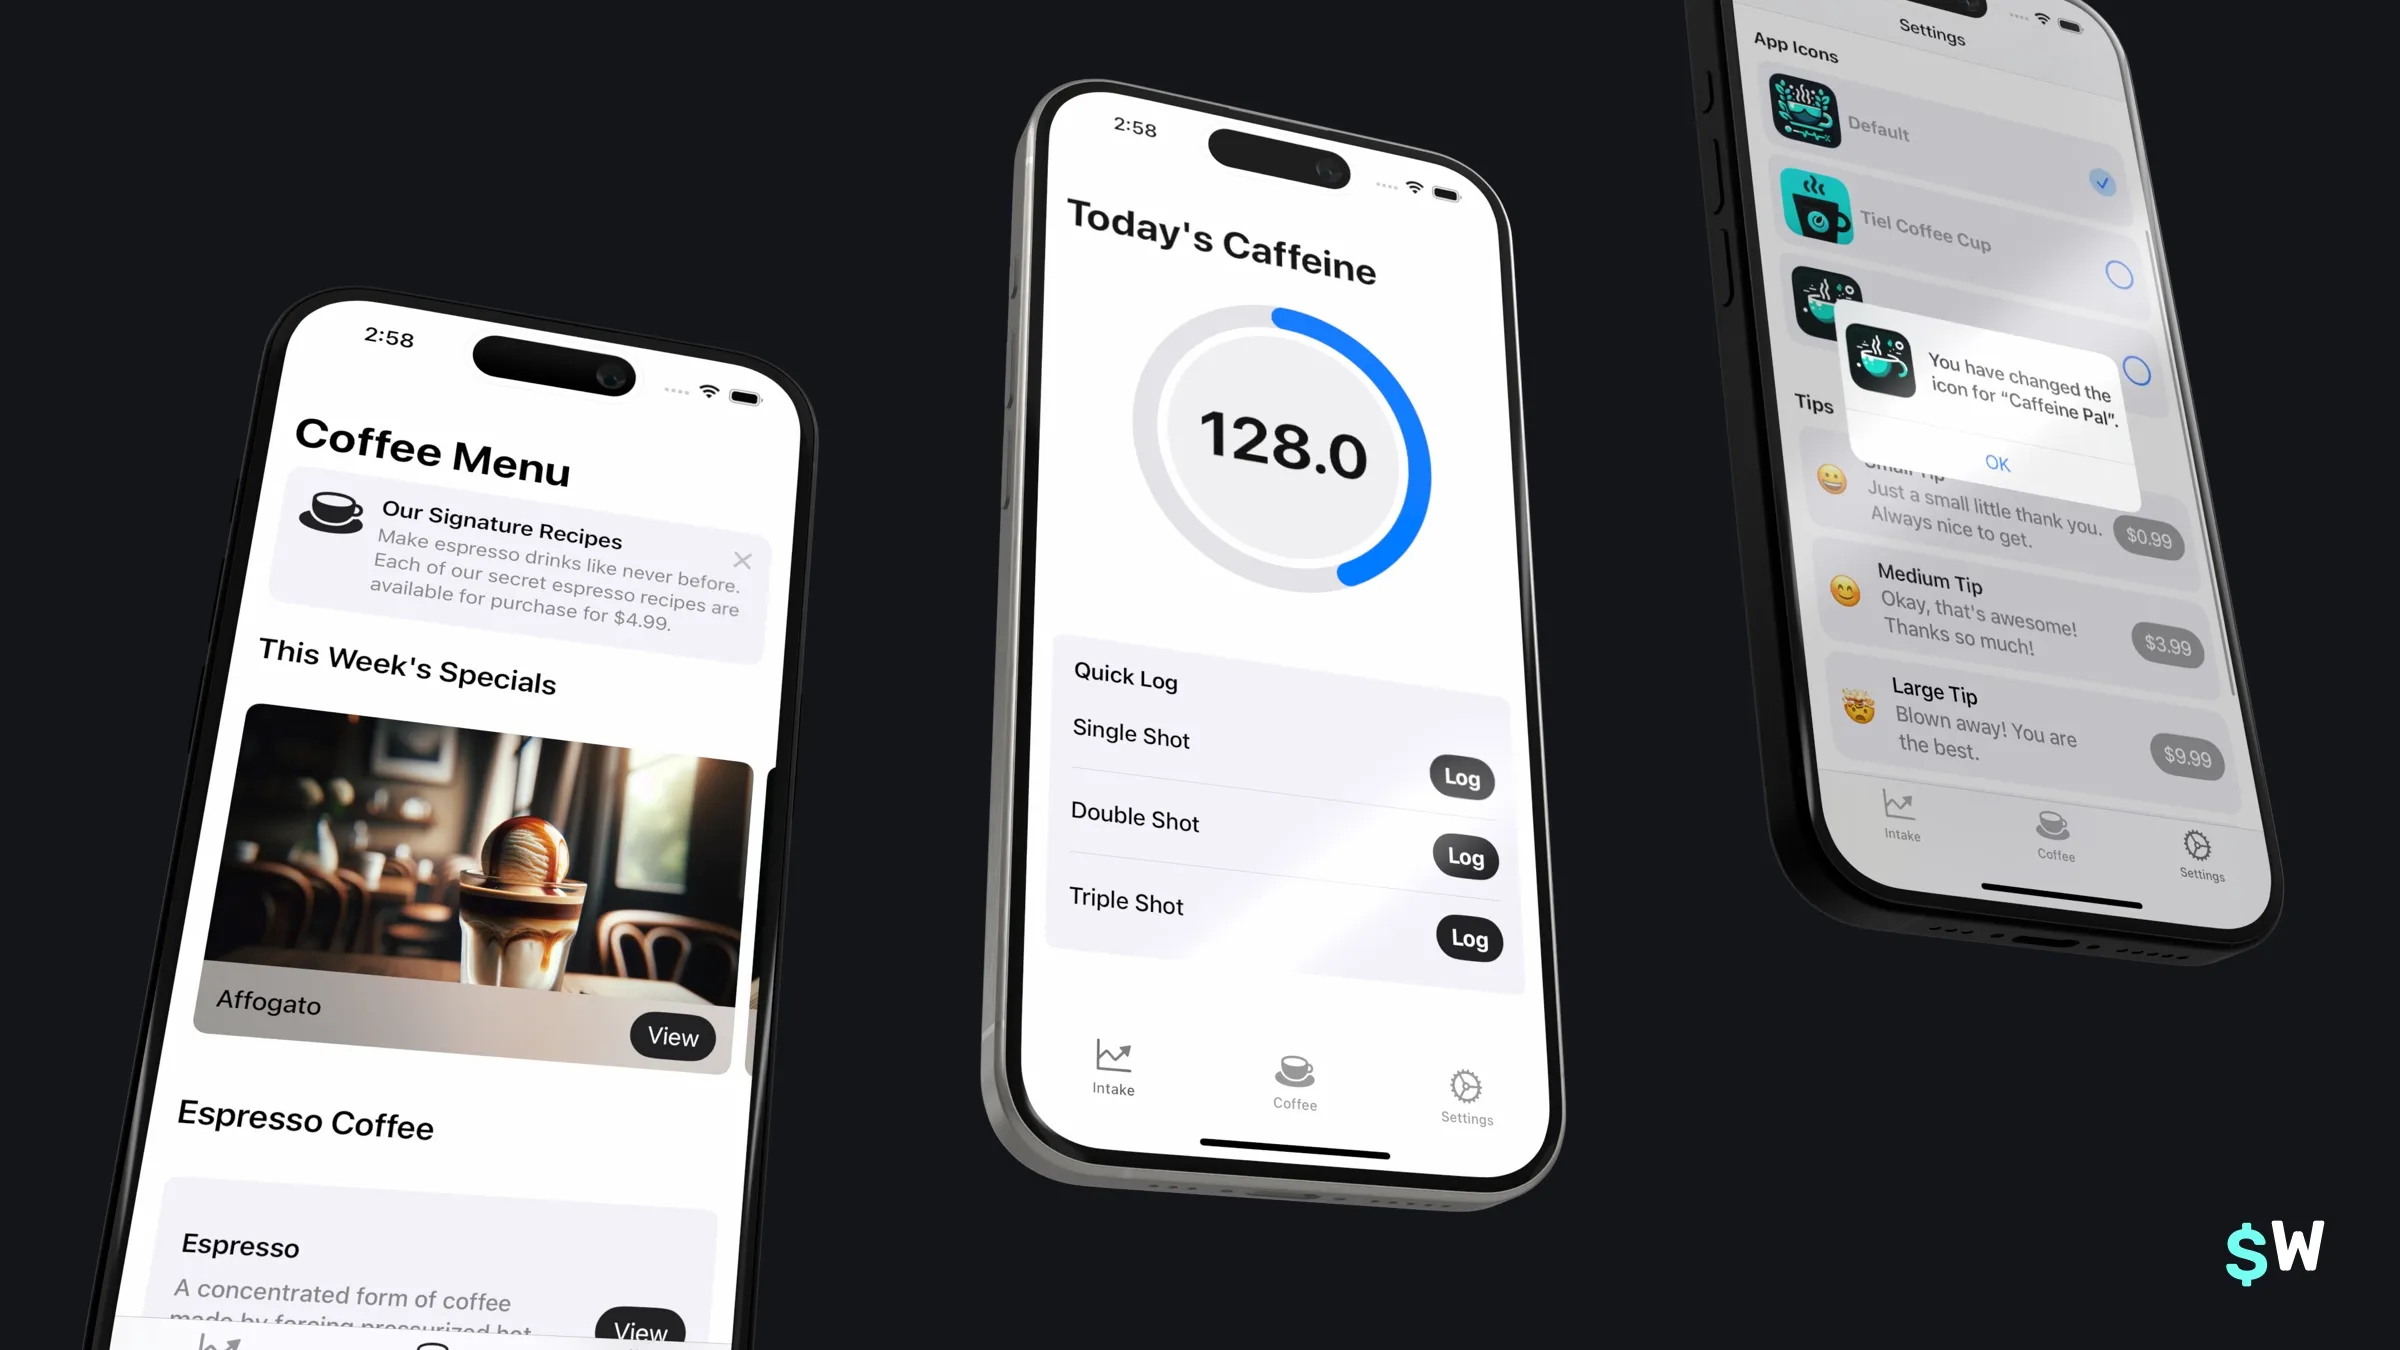
Caffeine Pal is where we will implement our StoreKit code. To get started, either clone the project or download it locally from Github:
We'll get right to the code in a second, but first I want to review exactly what we will offer for purchase in Caffeine Pal.
So, what can we buy here?
To get going, make sure you can build the project first. If you can't, give me a shout on Twitter and I'll help you out. Once it's built, you can either use SwiftUI Previews or run the app on the simulator to take a look around. For our purchasing options, we're going to charge for a few different things:
- People can buy individual recipes from the "Recipes" tab. These are espresso-based Caffeine Pal greats that show people how to make them, step-by-step.
- There is a Caffeine Pal Pro annual subscription, which unlocks other paywalled features such as caffeine tracking, custom app icons, as well as unlocking every available recipe.
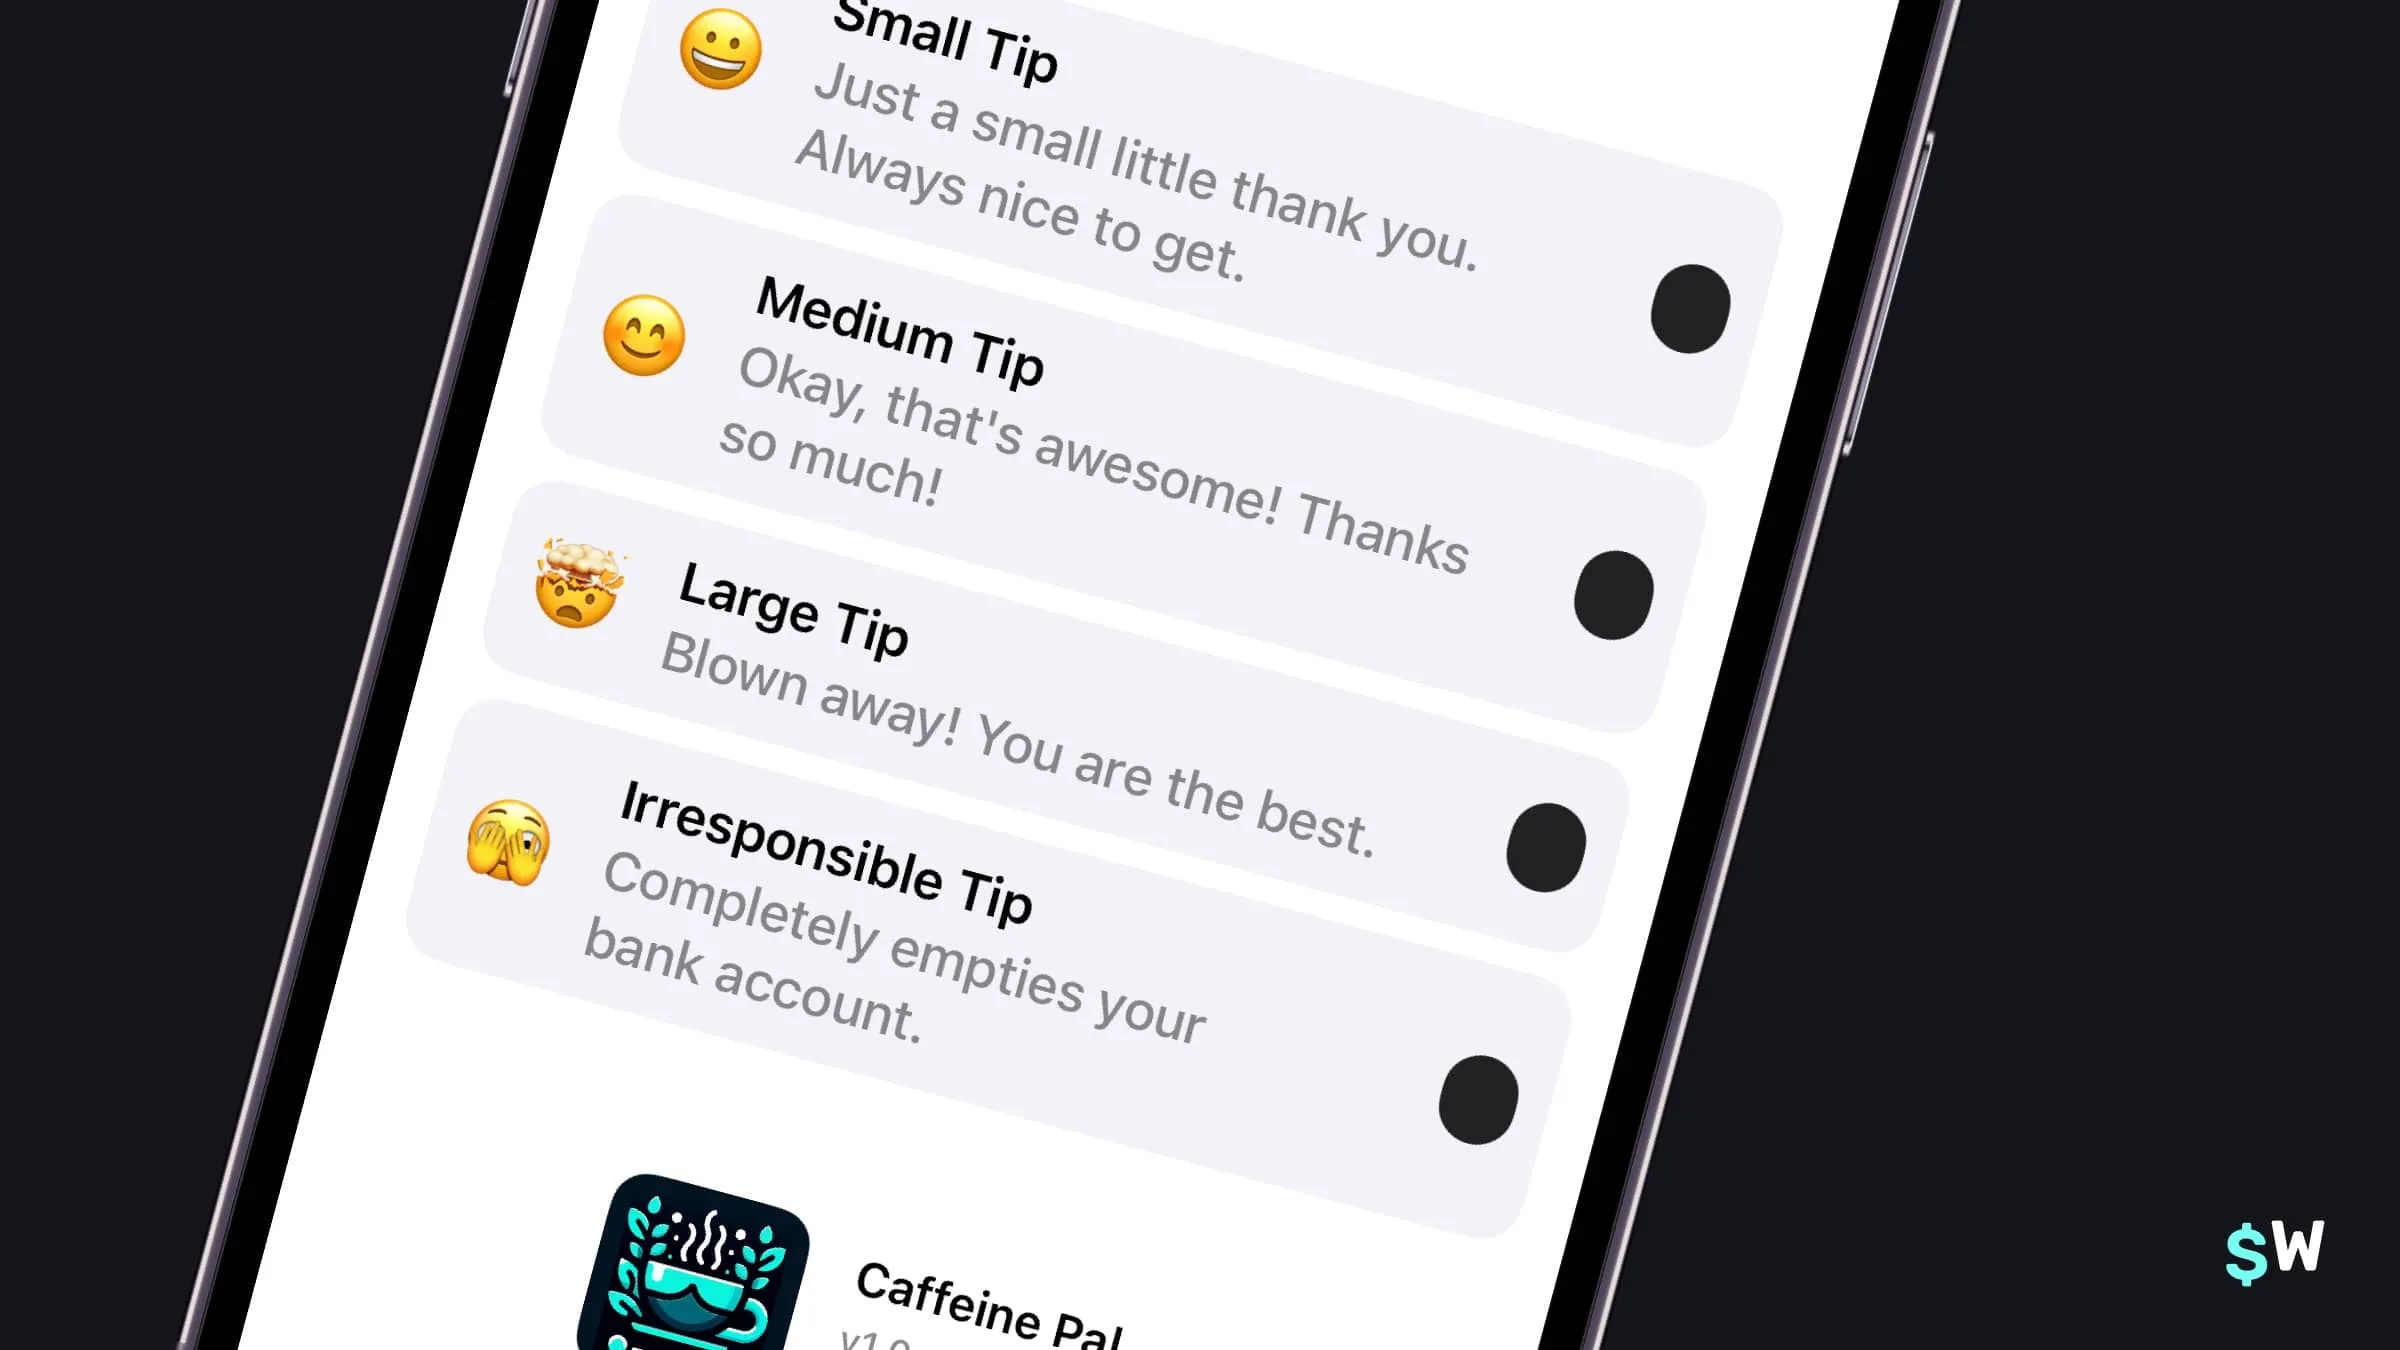
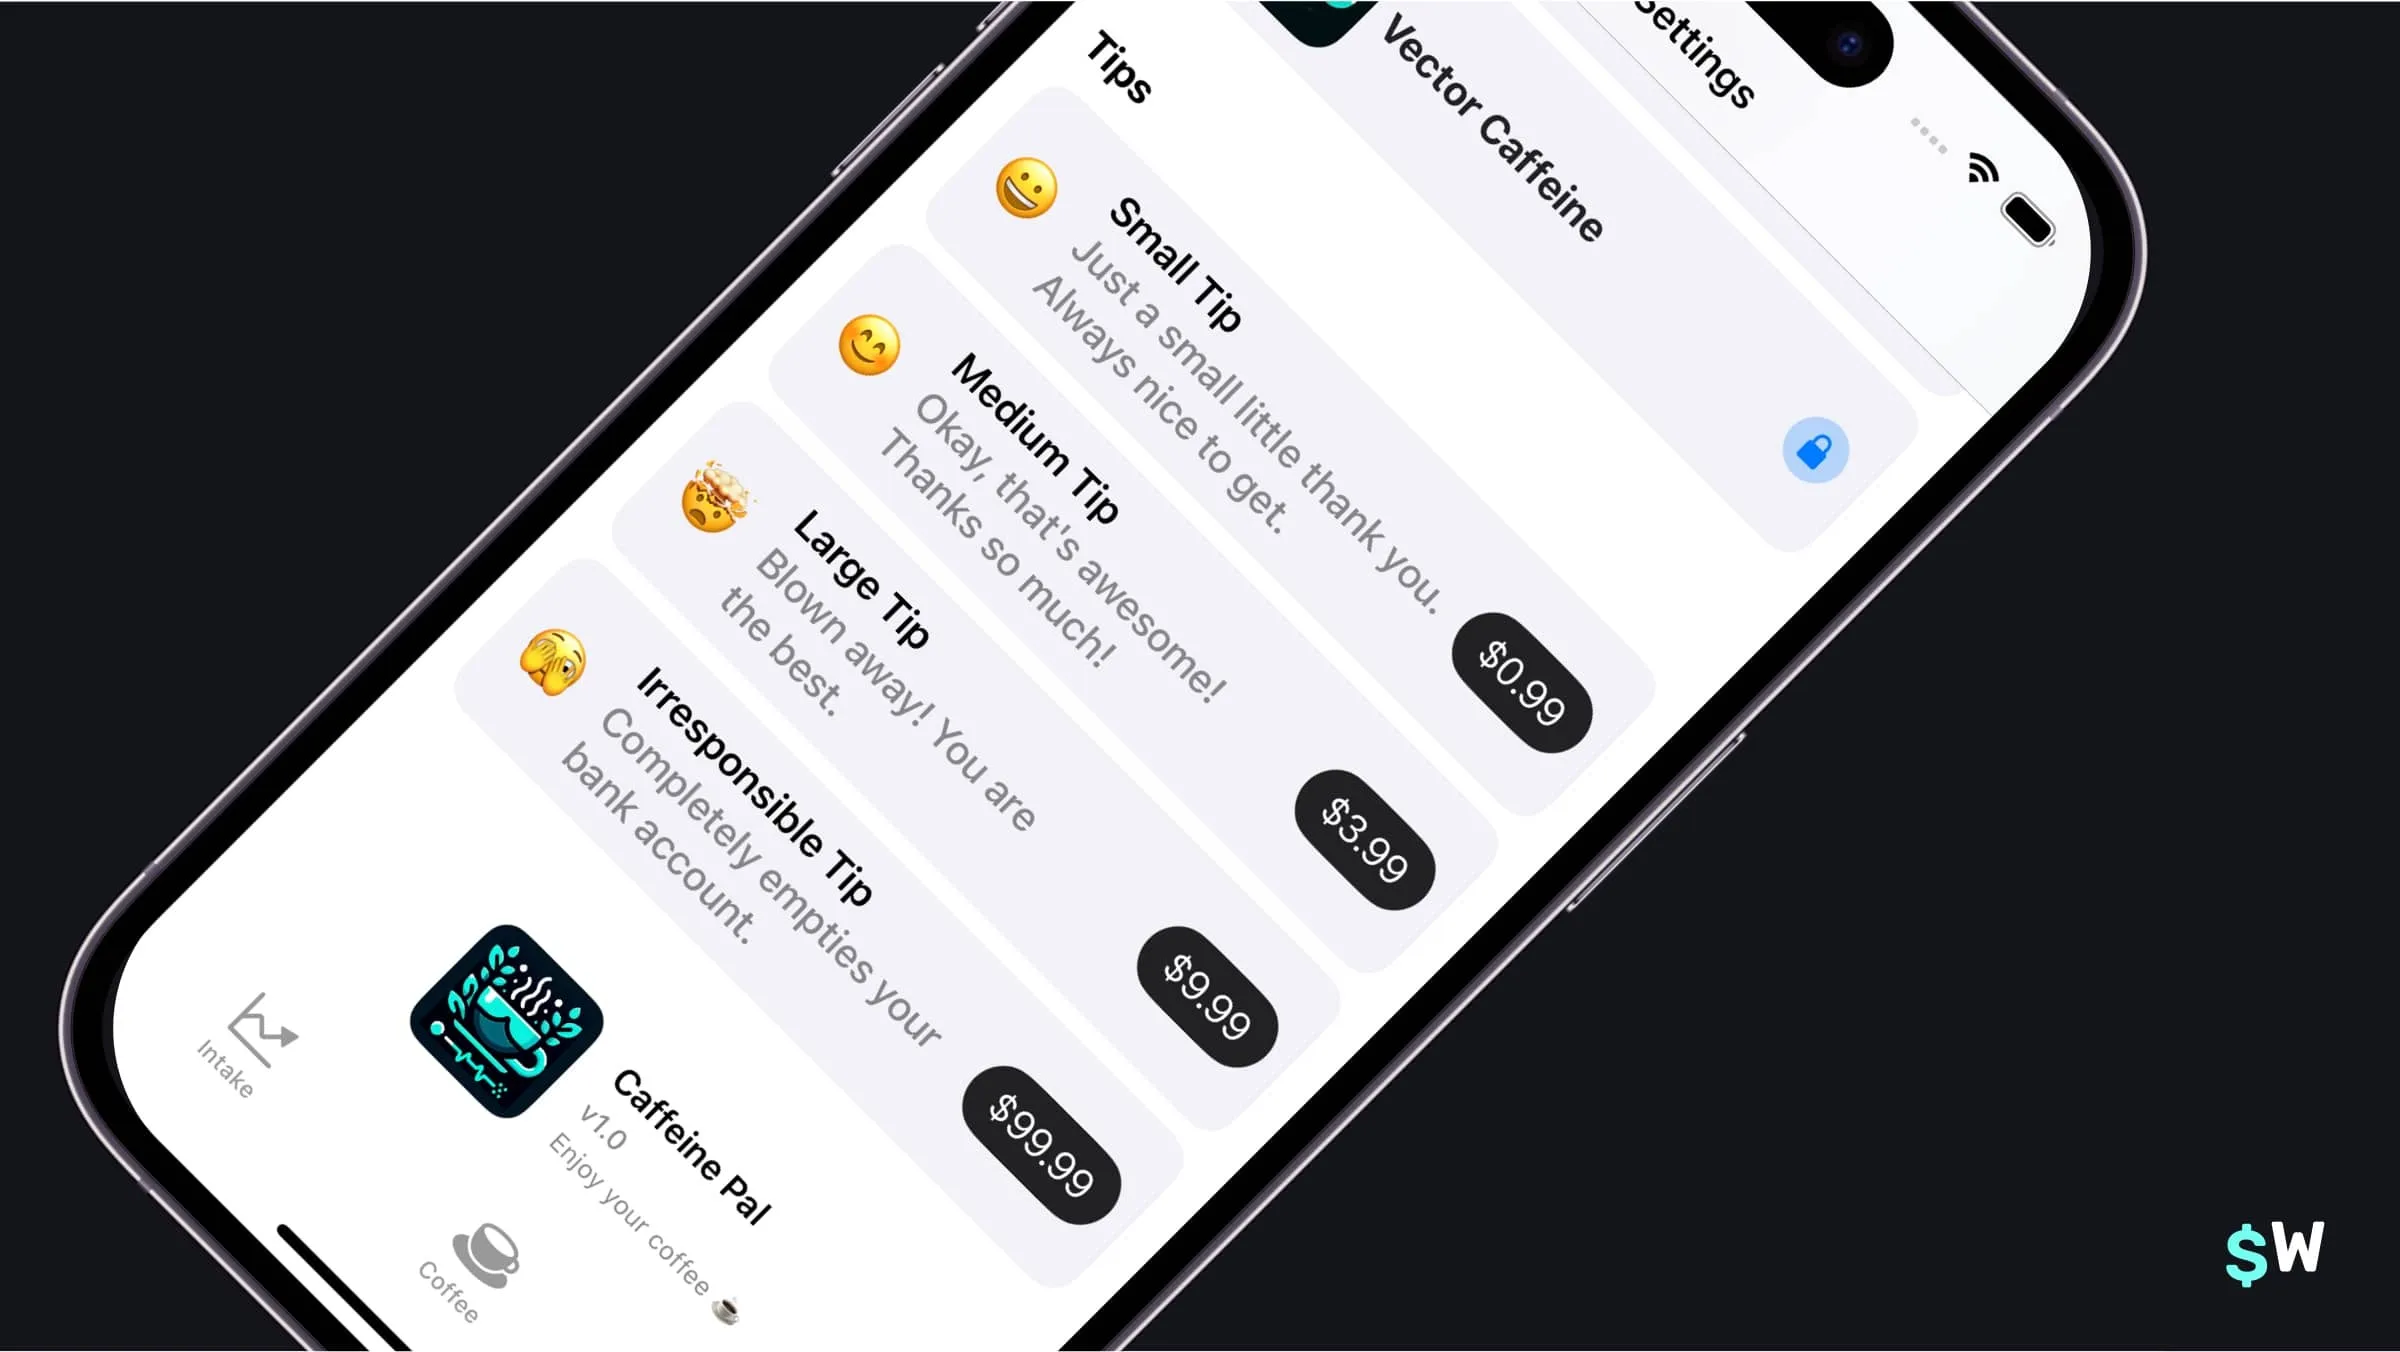
- Finally, you can also leave a tip if you're feeling nice.
Each of these items represent the three primary types of products you can sell using StoreKit:
- Consumable In-App Purchases: These are things you use, and then they're gone. Think of "gems" you could buy in a game. For us, these are the tips people can buy.
- Non-consumable In-App Purchases: You buy it, and then it's yours. In Caffeine Pal, that'll be recipes. Once someone buys access to one, they'll always have it.
- Auto-Renewing Subscriptions: The most common purchase these days. This represents the subscriptions you're used to. They renew once expired unless someone cancels it first.
Keep in mind, there are also non-renewing subscriptions, but I really want Caffeine Pal's M.R.R. to go up, and I think Caffeine Pal Pro represents an enticing value — so we won't be using those here!
Before we can write a line of StoreKit code, though, it pays to have your purchasable products setup. For that, we'll be using a StoreKit configuration file.
StoreKit configuration files
Perhaps the best part of all of this setup? We don't even have to touch App Store Connect. By using a StoreKit configuration file, we can add products locally to test out our code. Even better, if you do have products already setup in App Store Connect, you can sync them directly to a configuration file.
I've already created a configuration file for us (CaffeinePalProducts.storekit) and it has all of the products we can buy:
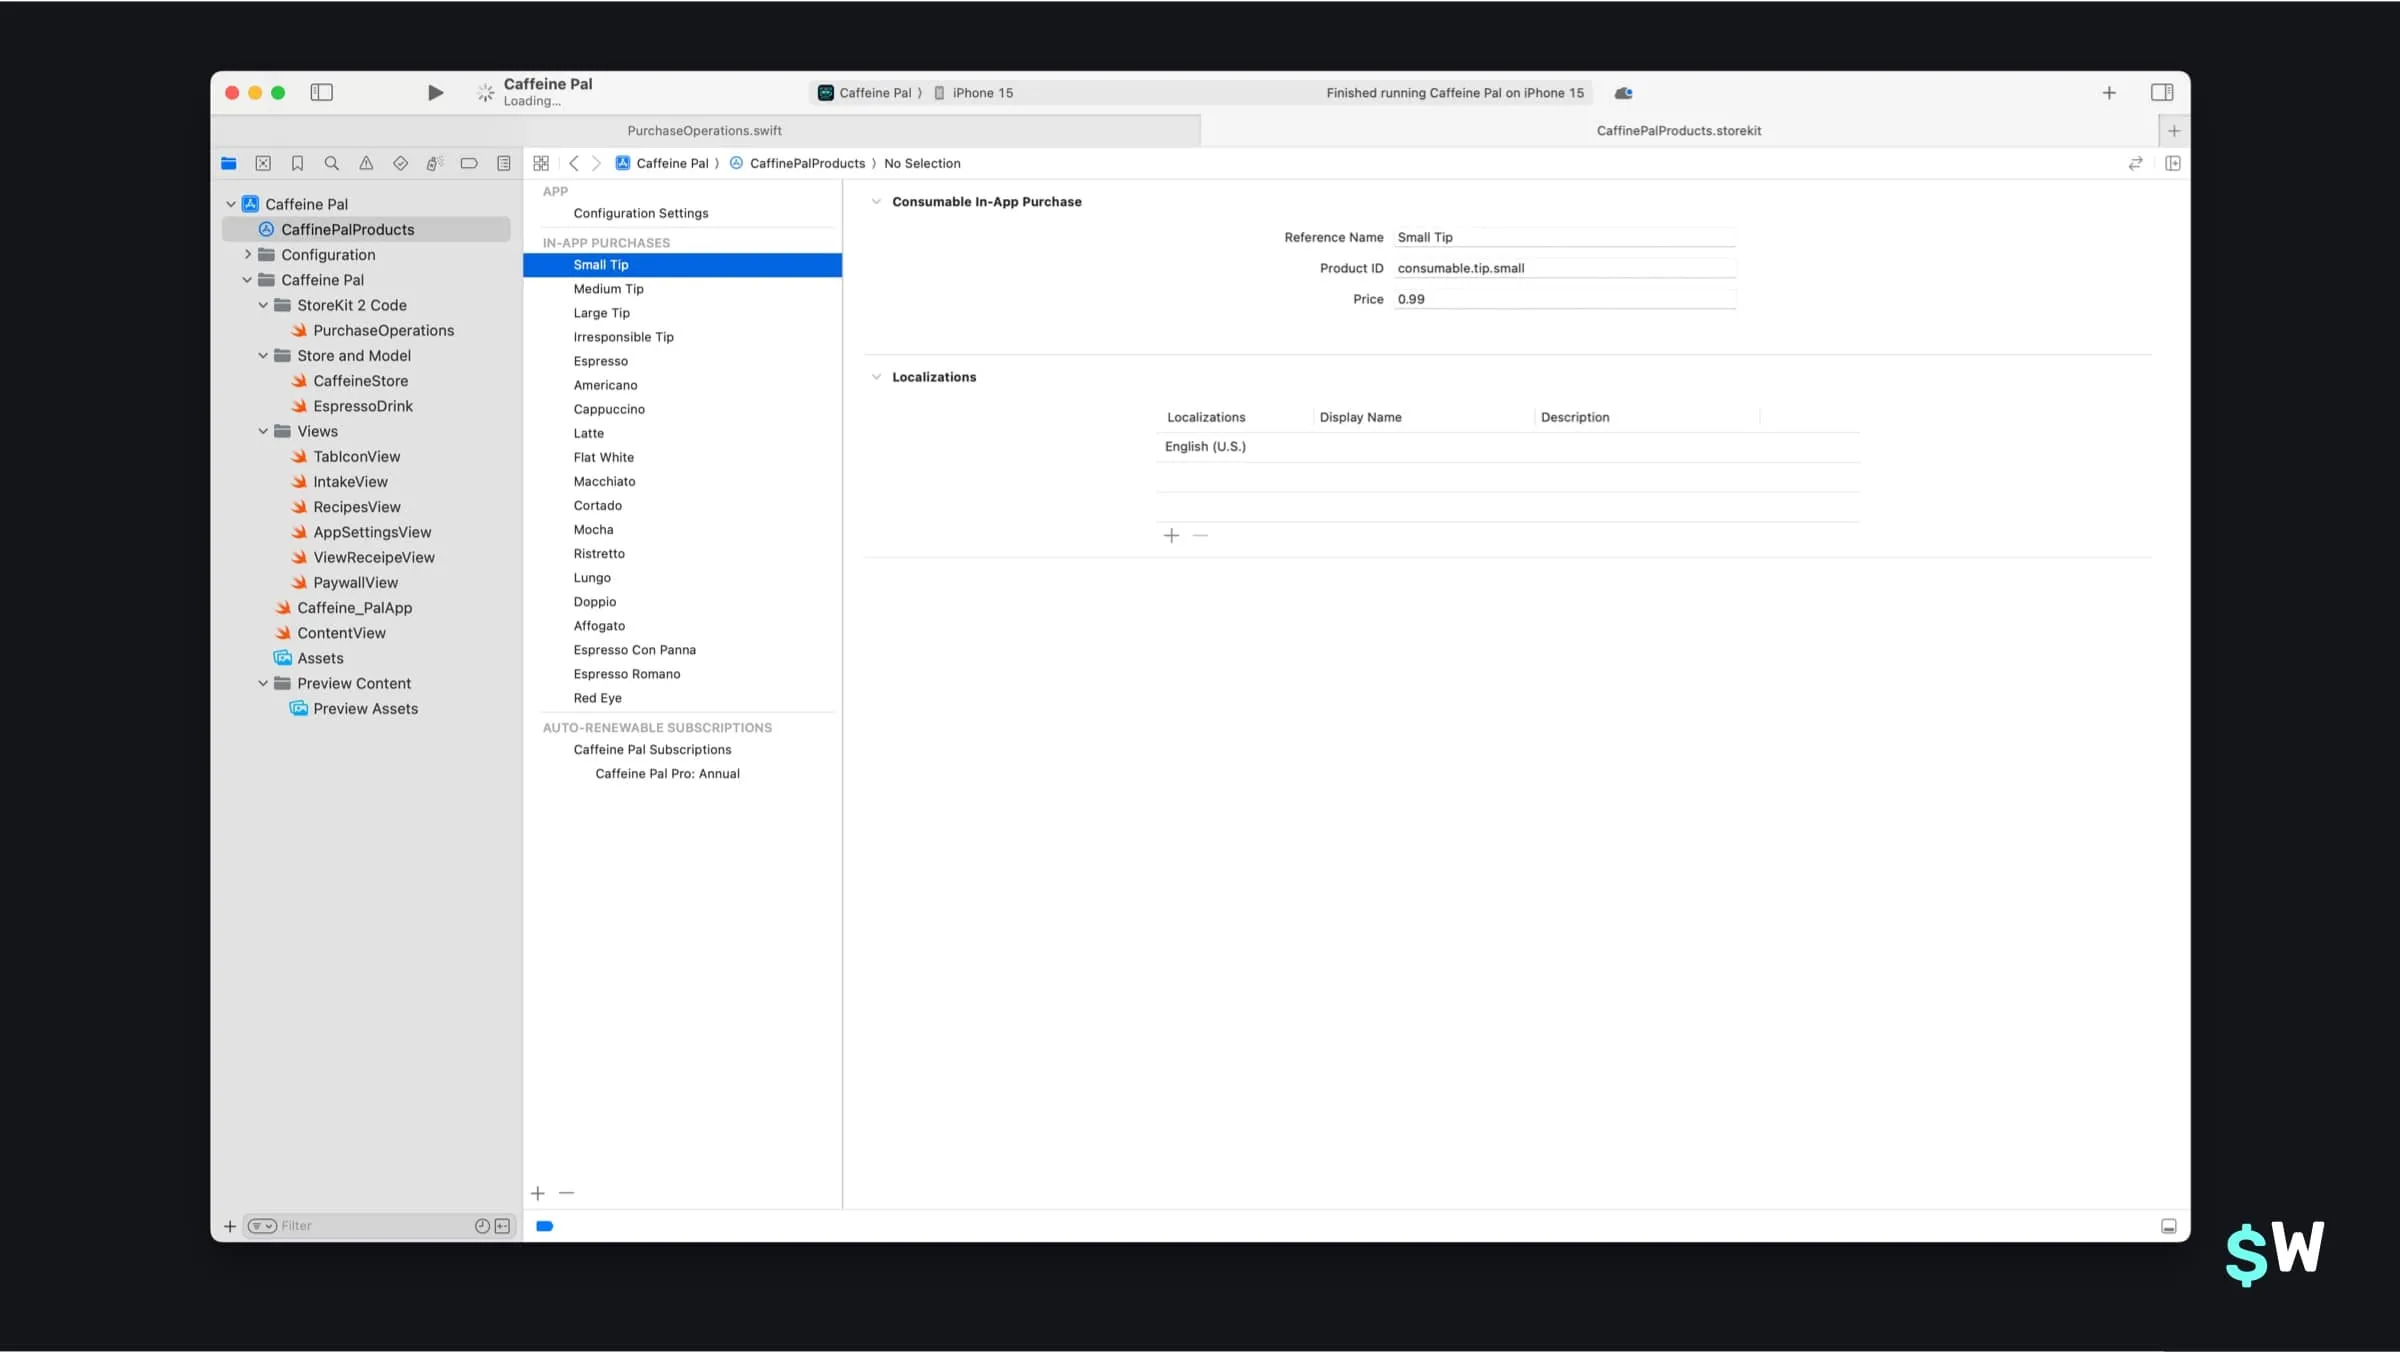
Feel to browse through them now, and you'll notice an entry for all of the
things that you can purchase in Caffeine Pal. A subscription, tips and
entries for each recipe. The important bit here is each item's Product ID, this is what we'll use to fetch the products using StoreKit.
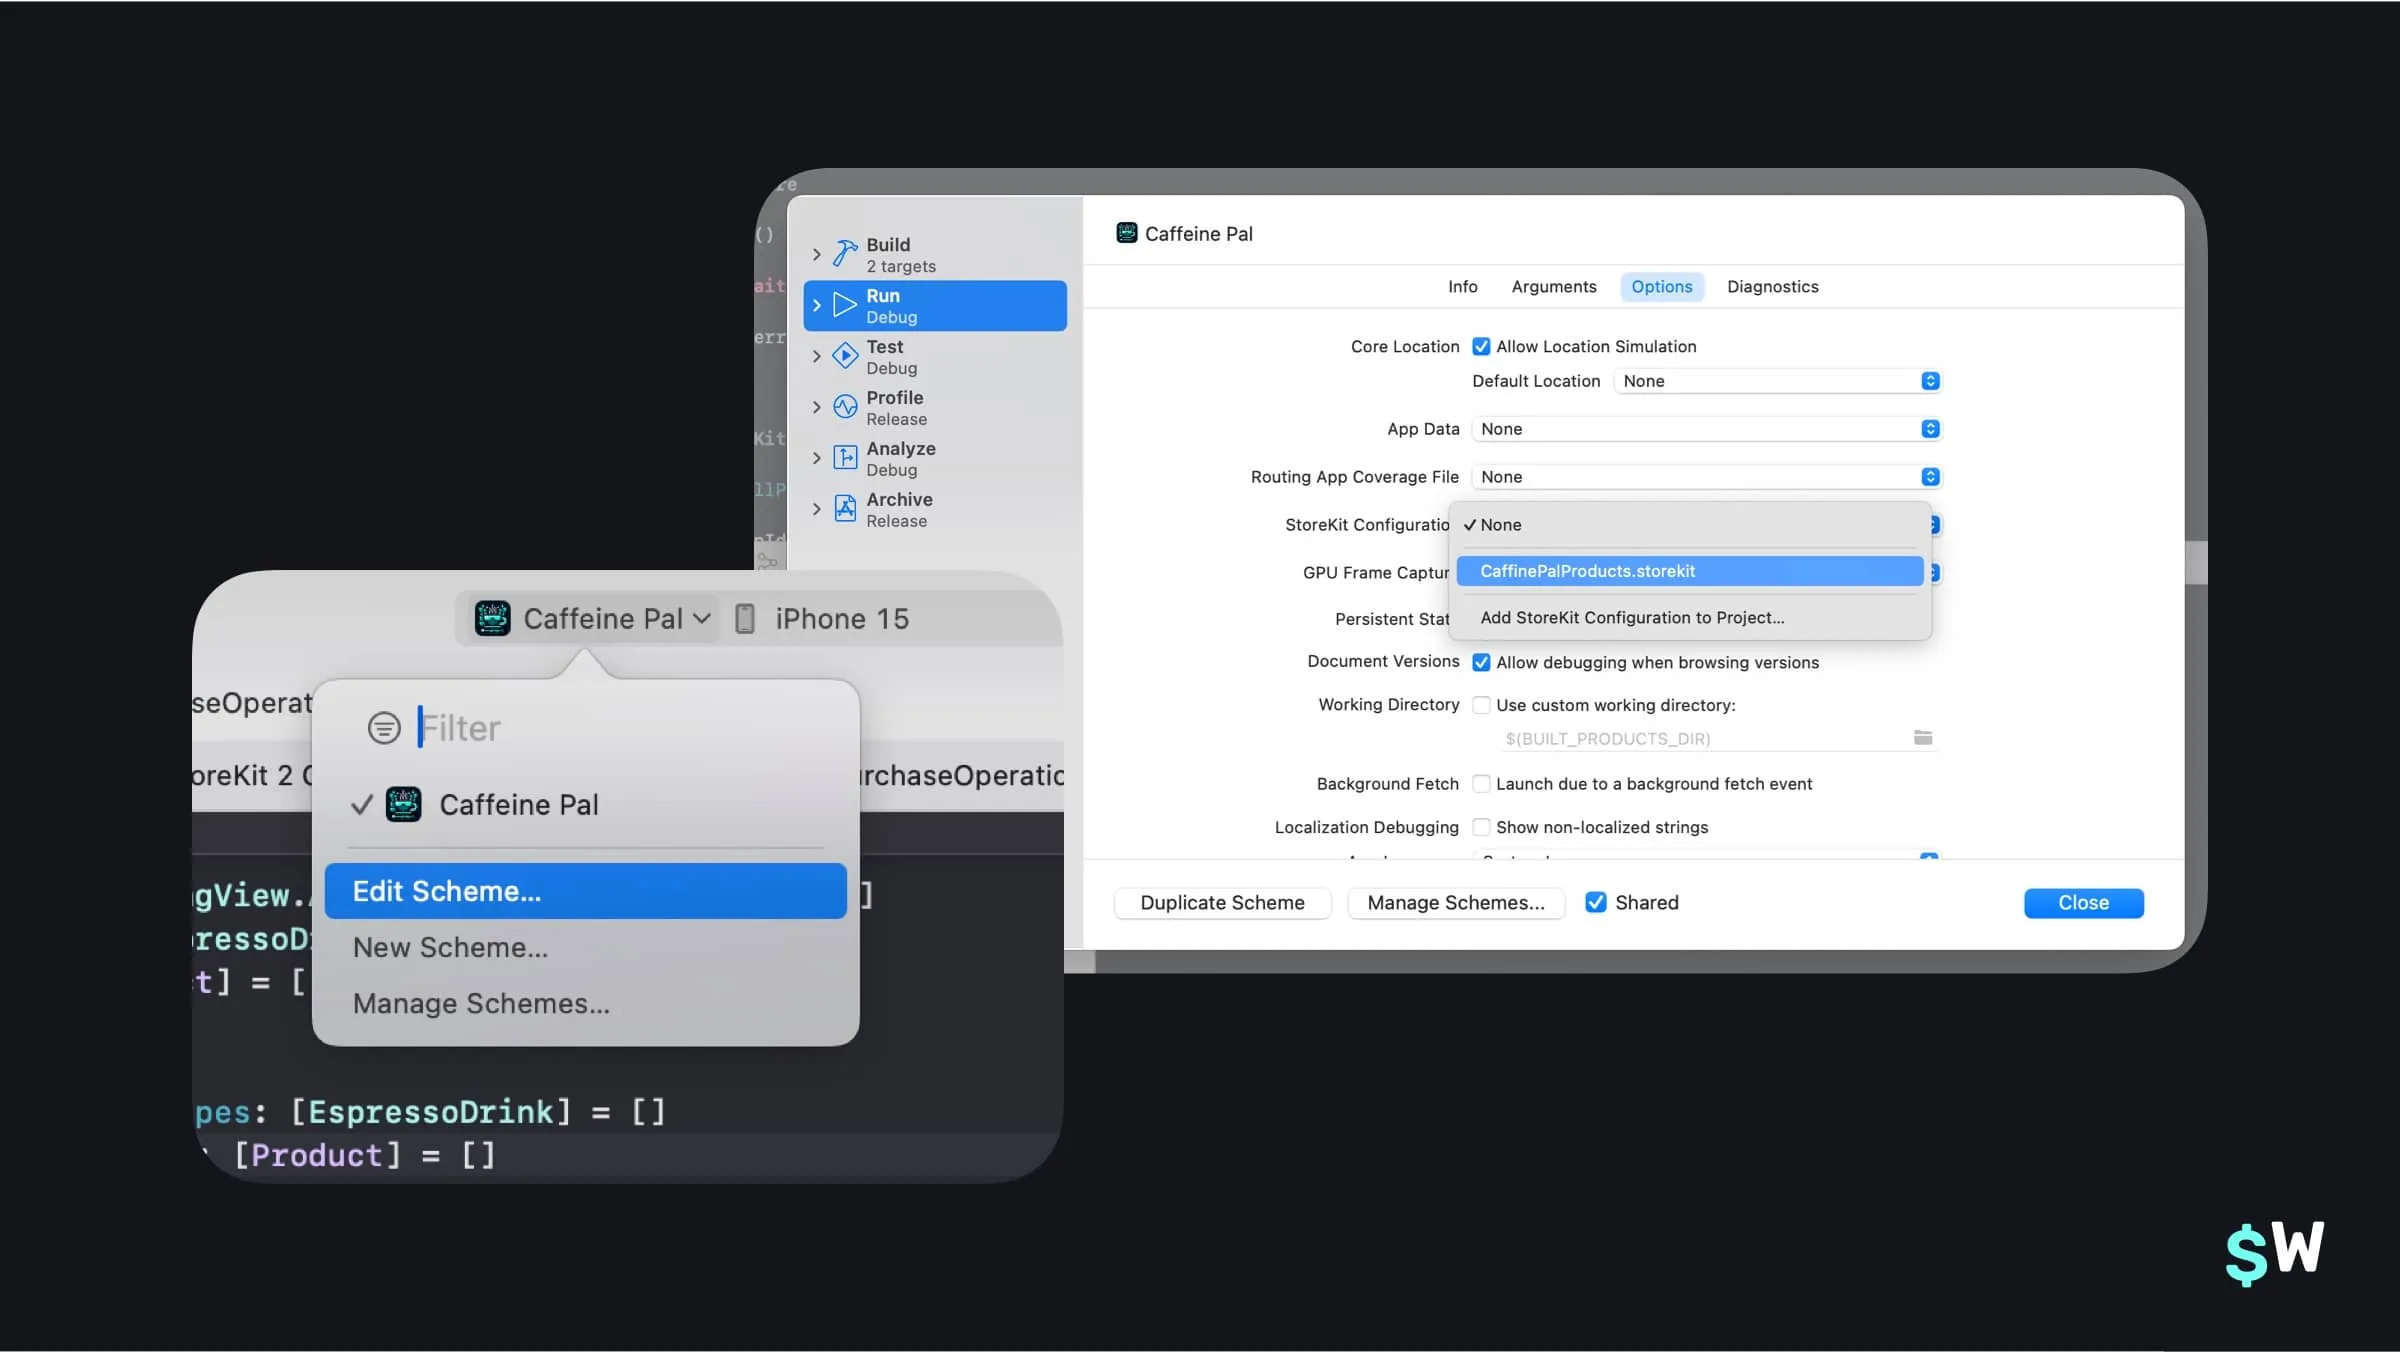
To use a configuration file, we'll need to enable it in our scheme. I haven't done this on purpose because it's easy to forget when you do it on your own. So, let's fix that now. Edit Caffeine Pal's scheme, and under "Run" choose "Options". Finally, select our configuration in the "StoreKit Configuration" dropdown:
With that done, let's dive right in. The first place we'll start is by supporting tip purchases. If you look right now, none of the prices are showing for any of the tips:
Let's fix that now! Open up PurchaseOperations.swift and we'll
learn how to do a fundamental StoreKit operation: fetch products.
Fetching products
The PurchaseOperations class is where all of our StoreKit code
will go. It uses the nascent Observation framework introduced in
iOS 17, so syncing up our interface with StoreKit data will be a breeze. At
the top of the PurchaseOperations.swift class, you can see a few
properties we have setup:
// Available Products
private(set) var tips: [TippingView.AvailableTips : Product] = [:]
private(set) var recipes: [EspressoDrink : Product] = [:]
private(set) var subs: [Product] = []

// Purchased Products
private(set) var purchasedRecipes: [EspressoDrink] = []
private(set) var purchasedSubs: [Product] = []
private(set) var hasCaffeinePalPro: Bool = false
Essentially, we'll fetch all that we have available to offer and track
those in the top properties. In the bottom properties, we'll track what
they've bought among those offerings. Fetching products in StoreKit 2 is
achieved by calling the static function Product.products(for:):
static func products<Identifiers>(for identifiers: Identifiers) async throws -> [Product]
The identifiers collection here represents the identifiers
you'll use in App Store Connect for your products. In our case, these are
the "Product ID" values I mentioned earlier in our StoreKit configuration
file. Let's write an extension off of our local models (AvailableTips for tips, and EspressoDrink for our recipes) which we'll use
to represent product identifiers.
Add this code to the bottom of PurchaseOperations.swift:
// MARK: Local Models to StoreKit values
extension TippingView.AvailableTips {
    var skIdentifier: String {
        return "consumable.tip." + self.shortDescription
    }
}

extension EspressoDrink {
    var skIdentifier: String {
        return "nonconsumable.recipe." + id
    }
}
Great, now both of our local data models have an identifier corresponding
to their StoreKit identifiers. Again, take note at how these String properties will map to the identifiers in our StoreKit configuration file
— each "Product ID" will now be represented.
Now, let's aggregate them altogether into an array so we can fetch them all. Add this right above the code you just wrote:
// MARK: Product Identifiers
extension PurchaseOperations {
    static var tipProductIdentifiers: [String] {
        get {
            return TippingView.AvailableTips.allCases.map { $0.skIdentifier }
        }
    }

    static var recipeProductIdentifiers: [String] {
        get {
            return EspressoDrink.all().map { $0.skIdentifier }
        }
    }
}
Now that we've got all of our product identifiers, we're ready to implement
retrieveAllProducts() in PurchaseOperations.swift.
The flow is simple, we'll fetch all of the products, which come back as a Product struct from StoreKit, and then store them in the corresponding property we
touched on earlier:
func retrieveAllProducts() async throws {
    do {
    	// 1
        let tipIdentifiers: [String] = PurchaseOperations.tipProductIdentifiers
        let recipeIdentifiers: [String] = PurchaseOperations.recipeProductIdentifiers
        let subIdentifiers: [String] = ["subscription.caffeinePalPro.annual"]
        let allIdentifiers: [String] = tipIdentifiers + recipeIdentifiers + subIdentifiers

        // 2
        let products = try await Product.products(for: allIdentifiers)
        let allTips = TippingView.AvailableTips.allCases
        let allRecipes = EspressoDrink.all()

        // 3
        for product in products {
            switch product.type {
            case .consumable:
                if let tip = allTips.first(where: {
                    $0.skIdentifier == product.id
                }) {
                    self.tips[tip] = product
                } else {
                    print("Unknown product id: \(product.id)")
                }
            case .nonConsumable:
                if let recipe = allRecipes.first(where: {
                    $0.skIdentifier == product.id
                }) {
                    self.recipes[recipe] = product
                } else {
                    print("Unknown product id: \(product.id)")
                }
            case .autoRenewable:
                self.subs.append(product)
            default:
                print("Unknown product with identifier \(product.id)")
            }
        }
    } catch {
        print(error)
        throw error
    }
}
Here's a breakdown:
- We get all of our identifiers to pass to StoreKit, and each one represents a product we've created in App Store Connect (or in a StoreKit Configuration file).
- Then, we call StoreKit's function to fetch those products.
-
Finally, we loop over the resulting products and store them in our local
dictionaries representing each product. The key is our app's data model,
and the value will be its corresponding
Productrepresentation from StoreKit.
Also, note that I don't have a model for our subscription. We just offer one for Caffeine Pal, so I've written its product identifier directly. Though, it's still in an array...
let subIdentifiers: [String] = ["subscription.caffeinePalPro.annual"]...so if we add more subscriptions later — they'd be added here.
Great! Now, to make sure we fetch products when Caffeine Pal runs, we'll
add this logic to our existing configure function:
func configure() async throws {
    do {
        try await retrieveAllProducts()
    } catch {
        throw error
    }
}
In SwiftUI, I like to use a configure function so that we can still
easily leverage Xcode Previews without actually invoking StoreKit calls
inside an init function. If you look at Caffeine_PalApp.swift, you'll see the configure() function being called there when our
app runs.
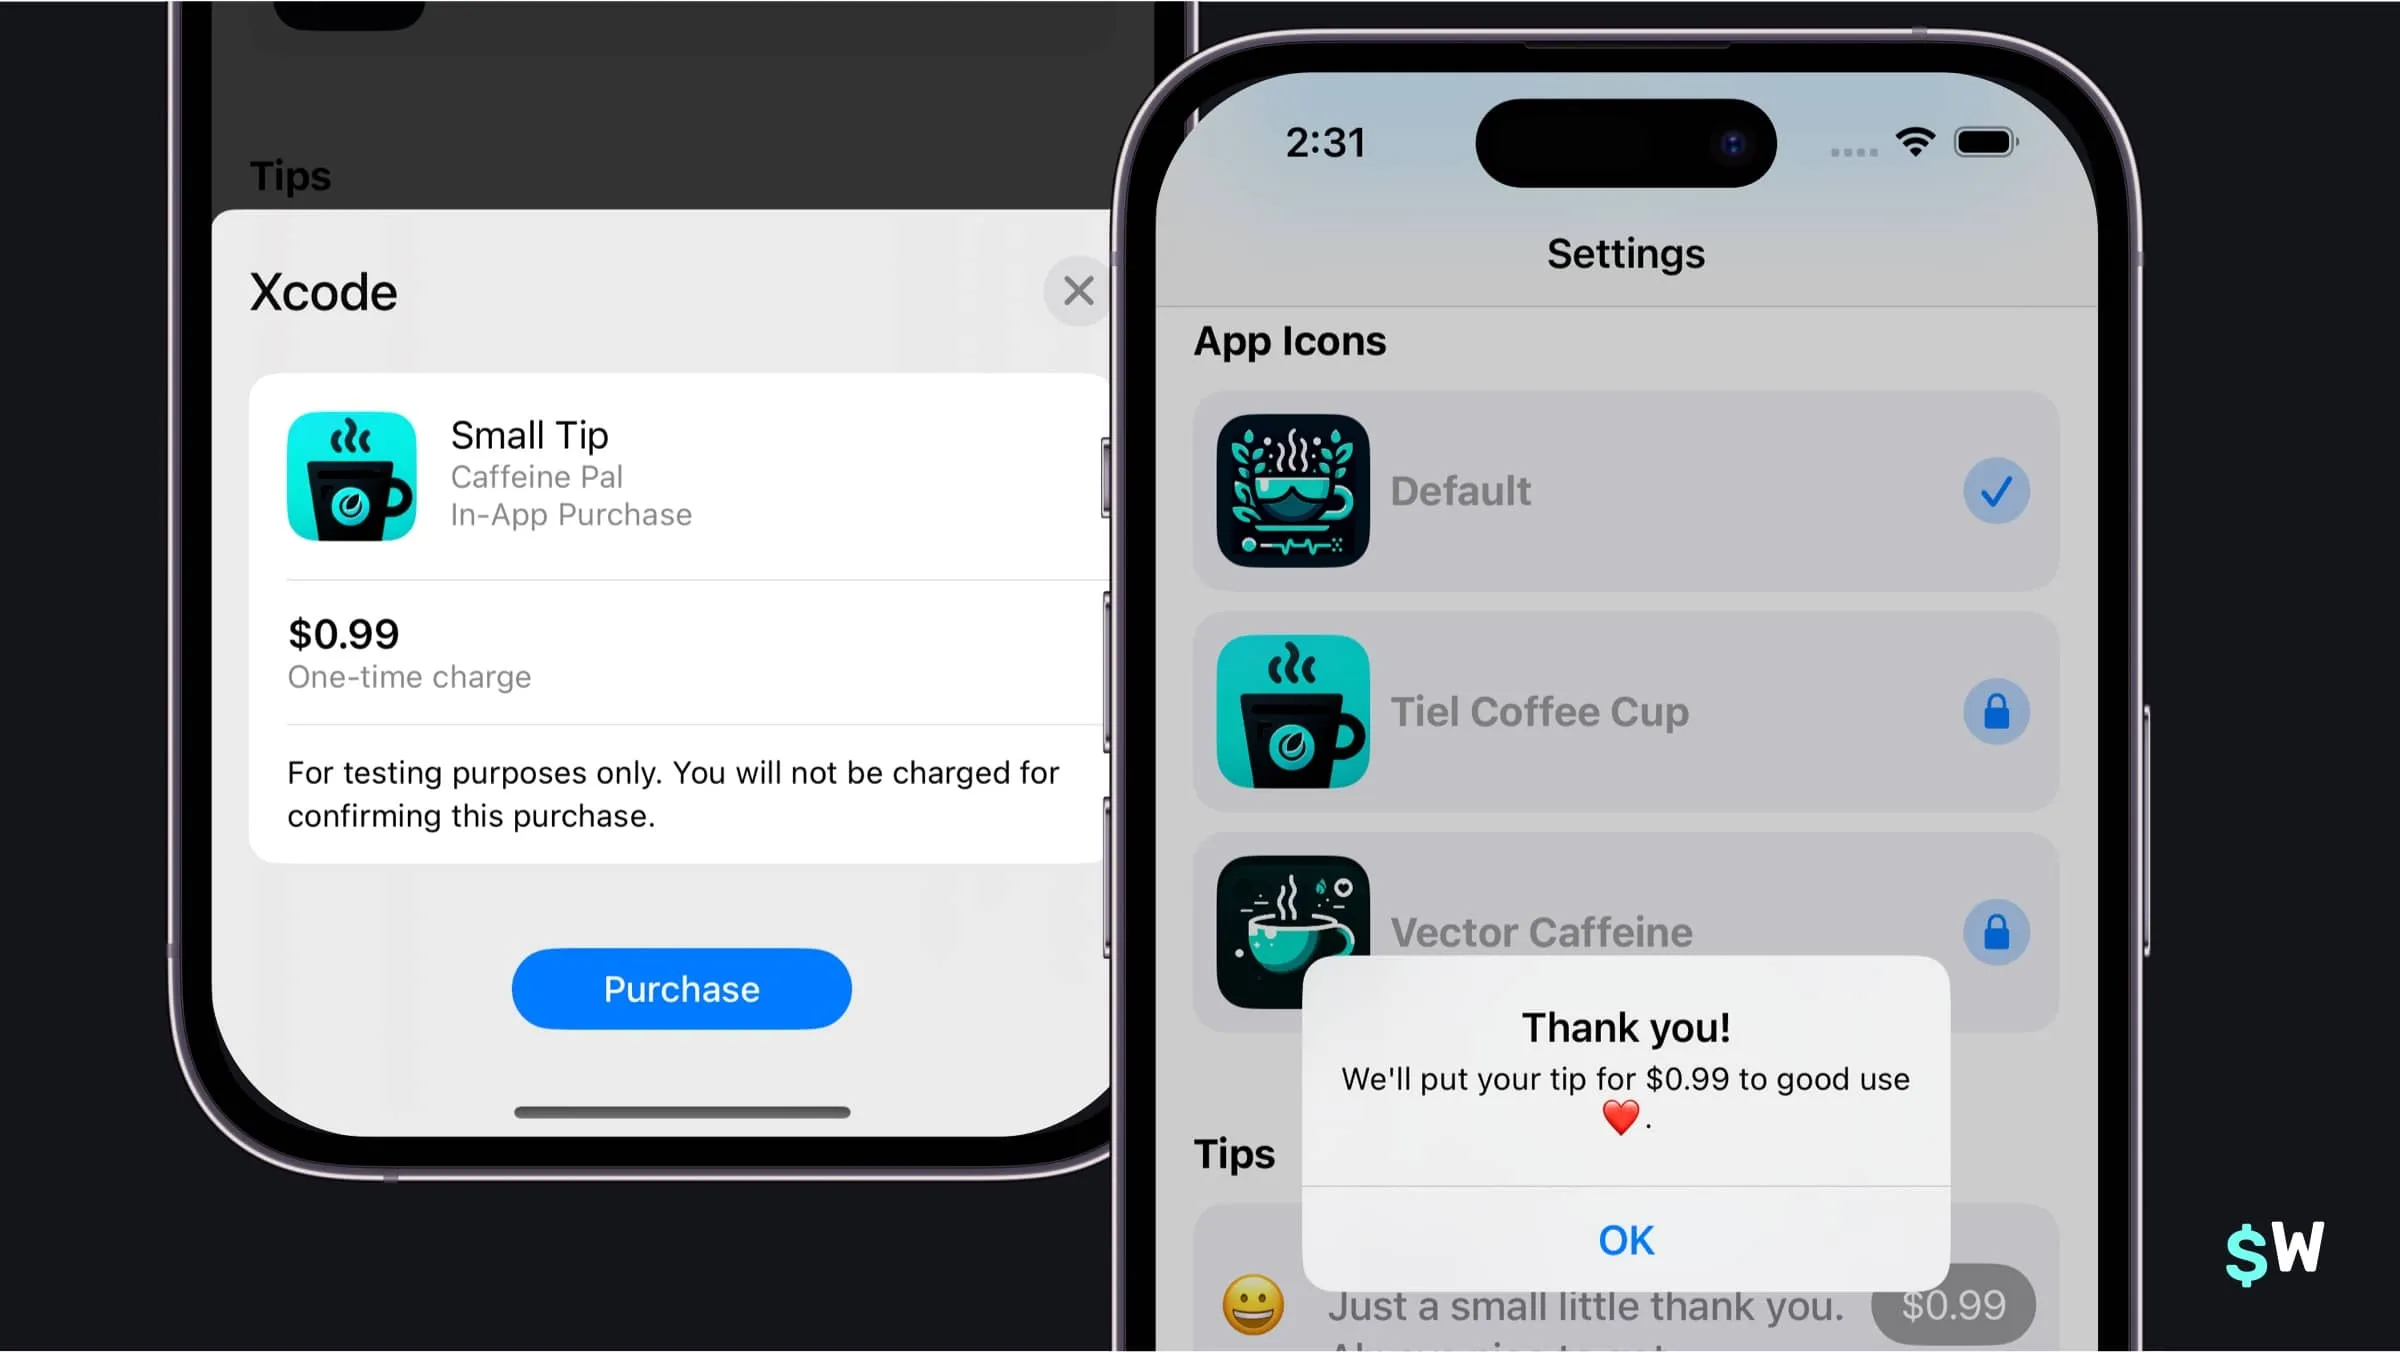
Now, if we run the app and open the Settings tab, scrolling down we should see all of the tips with their actual prices showing:
Let's review what we've learned so far:
- To test purchasing logic, we can use a StoreKit Configuration file that we associate to our scheme. That configuration file can either be products we make up on the fly, or it can sync to existing products in App Store Connect.
-
To fetch products, we use StoreKit 2's
Product.products(for:)and pass it a collection of product identifiers. - In our models, if we have any existing ones, we need to associate those to StoreKit identifiers for use in the function mentioned above (we did this with some extensions we wrote).
- Finally, once you fetch products, it helps to store them locally in some properties. And, I like to have two properties for each type of product — a collection for all available products from StoreKit, and a collection of those products which have been purchased.
Now, let's move on to buying stuff. Time to write some purchasing code!
Purchases with StoreKit
Let's check out some of the functions we've got to purchase our offerings
in Caffeine Pal. If you open up PurchaseOperations.swift,
you'll see three stubbed out functions:
func purchase(_ recipe: EspressoDrink) async throws -> Bool {
    return false
}

func purchase(_ tip: TippingView.AvailableTips) async throws -> Bool {
    return false
}

func purchasePro() async throws -> Bool {
    return false
}
All of these will funnel into one private function to purchase things, you'll see that a little further down:
// MARK: Private Functions
private func purchaseProduct(_ product: Product) async throws -> Bool {
    return false
}
Purchasing a product with StoreKit is as easy as invoking purchase() on an instance of a Product struct. So, our code will map a Product struct (which we retrieved earlier) from one of our local models. Then, we'll
pass that off to our private purchaseProduct() function. Let's write
that one first.
Here's our implementation of purchaseProduct():
private func purchaseProduct(_ product: Product) async throws -> Bool {
    do {
        let result = try await product.purchase()

        switch result {
        case .success(let result):
            return true
        case .userCancelled:
            print("Cancelled")
        case .pending:
            print("Needs approval")
        @unknown default:
            fatalError()
        }

        return false
    } catch {
        throw error
    }
}
The purchase() function will return a PurchaseResult that we can switch over. It's a very simple API (thankfully!).
Let's fill in our other functions to call this one now, here are the other functions
to purchase our other offerings:
func purchase(_ recipe: EspressoDrink) async throws -> Bool {
    guard let product = self.recipes[recipe] else {
        throw CaffeinePalStoreFrontError.productNotFound
    }

    return try await purchaseProduct(product)
}

func purchase(_ tip: TippingView.AvailableTips) async throws -> Bool {
    guard let product = self.tips[tip] else {
        throw CaffeinePalStoreFrontError.productNotFound
    }

    return try await purchaseProduct(product)
}

func purchasePro() async throws -> Bool {
    guard let product = subs.first else {
        throw CaffeinePalStoreFrontError.productNotFound
    }

    return try await purchaseProduct(product)
}
To recap:
- Purchasing in StoreKit 2 is done via getting a
Productinstance. - Then, you invoke the
purchase()function on it. - From there, you inspect the resulting
PurchaseResult.
However, if we have this all in place — we're still needing to implement one more important piece of the puzzle. That is, verifying our transactions.
Transaction verification
Each time someone buys something, we get a PurchaseResult to inspect.
If the purchase was successful, we get a verification result (VerificationResult<Transaction>). In that verification result, we want to make sure the purchase was
signed by the App Store for our app. Under the hood, there is a JWS payload
— but you don't need to worry about the details for the most part.
What we do need to know is this: we should verify each purchase. So, let's
write a function to check verification status. Add this new function under purchaseProduct():
private func verifyPurchase<T>(_ result: VerificationResult<T>) throws -> T {
    switch result {
    case .unverified:
        throw CaffeinePalStoreFrontError.failedVerification
    case .verified(let safe):
        return safe
    }
}
If the transaction is legitimate, we return the result (which will be a Transaction instance). Since we funnel all purchases down to the same function, we only
need to update this in one spot, our purchaseProduct() function.
In the .success(let result): case, add this above return true:
let verificationResult = try self.verifyPurchase(result)
await verificationResult.finish()
return true
Great! At this point, we should be able to purchase anything in Caffeine Pal. Give it a try:
- Buy a tip.
- Purchase an individual recipe.
- Or, join Caffeine Pal Pro.
Here's an example of buying a tip in action, complete with the localized
price showing by using the displayPrice property of the corresponding
Product:
To recap here:
-
We want to verify that purchases came from the App Store after we call
product.purchase()and get a successful result. -
We do that by switching over the
VerificationResultand making sure it's verified. - We should do this for all purchases.
But wait! Xcode is upset about something, even though our purchases are working. You might've noticed this little error as we bought a product:
Making a purchase without listening for transaction updates risks missing successful purchases. Create a Task to iterate Transaction.updates at launch.Xcode makes a great point. What if the user needs their parent to "okay" the transaction? Then it would be pending. Or, what if they bought stuff from another device? And so on. Listening for transactions is key, so we'll do that next.
Transaction listener
To start, we'll add a property that'll hold a reference to a task which
listens for any transaction changes from StoreKit. In PurchaseOperations.swift, add this right underneath the existing properties:
// Listen for transactions
var transactionListener: Task<Void, Error>? = nil
Next, let's write a function to create the listener. Underneath the stubbed
out updateUserPurchases() function, let's add this:
private func createTransactionTask() -> Task<Void, Error> {
    return Task.detached {
        for await update in Transaction.updates {
            do {
                let transaction = try self.verifyPurchase(update)
                try await self.updateUserPurchases()
                await transaction.finish()
            } catch {
                print("Transaction didn't pass verification - ignoring purchase.")
            }
        }
    }
}
Don't worry if you haven't worked a lot with Swift concurrency, this
function really isn't as complicated as it looks. Here, we return a
detached task and listen for any updates from StoreKit. Once they come in,
we verify them as we've been doing and call updateUserPurchases() (which we haven't implemented yet — that's next!) to keep everything in sync.
Now, if purchases are pending, bought from another device or anything else
along those lines, we'll pick those up. Let's hook this up in our configure() function to initialize our task, and we'll also add our updateUserPurchases() call while we're at it:
func configure() async throws {
    do {
        transactionListener = createTransactionTask()
        try await retrieveAllProducts()
        try await updateUserPurchases()
    } catch {
        throw error
    }
}
The last step is to make sure we kill the task when our class is deinitialized, so add that right underneath the property declaration for our listener:
// Listen for transactions
var transactionListener: Task<Void, Error>? = nil

deinit {
    transactionListener?.cancel()
}
We're nearly done and having a fully functioning app, complete with
purchases for nonconsumbales, consumables and a subscription. But, we've
got one more critical piece of code to write — and that's updating which
products the user has bought in our updateUserPurchases() function.
That's next, but first let's recap:
- A transaction listener is paramount in our StoreKit code, because it'll update us of any purchases (or changes to purchases) that occur.
- If you don't set one up, Xcode will give you a warning in the console.
- Be sure to verify purchases and update any user entitlements in your listener.
- And, finally, be sure to tear it down during deinitialization.
Now, let's make sure the things people have bought are shown correctly for them.
Tracking user purchases
Our updateUserPurchases() function is responsible for tracking
purchased products. Remember these properties we mentioned at the top of this
post?
// Purchased Products
private(set) var purchasedRecipes: [EspressoDrink] = []
private(set) var purchasedSubs: [Product] = []
private(set) var hasCaffeinePalPro: Bool = false
Now, we'll assign purchases to those. Here's our implementation:
private func updateUserPurchases() async throws {
    let allRecipes = EspressoDrink.all()

    // 1
    for await entitlement in Transaction.currentEntitlements {
        do {
            // 2
            let verifiedPurchase = try verifyPurchase(entitlement)

            // 3
            switch verifiedPurchase.productType {
            case .nonConsumable:
                if let recipe = allRecipes.first(where: { $0.skIdentifier == verifiedPurchase.productID }) {
                    purchasedRecipes.append(recipe)
                } else {
                    print("Verified purchase couldn't be matched to local model.")
                }
            case .autoRenewable:
                self.hasCaffeinePalPro = true

                if let subscription = subs.first(where: { $0.id == verifiedPurchase.productID }) {
                    purchasedSubs.append(subscription)
                } else {
                    print("Verified subscription couldn't be matched to fetched subscription.")
                }
            default:
                break
            }
        } catch {
            print("Failing silently: Possible unverified purchase.")
            throw error
        }
    }
}
Let's break it down:
- We go through each of the user's purchases entitlements.
- We verify each one.
- Then, we switch off of the product type. From there, we add the corresponding product to our properties.
Again, since we've only got one subscription — if there is a subscription entitlement, then we enable pro. If you have multiple subscriptions later, you'd simply handle it in a similar way we handle recipes here.
Now, let's update purchaseProduct() to reflect any purchase that
comes in, too. Here's what the switch case for a successful purchase should
look like now:
case .success(let result):
    let verificationResult = try self.verifyPurchase(result)
    try await updateUserPurchases()
    await verificationResult.finish()

    return true
We just added the try await updateUserPurchases() here. At this
point, if you run the app — everything purchase related should work. Try and
buy Caffeine Pal Pro, and everything should be unlocked after your purchase
goes through.
Let's do another recap:
- When someone buys something, you need to immediately "unlock" that entitlement.
- How this will look depends on your own app and setup, but here — we add them to local properties once the purchase comes through.
- As always, be sure to verify each transaction you receive.
Nice touches
For the last bit, there are two common things I'd like to point out:
- How to restore purchases, and;
- How to make a "Renews at" date string.
The second one is already implemented, but I want to point out the code. Even though StoreKit 2 is intuitive, this bit is honestly tricky to get right.
First, though, restoring purchases. As part of Apple's guidelines, you'll
need some sort of button that allows people to restore things they've
bought. In our app, that's in the PaywallView.swift. It has a button
that calls our restorePurchases() function, so let's implement
that now:
func restorePurchases() async throws {
    do {
        try await AppStore.sync()
        try await updateUserPurchases()
    } catch {
        throw error
    }
}
Thankfully, this boils down to one line! That's AppStore.sync() — but again, be sure to update any purchases in your app to reflect those
entitlements.
For our final bit of this post, let's see how we can construct what I call a
"renewal string" — those pieces of U.I. that lets people know when their
subscription will renew. Open up CaffeineProMemberView.swift and
check out the fetchRenewsAtString() function:
private func fetchRenewsAtString() async {
    guard let proAnnualSubscription = storefront.purchasedSubs.first,
          let status = try? await proAnnualSubscription.subscription?.status.first(where: { $0.state == .subscribed }) else {
        return
    }

    guard case .verified(let renewal) = status.renewalInfo,
          case .verified(let transaction) = status.transaction,
          renewal.willAutoRenew,
          let expirationDate = transaction.expirationDate else {
        return
    }

    renewalInfo = "Renews \(expirationDate.formatted(date: .abbreviated, time: .omitted))."
}
Let me go through this one a bit. The process looks like this:
- Get the subscription you're interested in.
- From there, get it's
renewalInfoandtransactionproperties. - Ensure the subscription will automatically renew.
- And finally, look at the corresponding transaction's
expirationDate.
And that's it!
We've written a fully functioning StoreKit 2 powered app now. Here's an entire recap of the big ideas:
- Consider how to match your existing model layer to product identifiers in App Store Connect (or, a StoreKit configuration file).
- Create a task to listen for transactions that may show up in realtime.
- Be sure to verify each transaction.
- And, update purchased entitlements along the way.
Final Thoughts
So there you have it! A full guide on how to get up and running with StoreKit 2. The API is precise, modern and easy to use. StoreKit 2 has come a long way from Apple's initial StoreKit APIs, and you can even use them together with StoreKit 2.
No matter the API, monetizing your app is critical to the health of your business. Whether you're a big player in the App Store or just getting started as an indie — nothing beats seeing those first few purchases come in!
At Superwall, we want to help you. Our SDK can handle a lot of subscription logic for you such as purchases, restoring them or checking their status. Plus, we've got industry-leading paywall templates ready to use! Give us a try today, your first 250 conversions a month are on us, too!
FAQ
- What is StoreKit 2?
- StoreKit 2 is Apple's modern, Swift-first framework for handling in-app purchases and subscriptions across iOS, iPadOS, tvOS, visionOS, watchOS, macOS and Mac Catalyst. Instead of relying on delegates and callbacks like the original StoreKit, it leverages Swift language features such as concurrency (async/await), making purchasing flows simpler to implement.
- What product types can you sell with StoreKit?
- StoreKit supports consumable in-app purchases (used once and gone, like tips or in-game gems), non-consumable in-app purchases (bought once and owned forever, like an unlocked recipe), and auto-renewing subscriptions (which renew until canceled). There are also non-renewing subscriptions.
- Do I need App Store Connect to test in-app purchases?
- No. You can use a StoreKit configuration file to define products locally and test your purchasing code without touching App Store Connect. If you already have products set up in App Store Connect, you can sync them directly to the configuration file. Remember to select the configuration file in your scheme under Run > Options > StoreKit Configuration.
- How do you verify a purchase in StoreKit 2?
- When a purchase succeeds you receive a VerificationResult wrapping the transaction. Switch over it: if it's .unverified, throw an error; if it's .verified, use the safe value. Under the hood the transaction is signed by the App Store via a JWS payload. You should verify every purchase and every current entitlement.
- Why do I need a transaction listener?
- Purchasing without listening for transaction updates risks missing successful purchases — for example, when a purchase is pending parental approval or was made on another device. A detached Task iterating Transaction.updates at launch catches these, verifies them, and keeps your app's entitlements in sync. Be sure to cancel the task on deinit.
- How do you restore purchases with StoreKit 2?
- Apple's guidelines require a restore button. Restoring boils down to calling AppStore.sync() and then re-checking entitlements (for example via Transaction.currentEntitlements) to update what the user has unlocked.