Getting Started with Flows
Create multi-page experiences like onboarding, cancellation surveys, and more using Superwall's Flows.
If you've ever wanted to build an onboarding sequence, a cancellation survey, or really any multi-step experience for your app, you've probably run into the same wall: it takes a lot of code, a lot of coordination, and an app update every time you want to change something. Getting changes out the door comes with friction, which means testing these types of things is not easy either.
Today, Superwall is changing that with Flows. It's a new way to build connected, multi-page experiences right inside the Superwall editor you're already familiar with. Now, you can build, test, and measure onboarding, cancellations flows and more. All with no app updates, no new SDK integrations, and you can ship changes whenever you want.
We rebuilt the popular Blinkist onboarding flow below so you can see what's possible:
Let me walk you through what it is, what you can build with it, and how to get started.
So, what is a Flow?
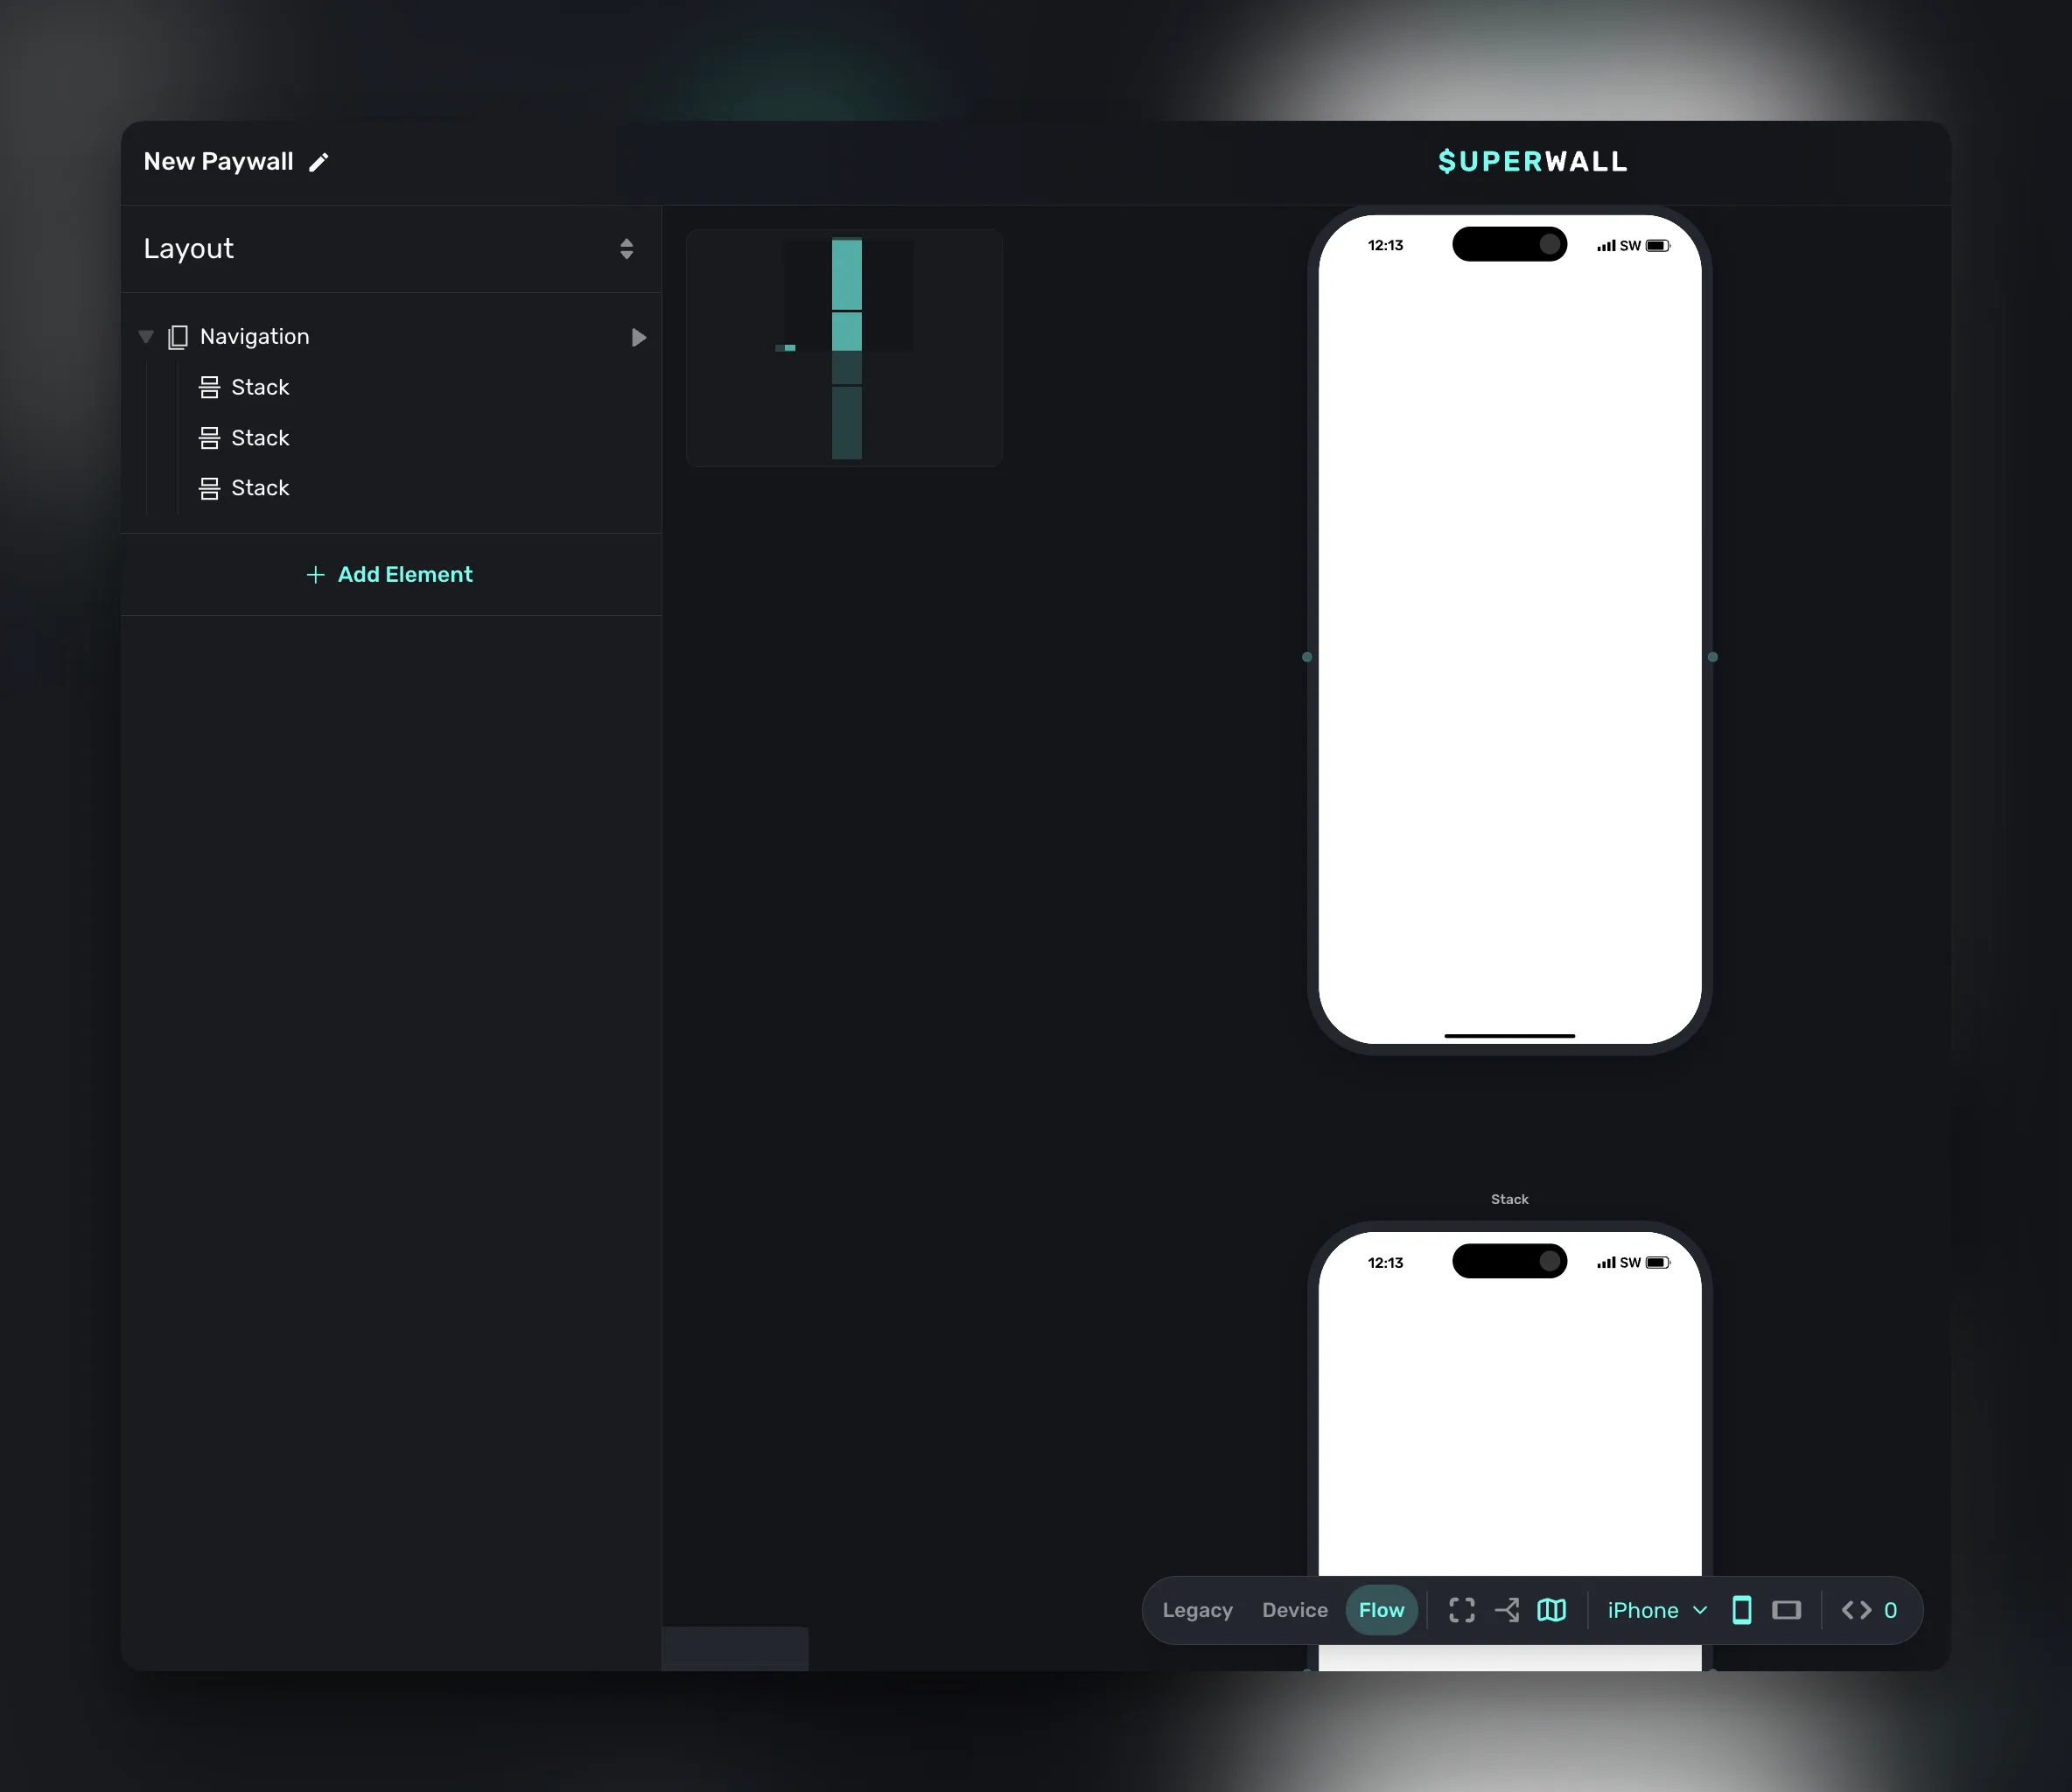
A Flow is a series of screens linked together with routes. Each screen can collect input, branch based on user choices, and guide people down a tailored path. If you've built a paywall in Superwall before, then you're ready to go — it's all built on top of our existing editor. The difference is that instead of designing one screen, now you're designing a journey. Superwall detects when you use our revamped Navigation component, and when you click "Flow", a whole new experience opens up:
Under the hood, a Flow is still inextricably a paywall. You create it the same way, present it the same way, and manage it in the same campaigns you already use. With flows, you have full control over navigating pages. You can go to any step or page based off of user input, user attributes that were set, multiple choice answers — literally anything.
What can you build?
With Superwall Flows, you can start making any experience that walks a user through a series of steps. Here are a few that come to mind right away:
- Onboarding sequences: Ask new users about their goals, show them relevant features, collect their name, and land on a personalized paywall.
- Cancellation surveys: Before a user churns, walk them through a quick survey. Ask why they're leaving, offer a targeted discount based on their answer, and collect feedback you can use to convince them to stick around.
- Feature discovery: Just shipped an awesome new feature? Guide users through it step by step, right inside the app. Trigger it with a placement.
- Upgrade paths: Ask a few qualifying questions, then show the product tier that fits best.
The nice thing is that these all live in the dashboard. No matter what kind of flow you're making, you can always change it over the air. Just like our paywalls, you can get an idea and put into production over a cup of coffee.
While they are easy to change, they are easy to test, too. With our built-in analytics, you can easily see how a flow is performing. For onboarding, you can track things like drop-off. Find what's working and double down on it, and continue experimenting on the weaker parts.
To get an idea of what you can do, let's do a quick tour of Flows.
Building your first Flow
Let's start simple. Say you want to scaffold out a three-screen onboarding experience: a welcome page, a question about the user's goals, and a personalized recommendation.
Connect a few screens
Start by creating a new paywall and adding a Navigation element. Each stack you add inside it becomes a page. Drop in three stacks, add your content to each one, and you've got the bones of a flow. Now, simply click "Flow" in the bottom toolbar to get started.
To move users between pages, add a button and give it a Navigate Page tap behavior. Set it to "Next" and that button now advances the flow. Want a back button? Same thing, just set it to "Back."
However, a lot of Flows aren't linear. Sometimes you need to go to page 4 based off of input, otherwise maybe you continue on to the next sequential page. That's easily done in Flows. Something as complex as going to the last page based off of user input, to simply going to page 1 or 2 based on button taps are easily done in Flows.
That's it for the basics. Now you have three screens, a button to progress to page two, and now you can start designing the rest. To do that, you can add our new tap behaviors and elements we tailored for flows. Let's look at those next.
Ask a question with Multiple Choice
Gathering user preferences, data, or any sort of "choice" is common in flows. Our new Multiple Choice element makes it trivial. This lets you present a set of options for users to pick from, things like "What's your primary goal?" with choices like "Get healthier," "Save money," or "Learn something new."
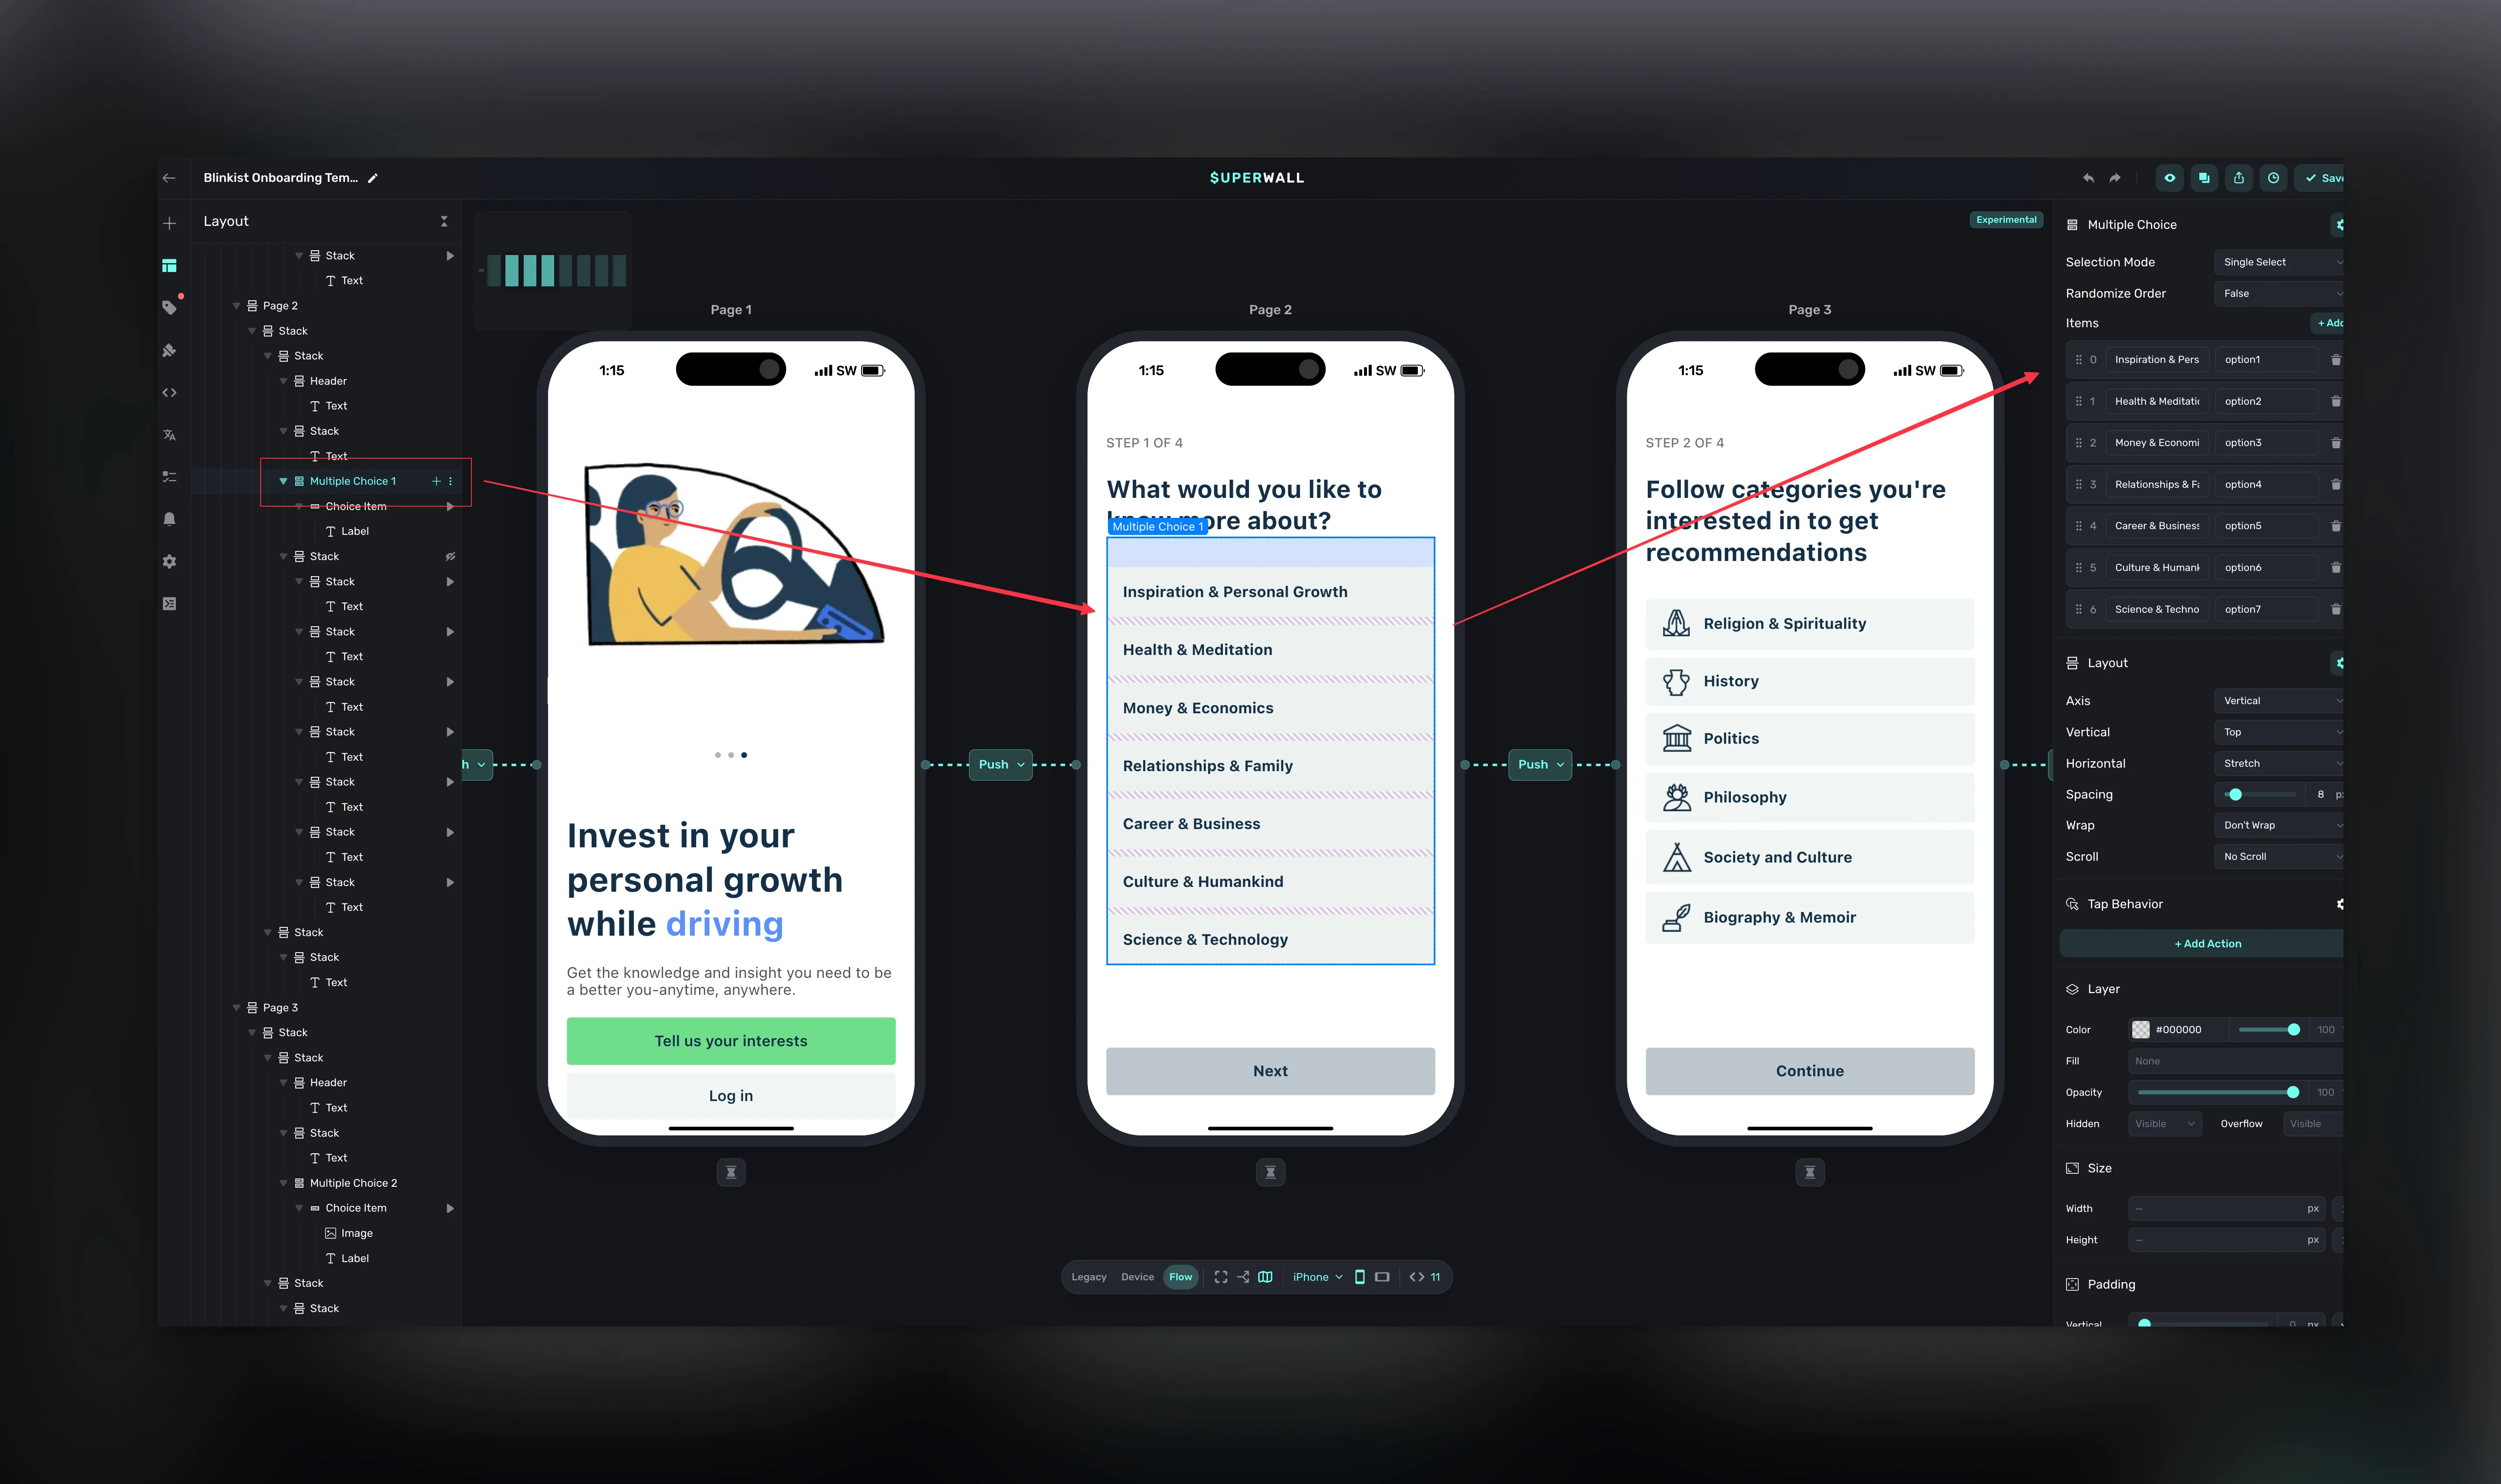
Each choice has a label (what users see) and a value (what gets stored). You can use that stored value to branch the flow, sending users who picked "Get healthier" to one page and "Save money" to another. Or just store it as a user attribute for later.
You can also toggle between single-select and multi-select, and randomize the order if you're running a survey where option position matters.
Collect text input
Need more than a multiple choice answer? The Input element lets users type a response. Think names, emails, or open-ended feedback:
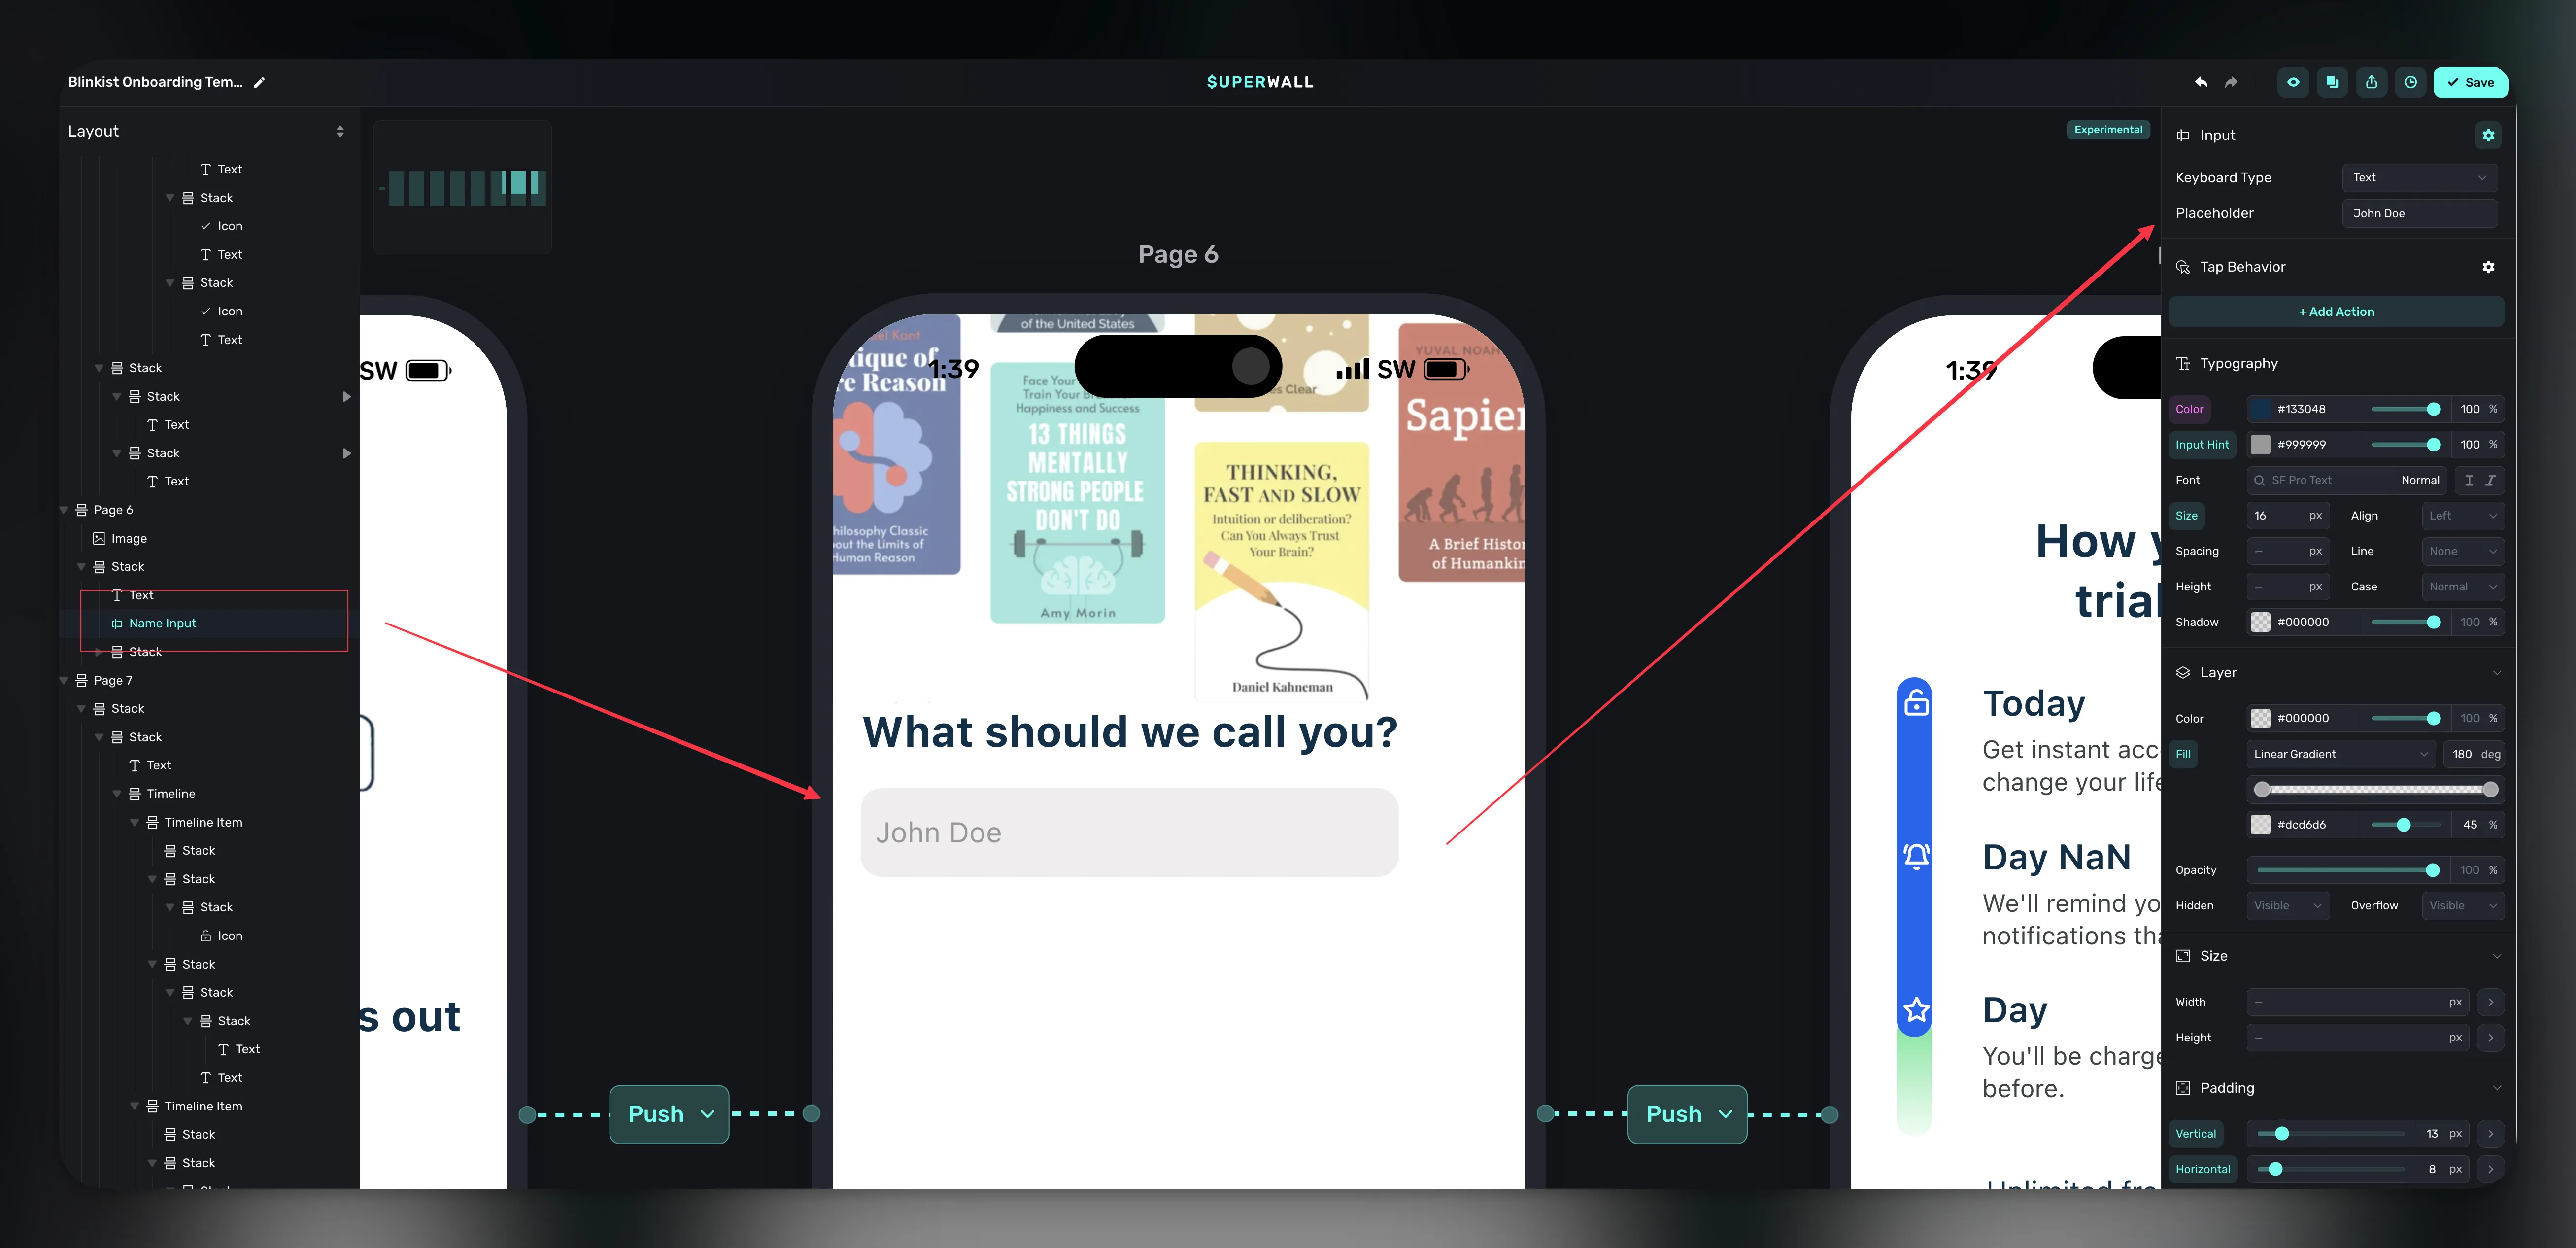
You pick the keyboard type (text, email, number, telephone, URL, password, or search) and set placeholder text. Whatever the user types gets stored as a user attribute, so you can reference it later. Imagine greeting someone by name on the next screen, that kind of thing.
Show progress
When your flow has more than a few pages, users start wondering how much is left. The Indicator element handles this. It shows progress as dots, bars, or numbers so people know where they stand.
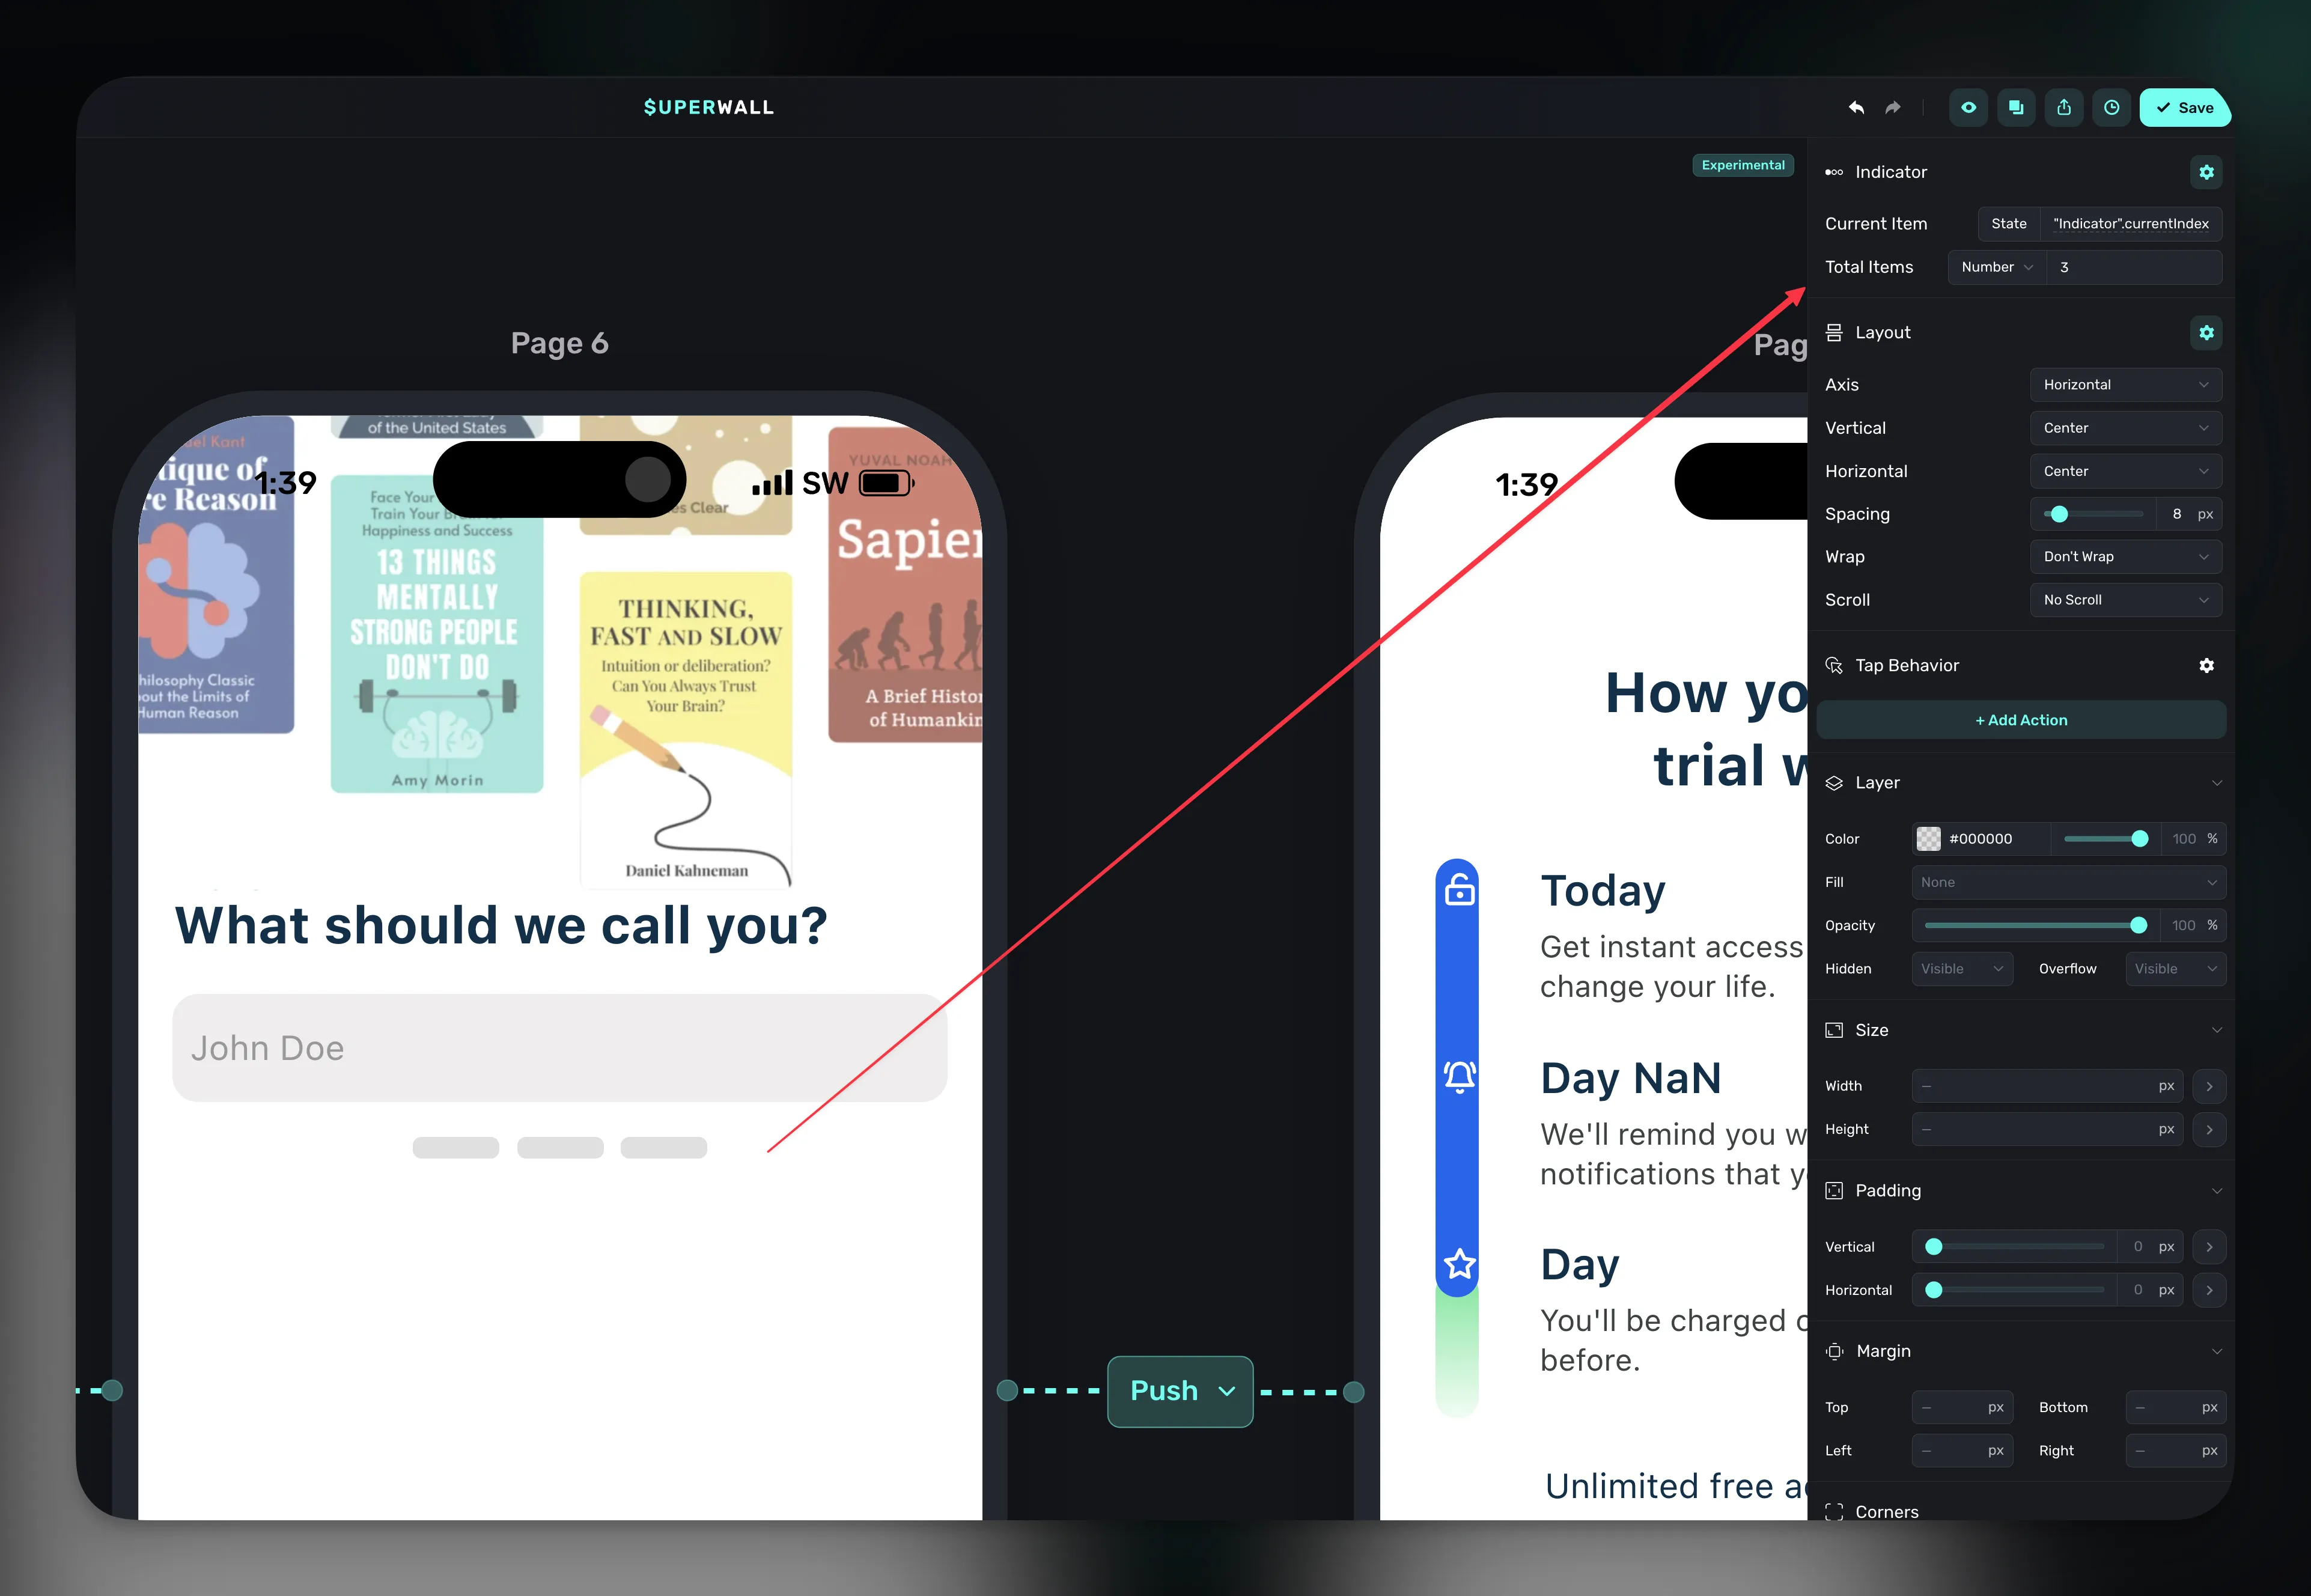
You can set the total manually, bind it to another element's child count, or drive it with a variable. It's a small touch that makes a real difference in completion rates.
Using user attributes
Setting custom user attributes inside a Flow is arguably its killer feature. Using it, you can react to user attributes in a few different ways.
When you tag a user with an attribute, you can use it later in the same Flow. Maybe it's a little thing, like a user name you want to show to personalize a view (i.e. "Awesome John Doe, welcome to App X"), or going to a different screen based on it via branching, or even changing the contents of packaging and offers.
If it's more on the analytics side to create cohorts, you can use the Superwall delegate to shuttle it straight to your analytics provider.
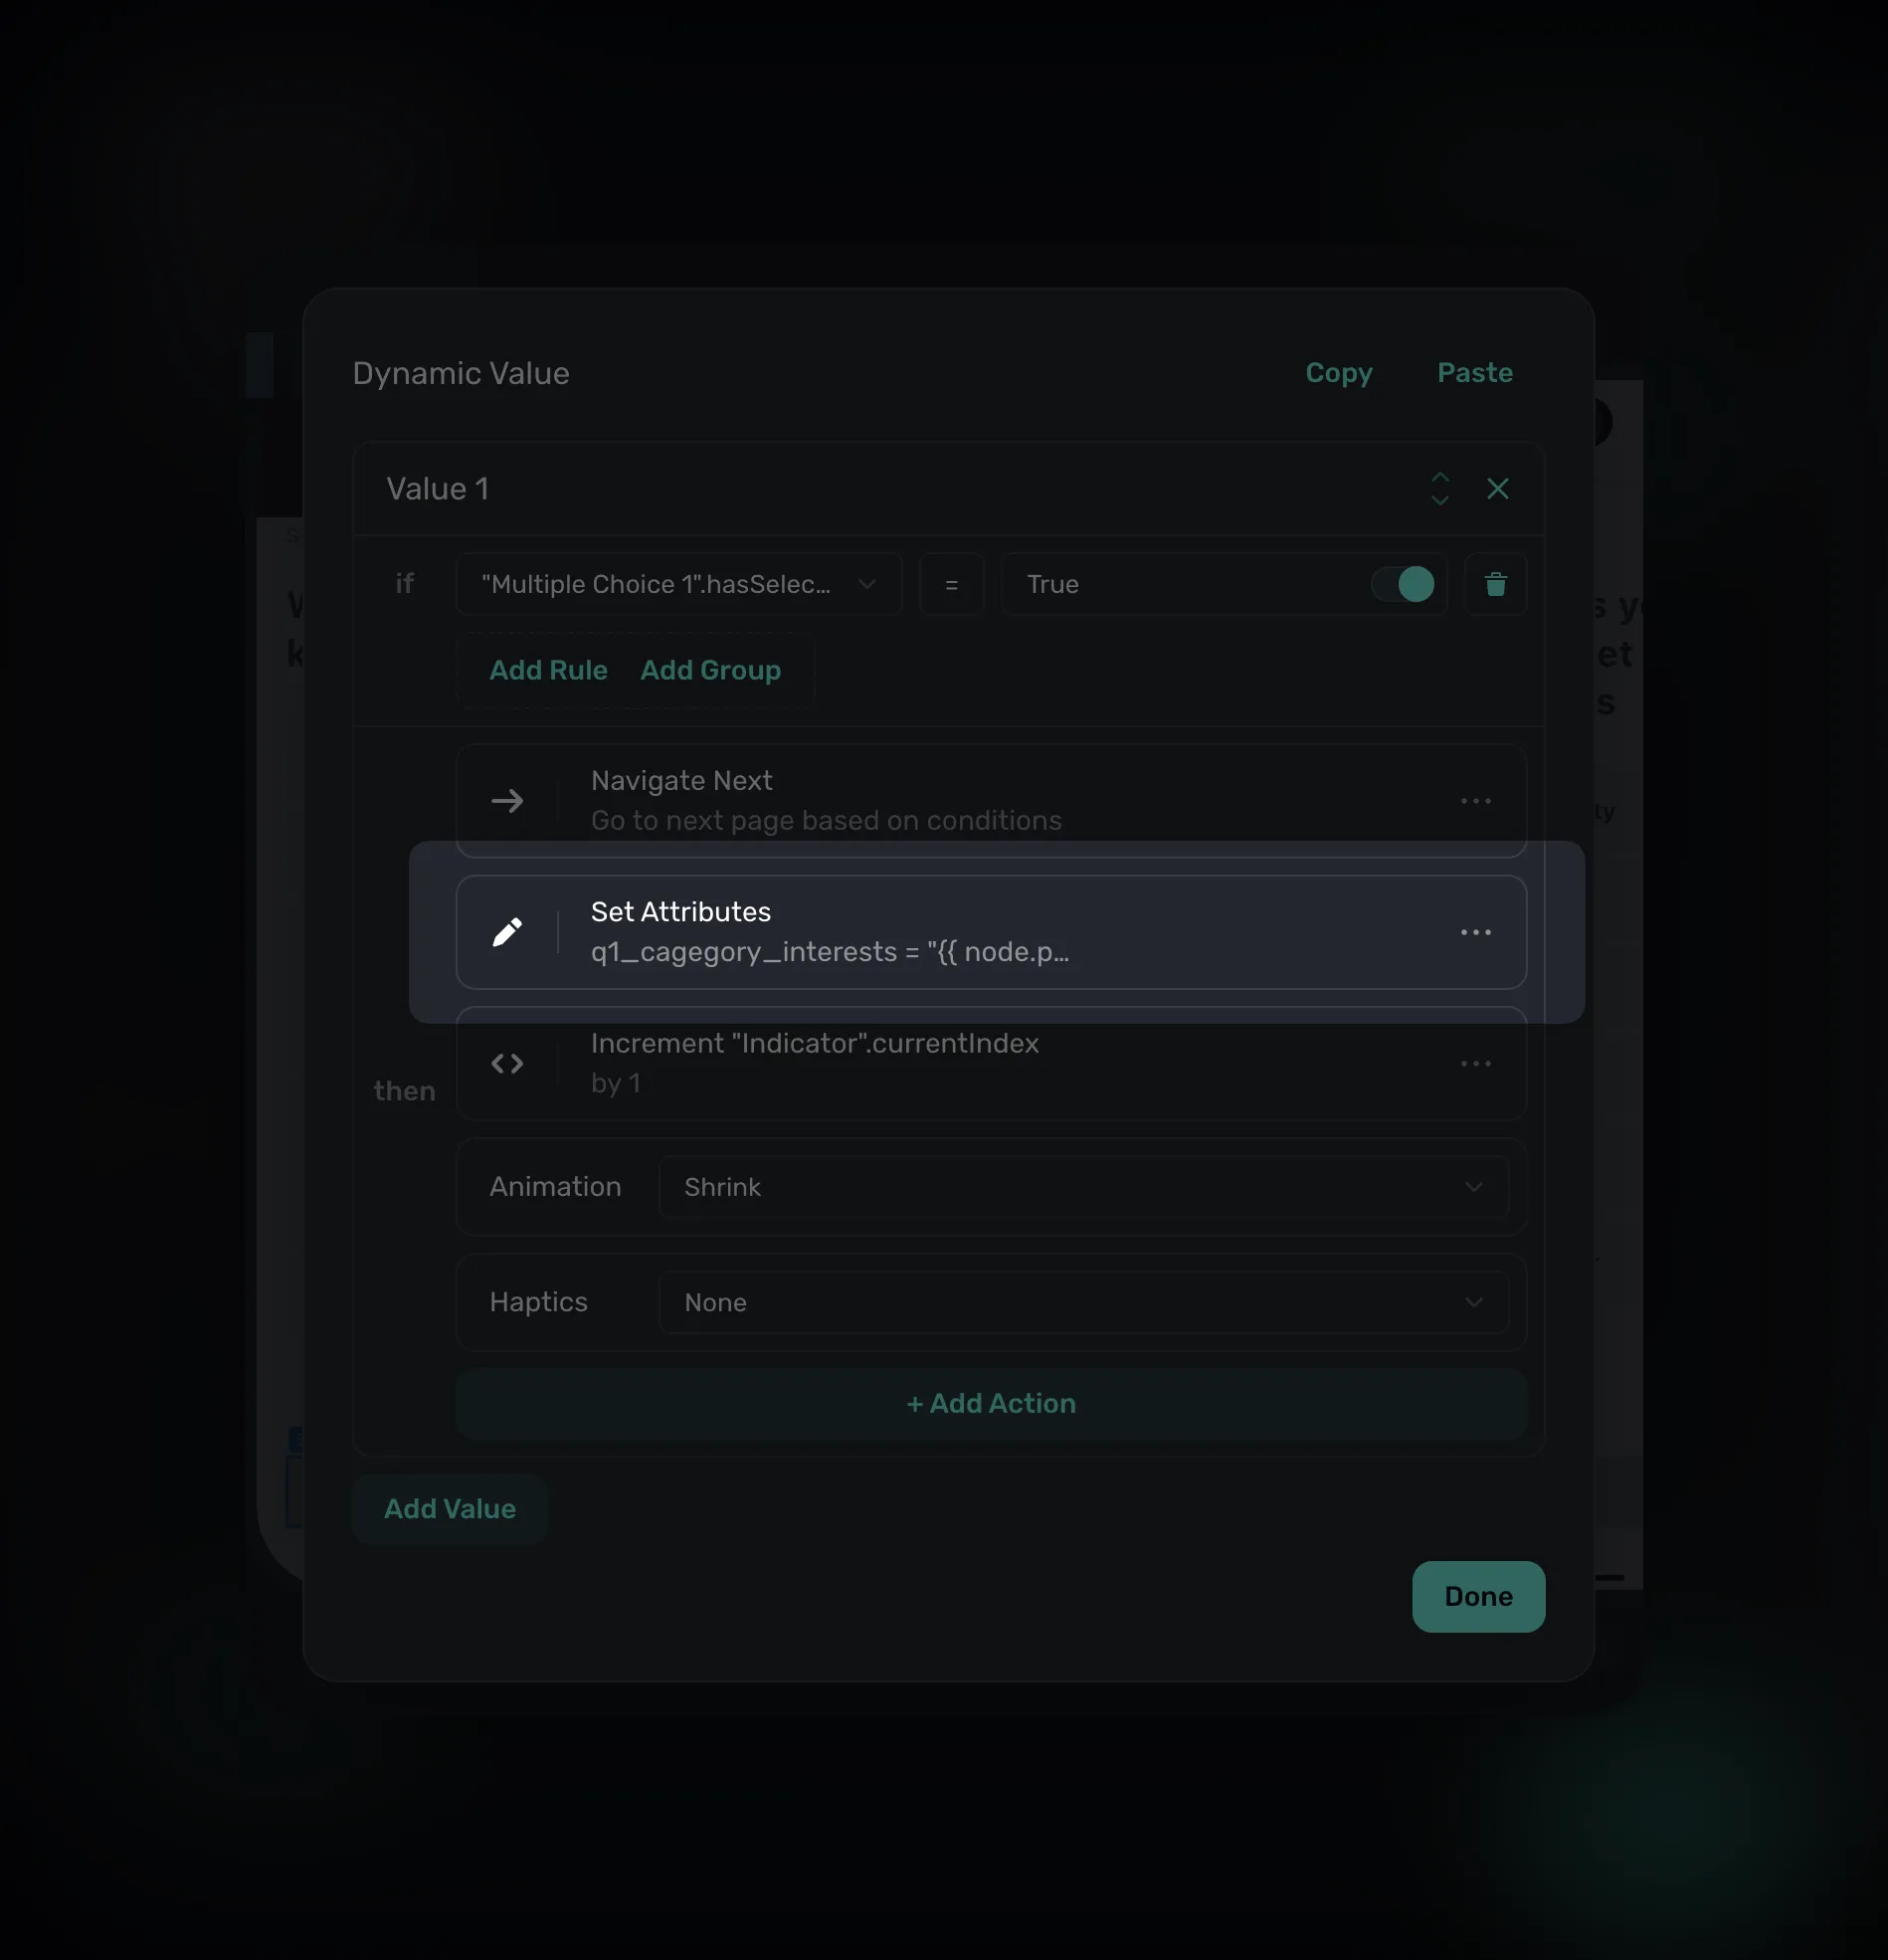
For example, in the Blinkist example, the "Next" buttons at the bottom do more than simply navigate to the next page. They also look at the multiple choice item that was selected, and then it sets a custom user attribute to the selected value.
From there, you can use it again in the Flow, or handle it in your app and send it to analytics, use it locally, or anything else you need:
extension MySuperwallDelegate: SuperwallDelegate {
    func userAttributesDidChange(newAttributes: [String : Any]) {
        // User attribute will be sent here
    }
}
Going further
Once you're comfortable with the basics, there's a lot more you can do.
- Set custom user attributes from inside a flow: Every input and selection can write to a user attribute, which means your flow can feed data back into your targeting rules, analytics, and personalization across the entire app. Using the Superwall Delegate, you can get callbacks in your app when these are set, too.
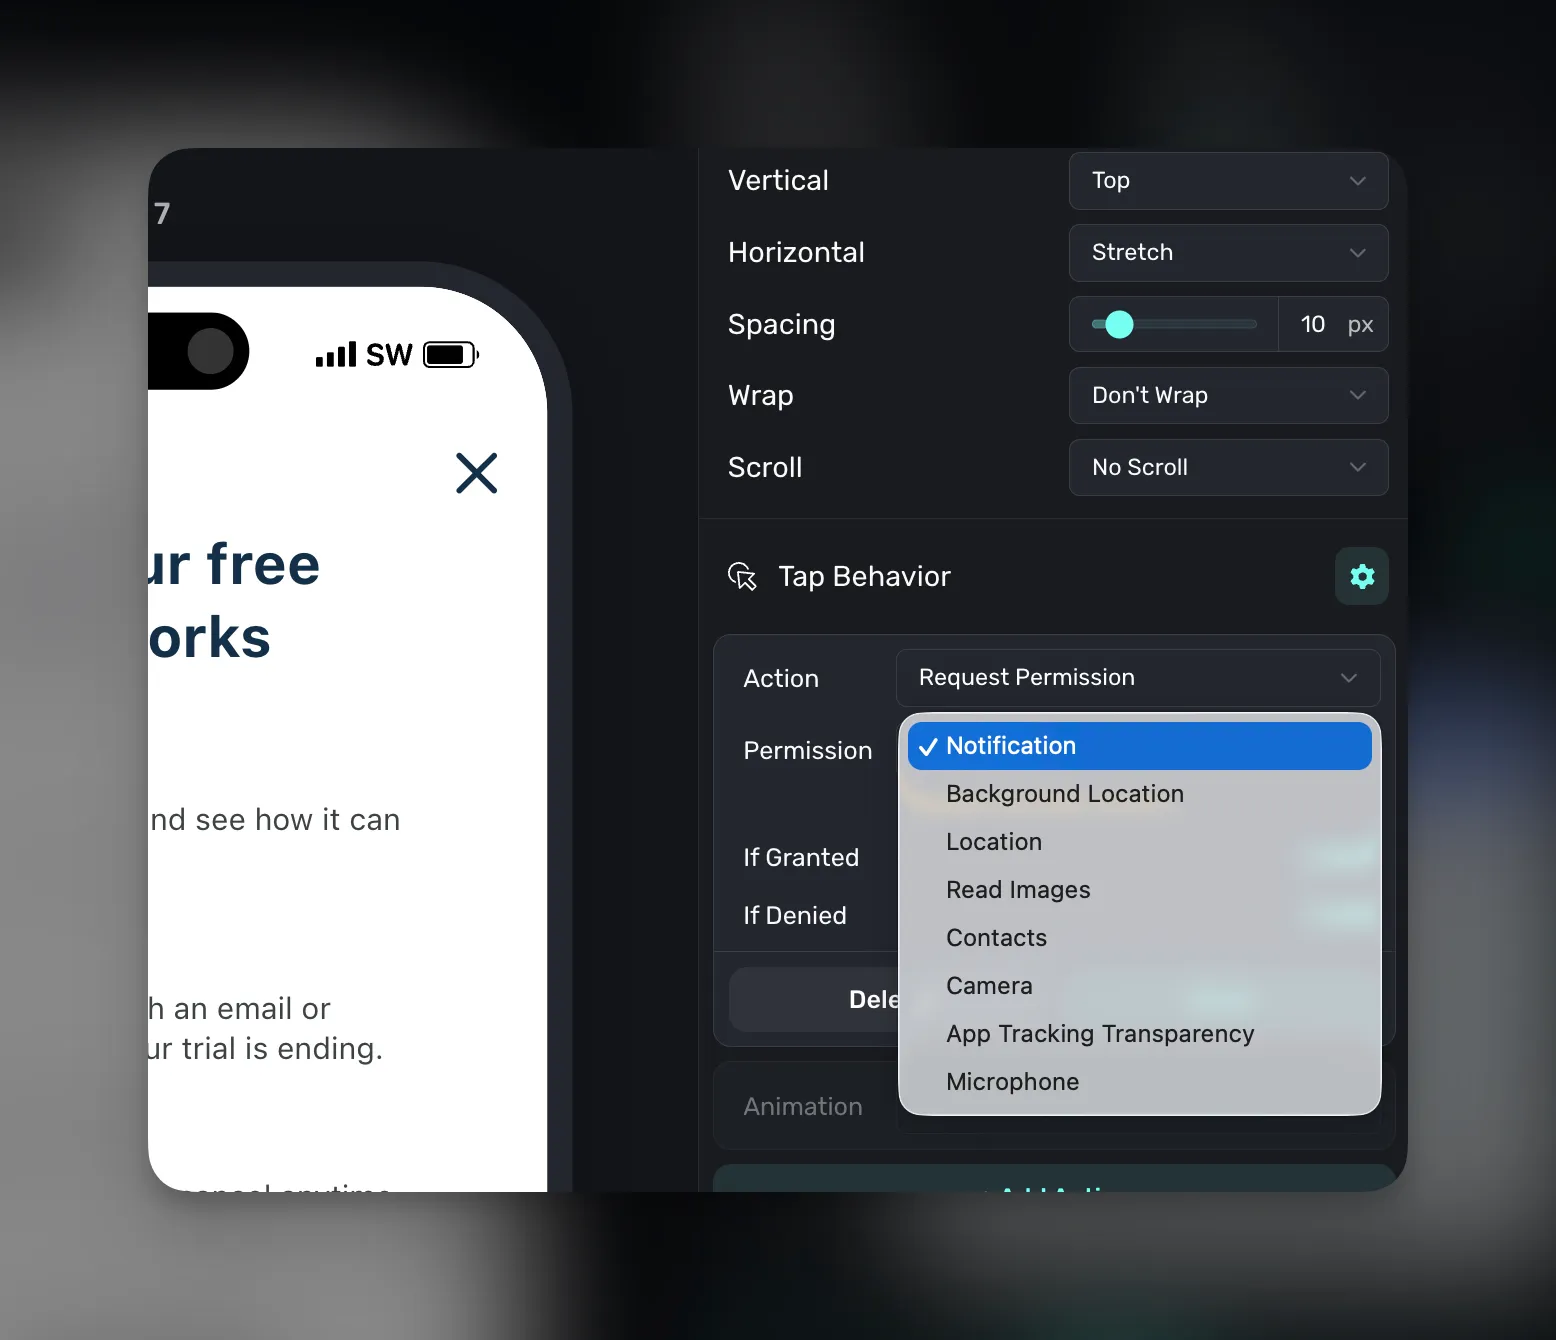
- Trigger native permission prompts: Need notification permissions during onboarding? You can request them right from a flow screen, no SDK code required. Same goes for location, camera, contacts, app tracking, microphone, and more. Pair the prompt with context explaining why you need it, and acceptance rates go up. Either way, you can add behaviors for when the prompt is granted or denied:
- Call native app functions: Using custom actions, your flow can trigger things on the native side like creating an account, starting a product demo, or kicking off a sync. The flow handles the UI and the conversation with the user, then hands off to your app for any domain-specific heavy lifting.
Taken together, all of these features mean your flows can do real work. You can test, optimize, and deploy everything from Superwall.
Start building today
Flows are available now, with a full suite of in-depth documentation. If you've built a paywall in Superwall before, you already know most of what you need. Add a Navigation element, connect some screens, drop in a few interactive components, and you've got a multi-page experience you can iterate on from the dashboard.
We're excited to see what you build with this. If you have questions or want to share what you're working on, come find us in the community. Flows is also available on all plans, so get started with Superwall today if you haven't made a free account yet.
FAQ
- What is a Superwall Flow?
- A Flow is a series of screens linked together with routes. Each screen can collect input, branch based on user choices, and guide people down a tailored path. It's built on top of Superwall's existing paywall editor, so instead of designing one screen, you're designing a whole journey.
- Do I need an app update to build or change a Flow?
- No. Flows are built and managed entirely in the Superwall dashboard, so you can build, test, and ship changes over the air with no app updates and no new SDK integrations.
- What can I build with Flows?
- Any multi-step experience that walks a user through a series of steps — for example onboarding sequences, cancellation surveys, feature discovery walkthroughs, and upgrade paths that ask qualifying questions before showing the right product tier.
- How do user attributes work inside a Flow?
- Every input and selection can write to a user attribute. You can use those attributes later in the same Flow to personalize screens, branch users, or change packaging and offers — and you can receive callbacks in your app via the Superwall Delegate to send them to analytics.
- Can a Flow request system permissions or call native functions?
- Yes. A flow can trigger native permission prompts for notifications, location, camera, contacts, app tracking, microphone, and more, with behaviors for granted or denied outcomes. Using custom actions, a flow can also call native app functions like creating an account, starting a demo, or kicking off a sync.
- Which plans include Flows?
- Flows are available now on all Superwall plans. If you haven't yet, you can make a free account and get started immediately.