Linking Pages
Connect pages with routes, configure animations, and set up conditional branching.
Linking pages is how you define the path through your flow. You'll connect pages using nodes in the Canvas view, and each connection (route) can have its own animation and conditions.
Creating connections
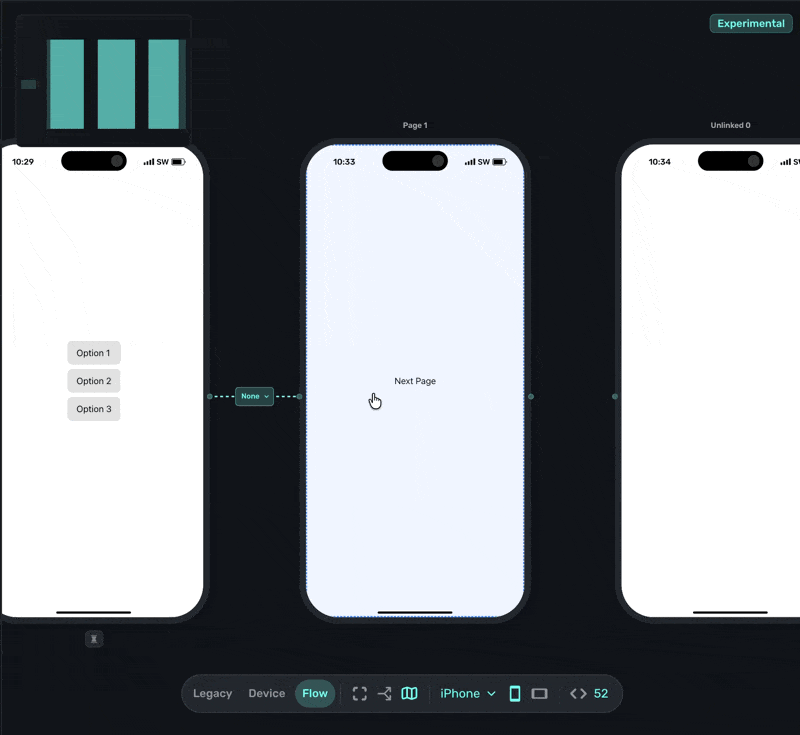
In Canvas view, you'll see nodes on the edges of each page. These are your connection points.
To link two pages:
- Click the node on the edge of the source page.
- Drag to the destination page.
- Release to create the route.
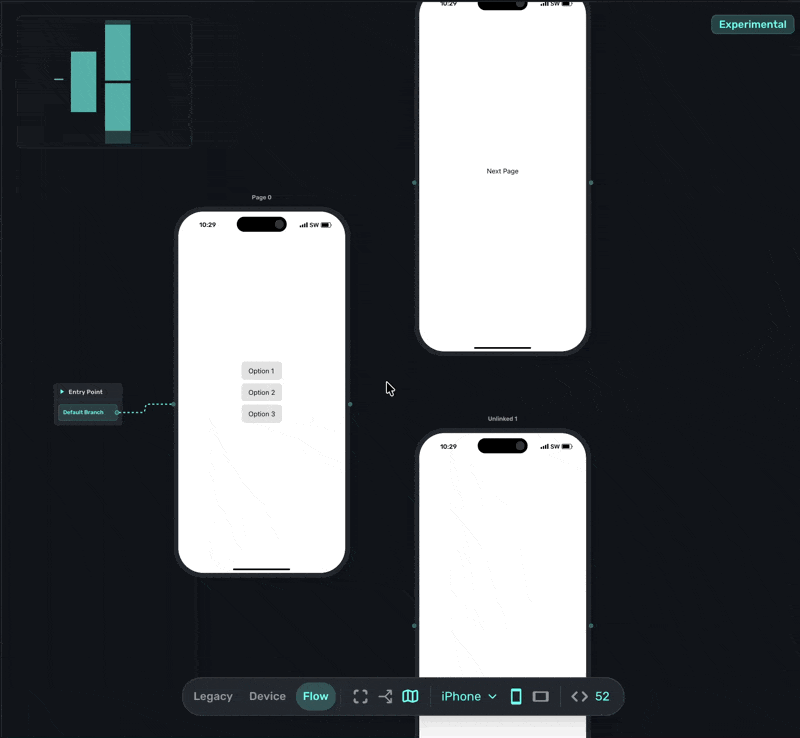
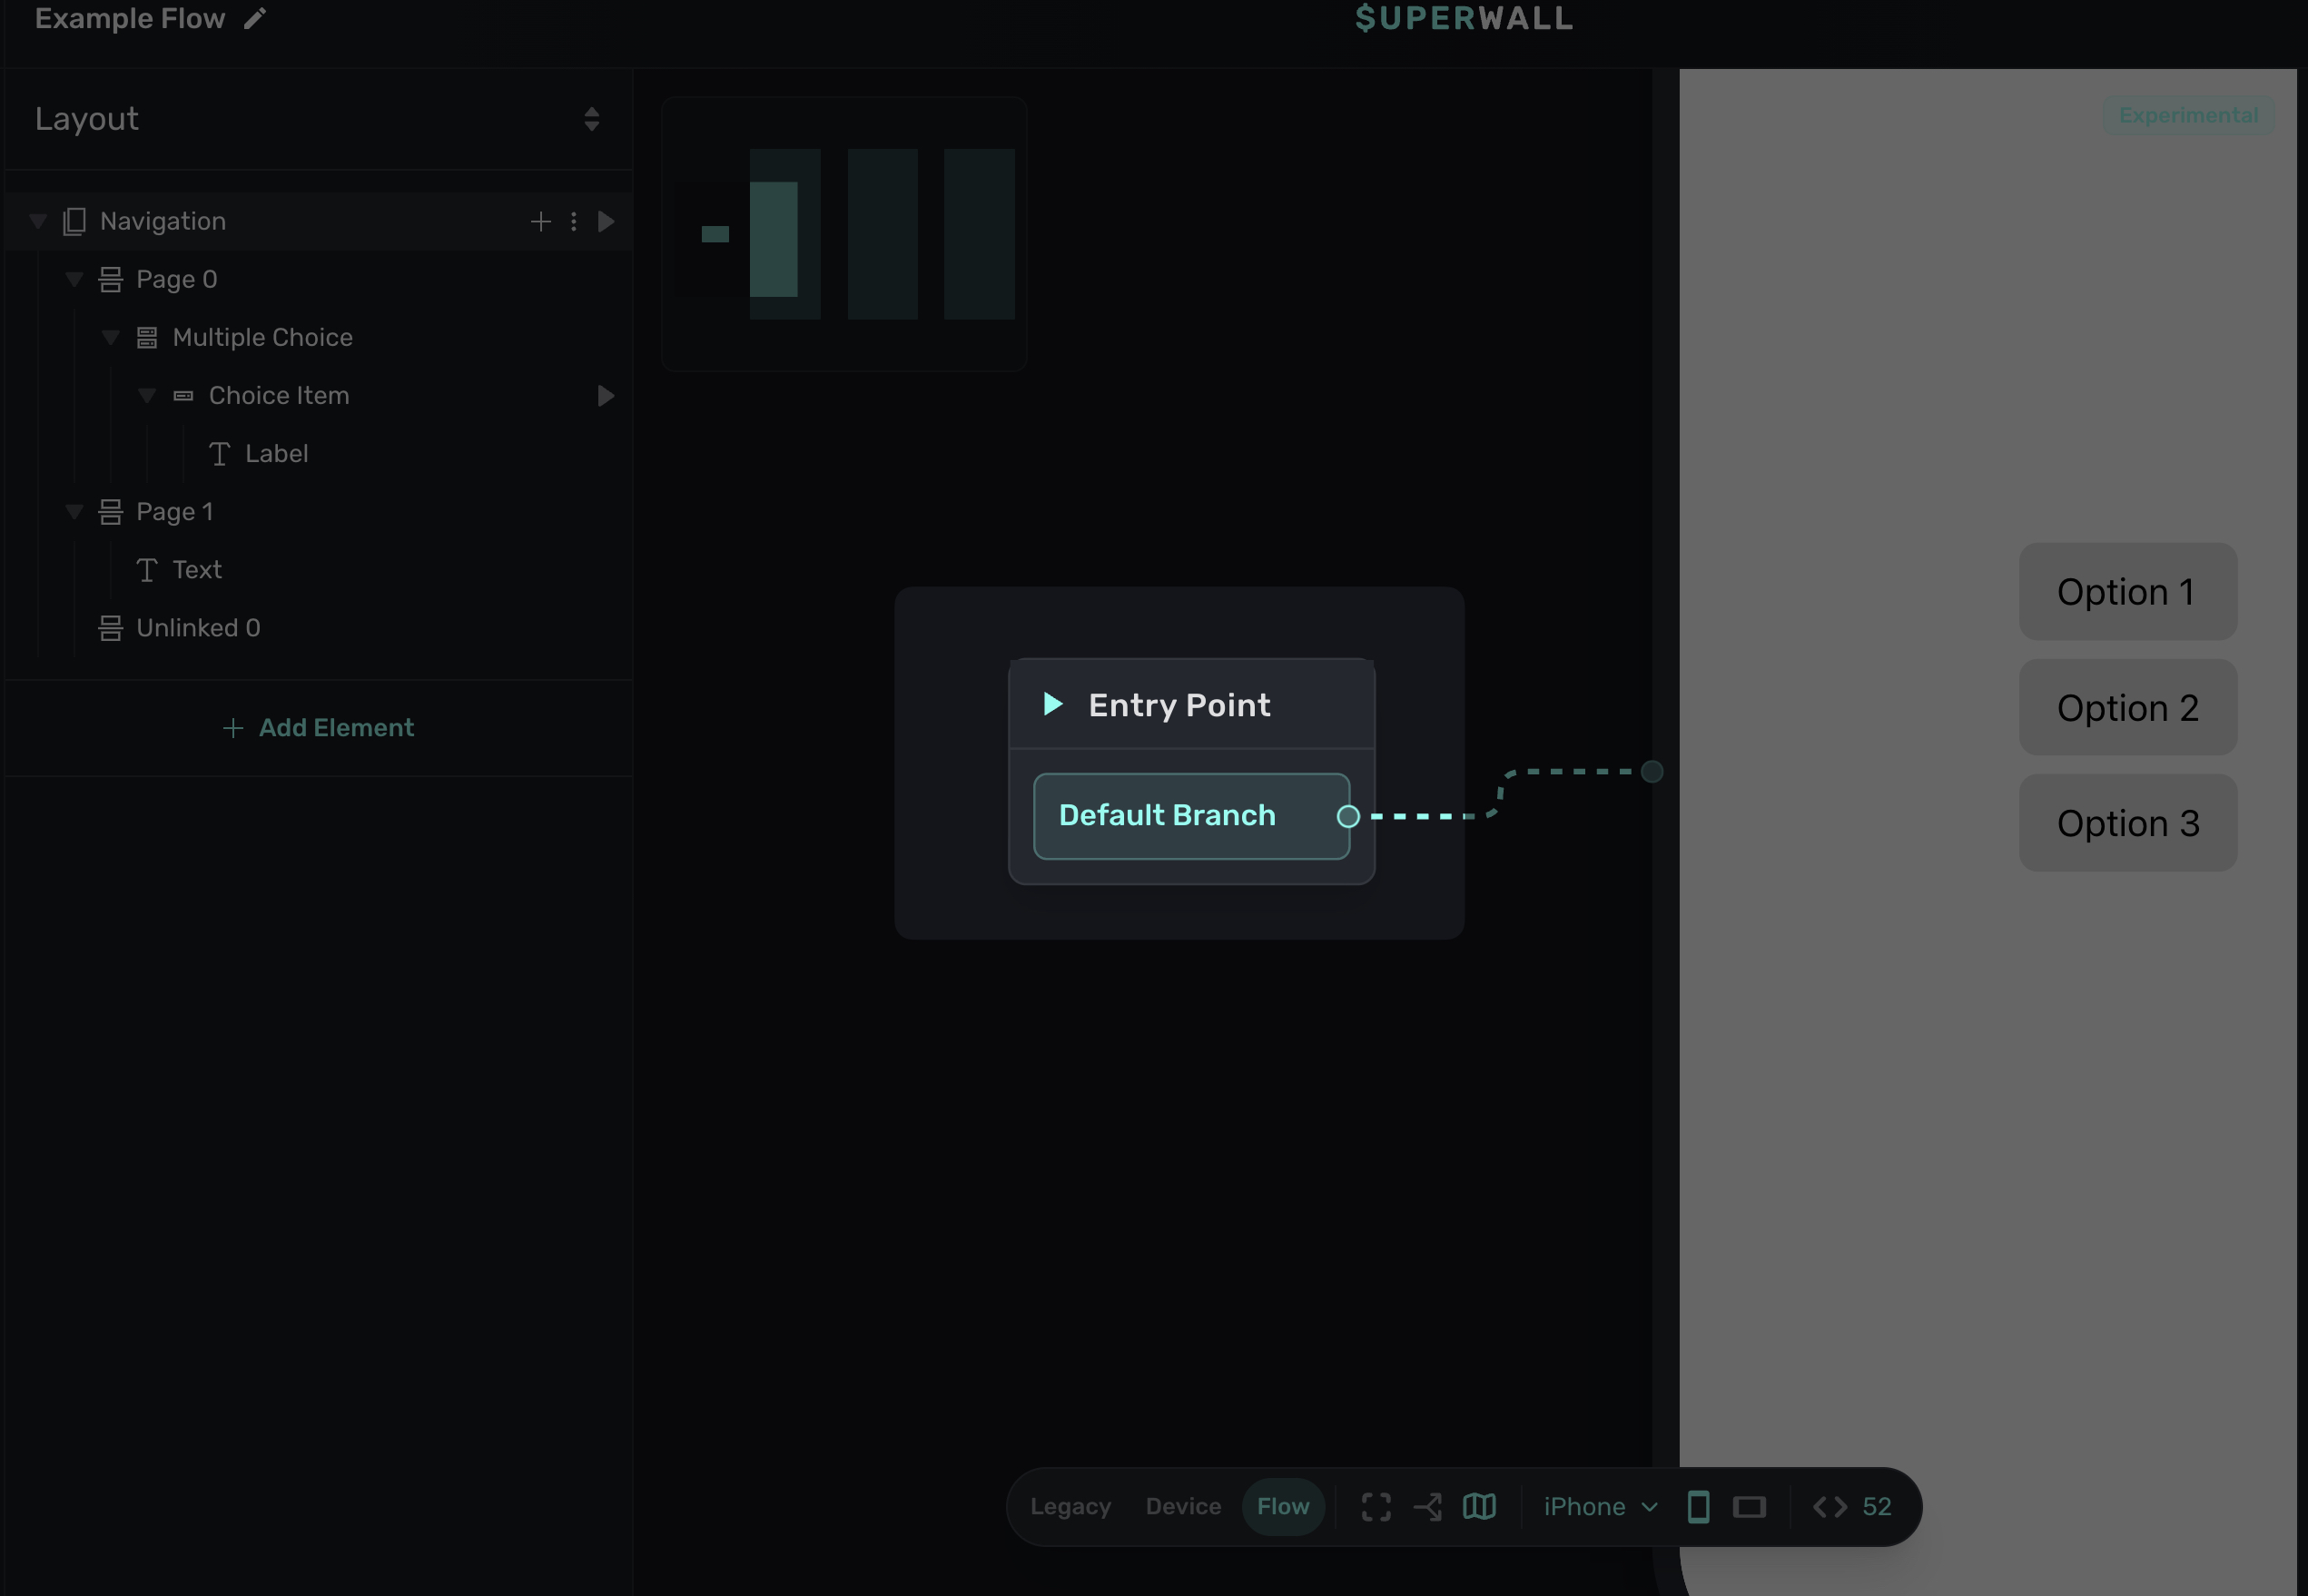
The first page in your flow should connect to the flow entry point, which is the starting node that appears in the Canvas. This marks where users begin:
The edge toolbar
When you click on a route (the line connecting two pages), an edge toolbar appears with several options:
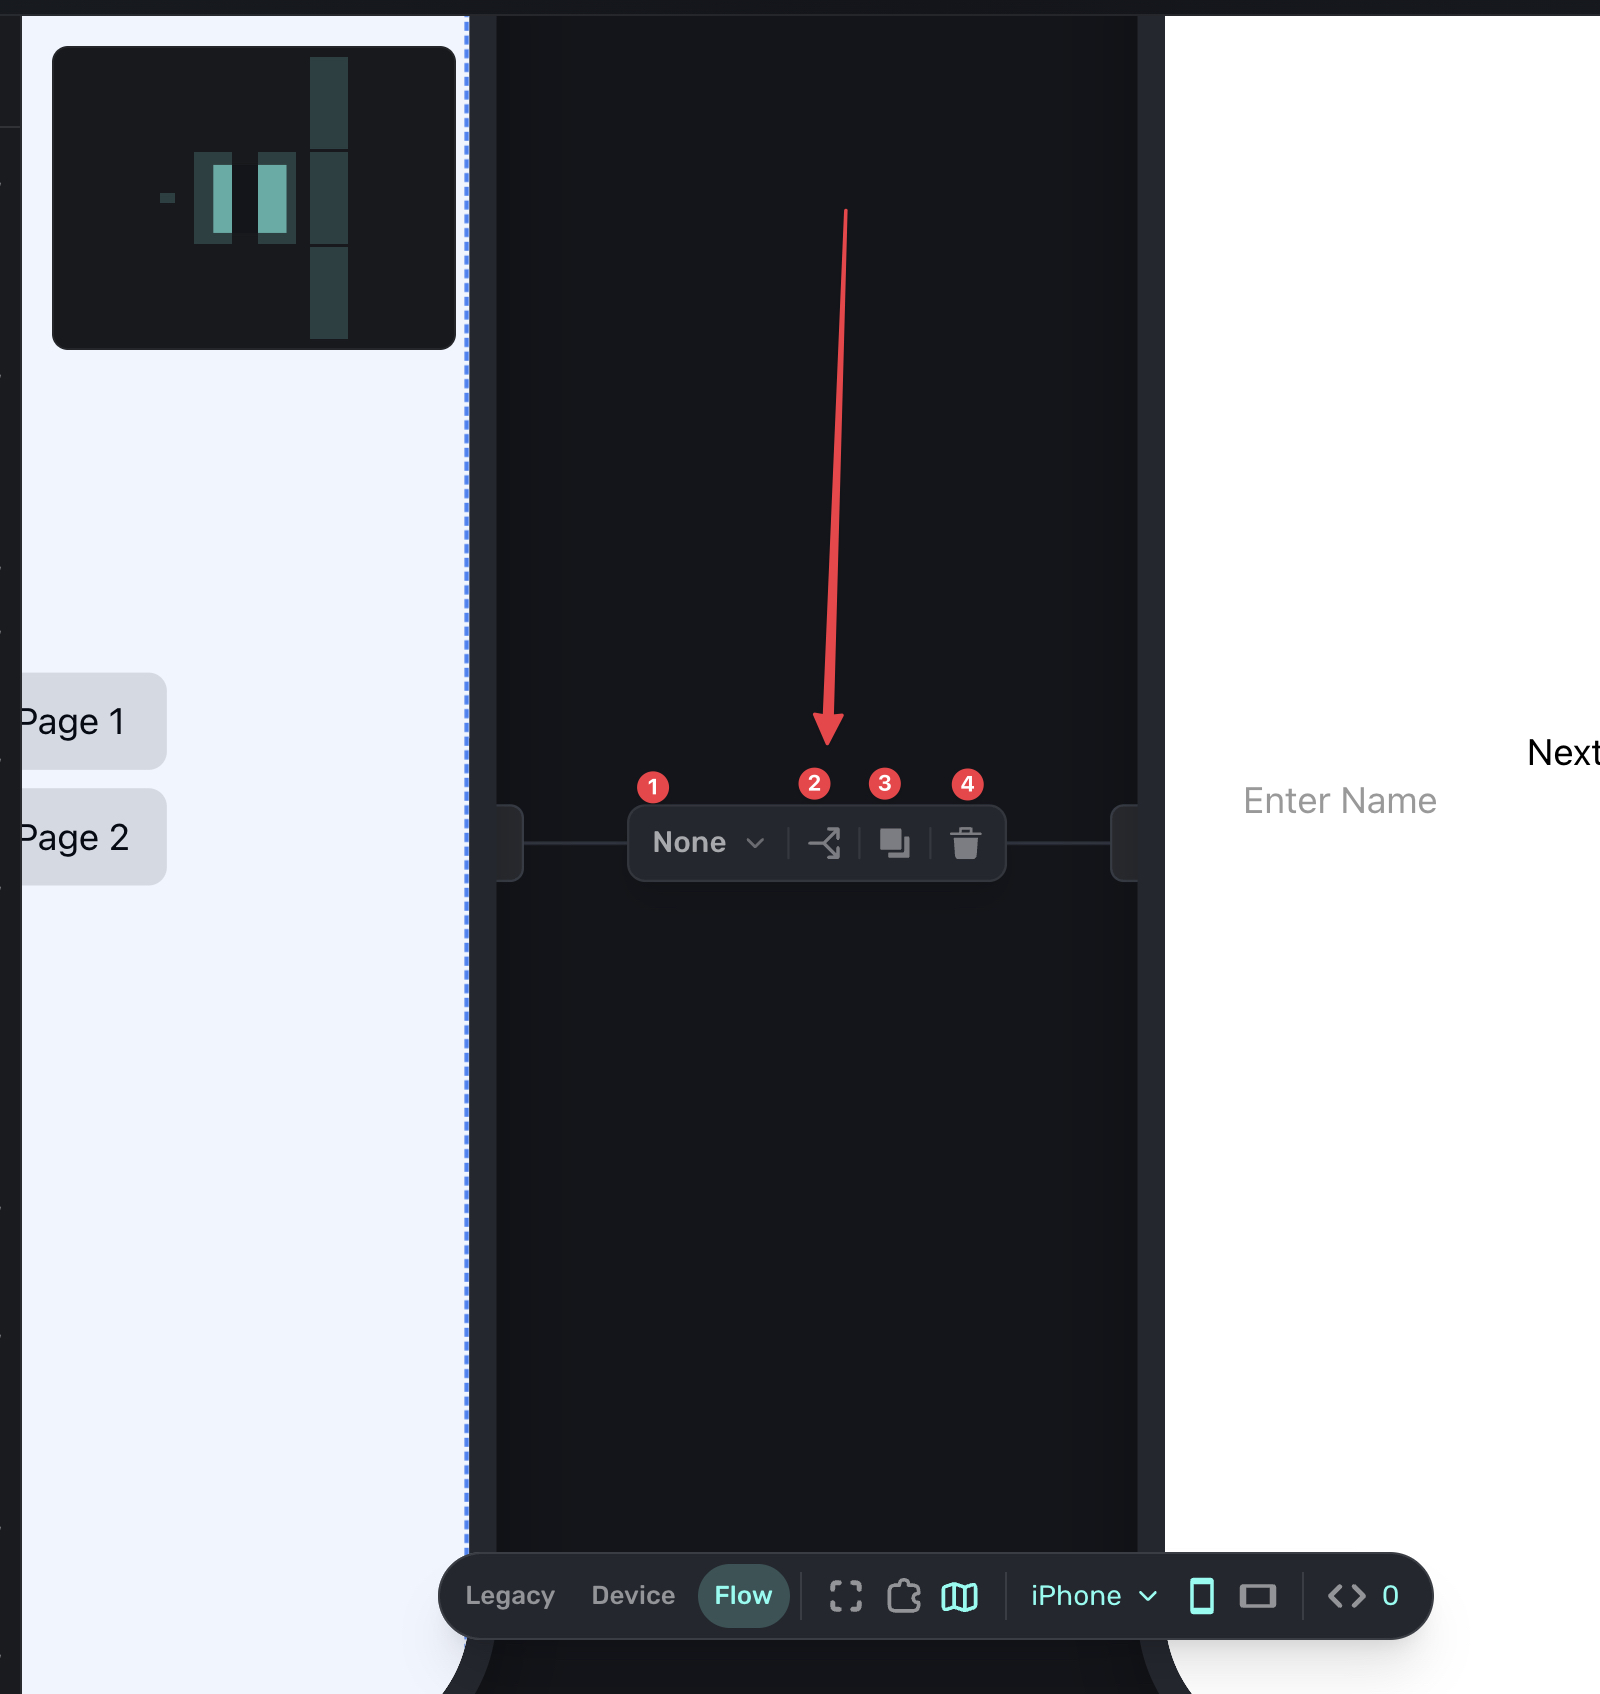
- Animation: Choose a transition style for this route (see below).
- Add condition: Opens a help dialog explaining how to set up conditional branching on this route.
- Duplicate: Duplicates the source destination page and then creates a branch between them.
- Delete: Remove the connection between two pages.
Animation styles
Each route has an animation style that controls how the transition looks when users move between pages.
To change an animation:
- Click on a route (the line connecting two pages).
- In the edge toolbar that appears, select an animation style:
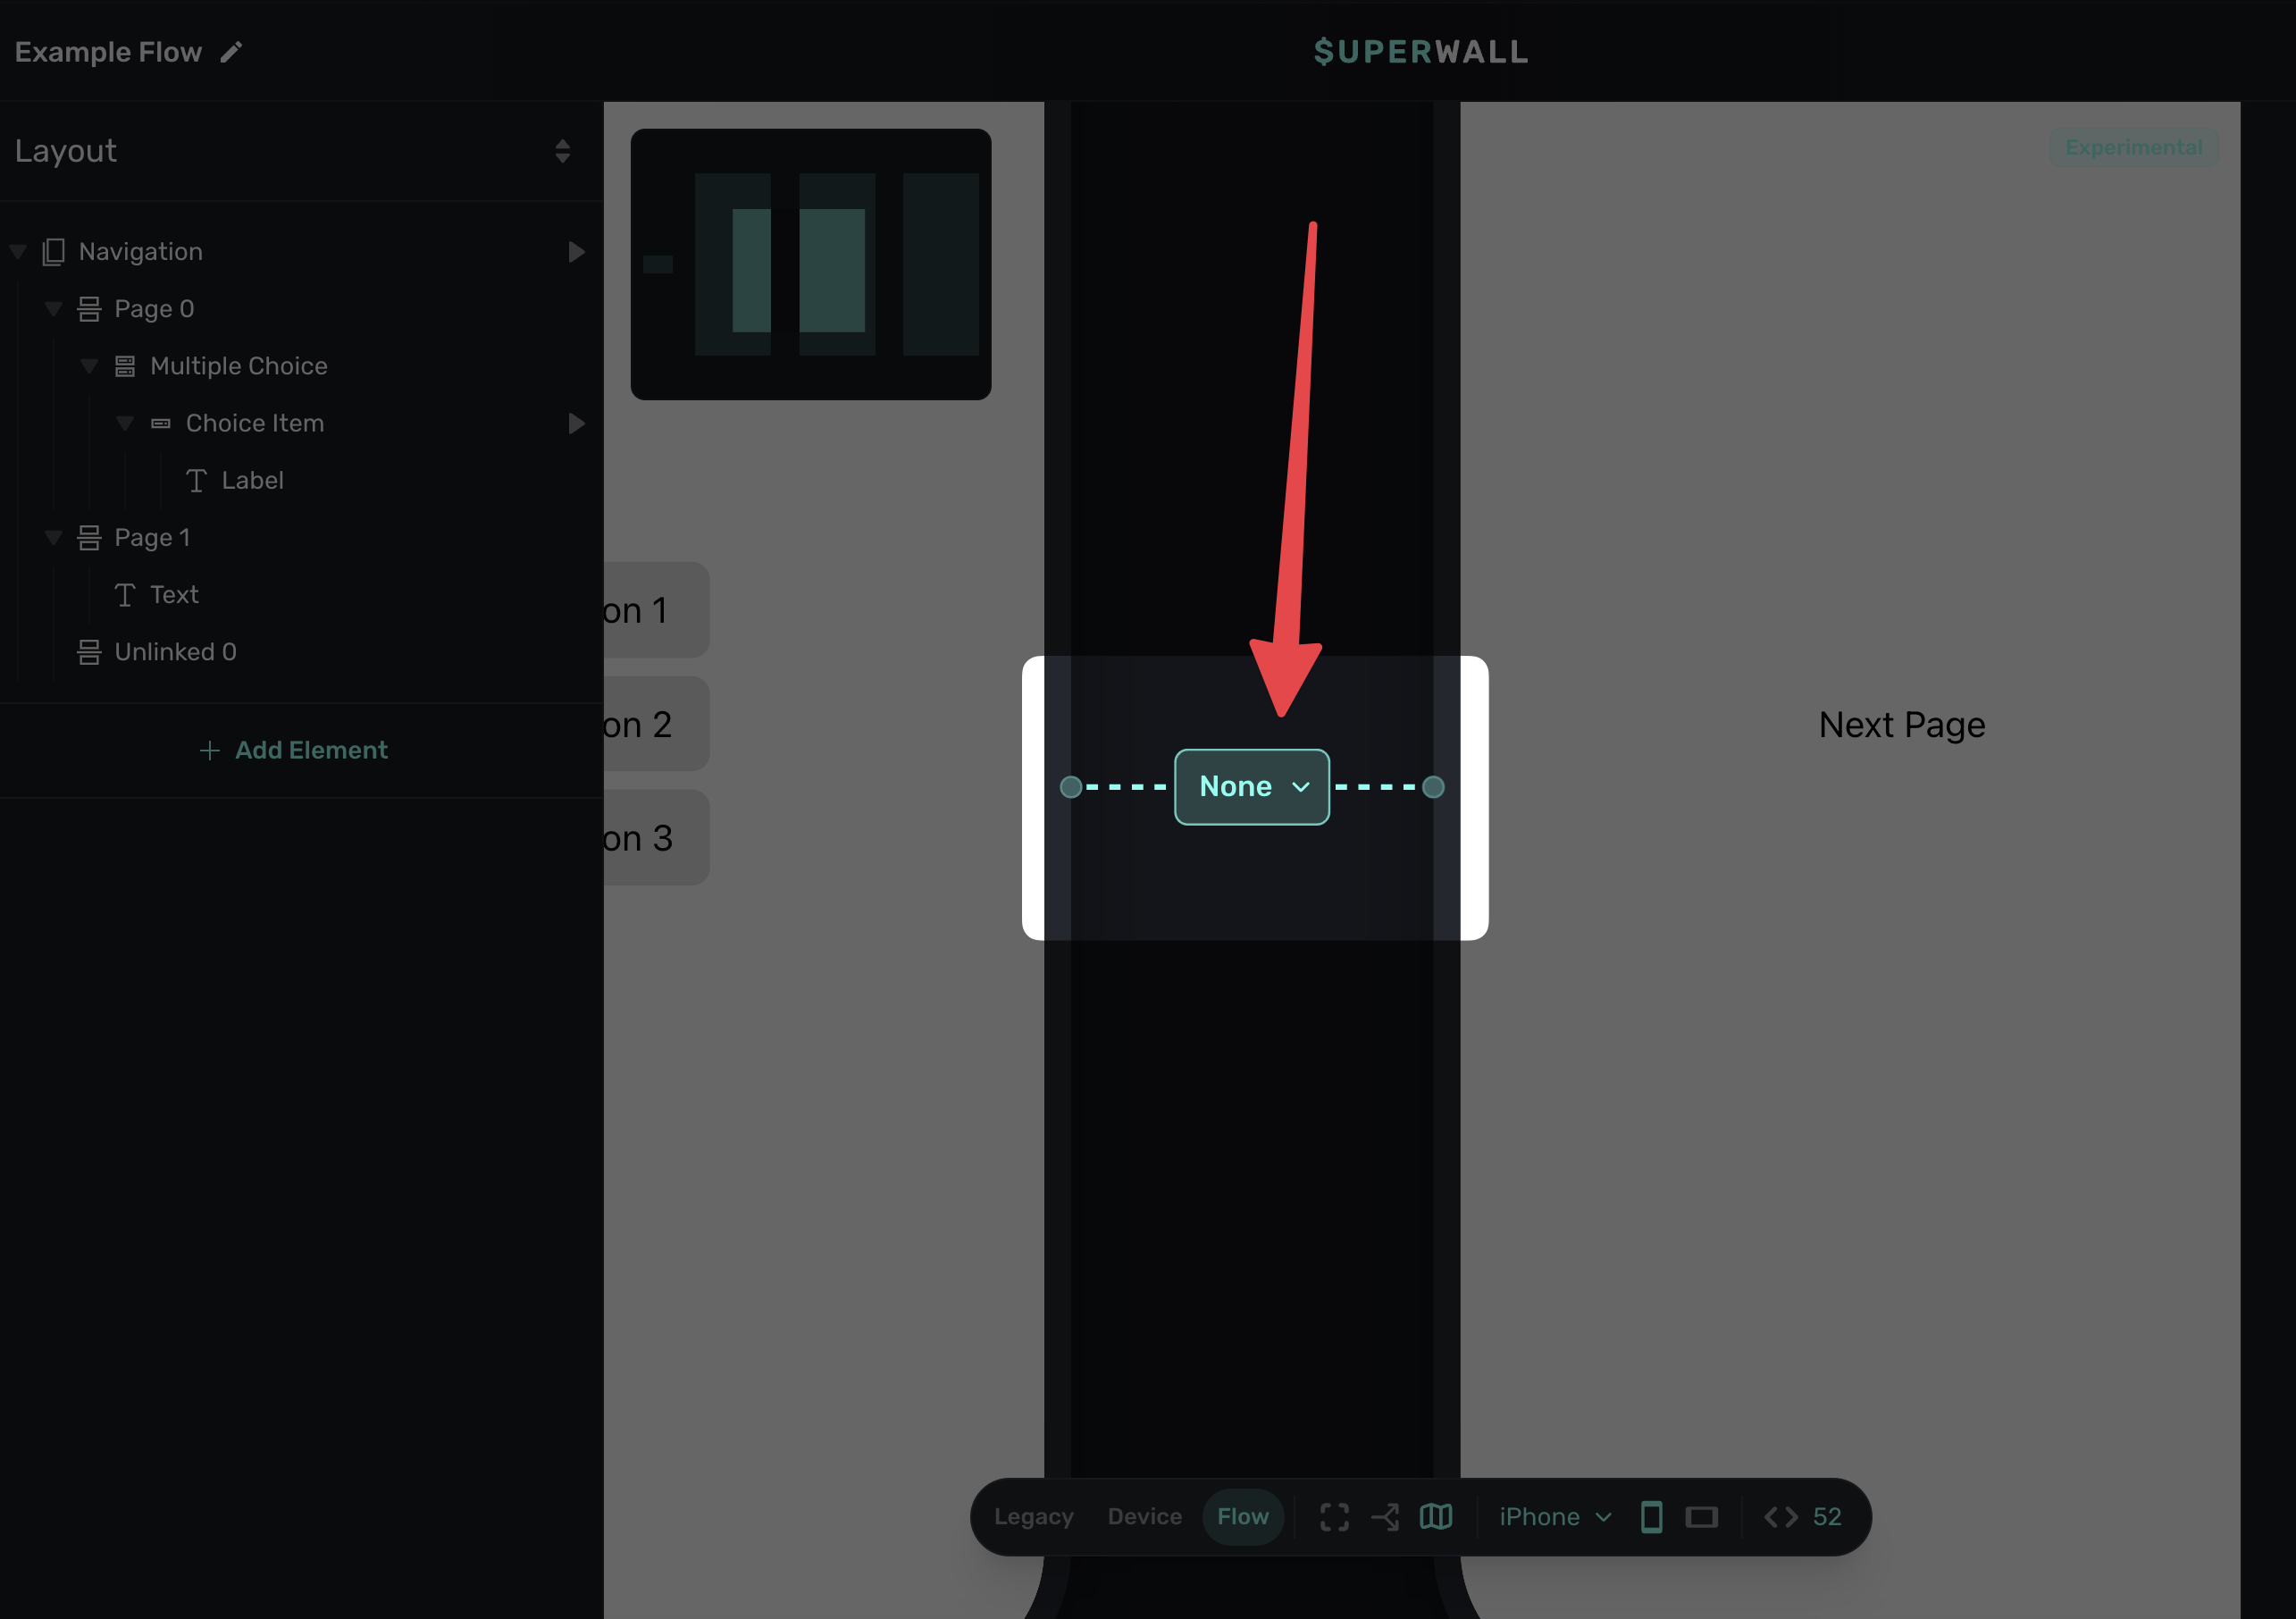
Available animations:
- Push: Slides the new page in from the right.
- Fade: Crossfades between pages.
- Slide: Smooth horizontal transition, like scrolling through a carousel.
- Fade & Slide: Combines a fade with a slide transition.
- None: Instant transition with no animation.
Unlinked pages
Pages that aren't connected to the flow show a label indicating they're unlinked. These pages won't appear in the user's journey until you connect them:

Unlinked pages are useful for drafts you're still working on, pages you want to keep but aren't using yet, or testing different versions before connecting them.
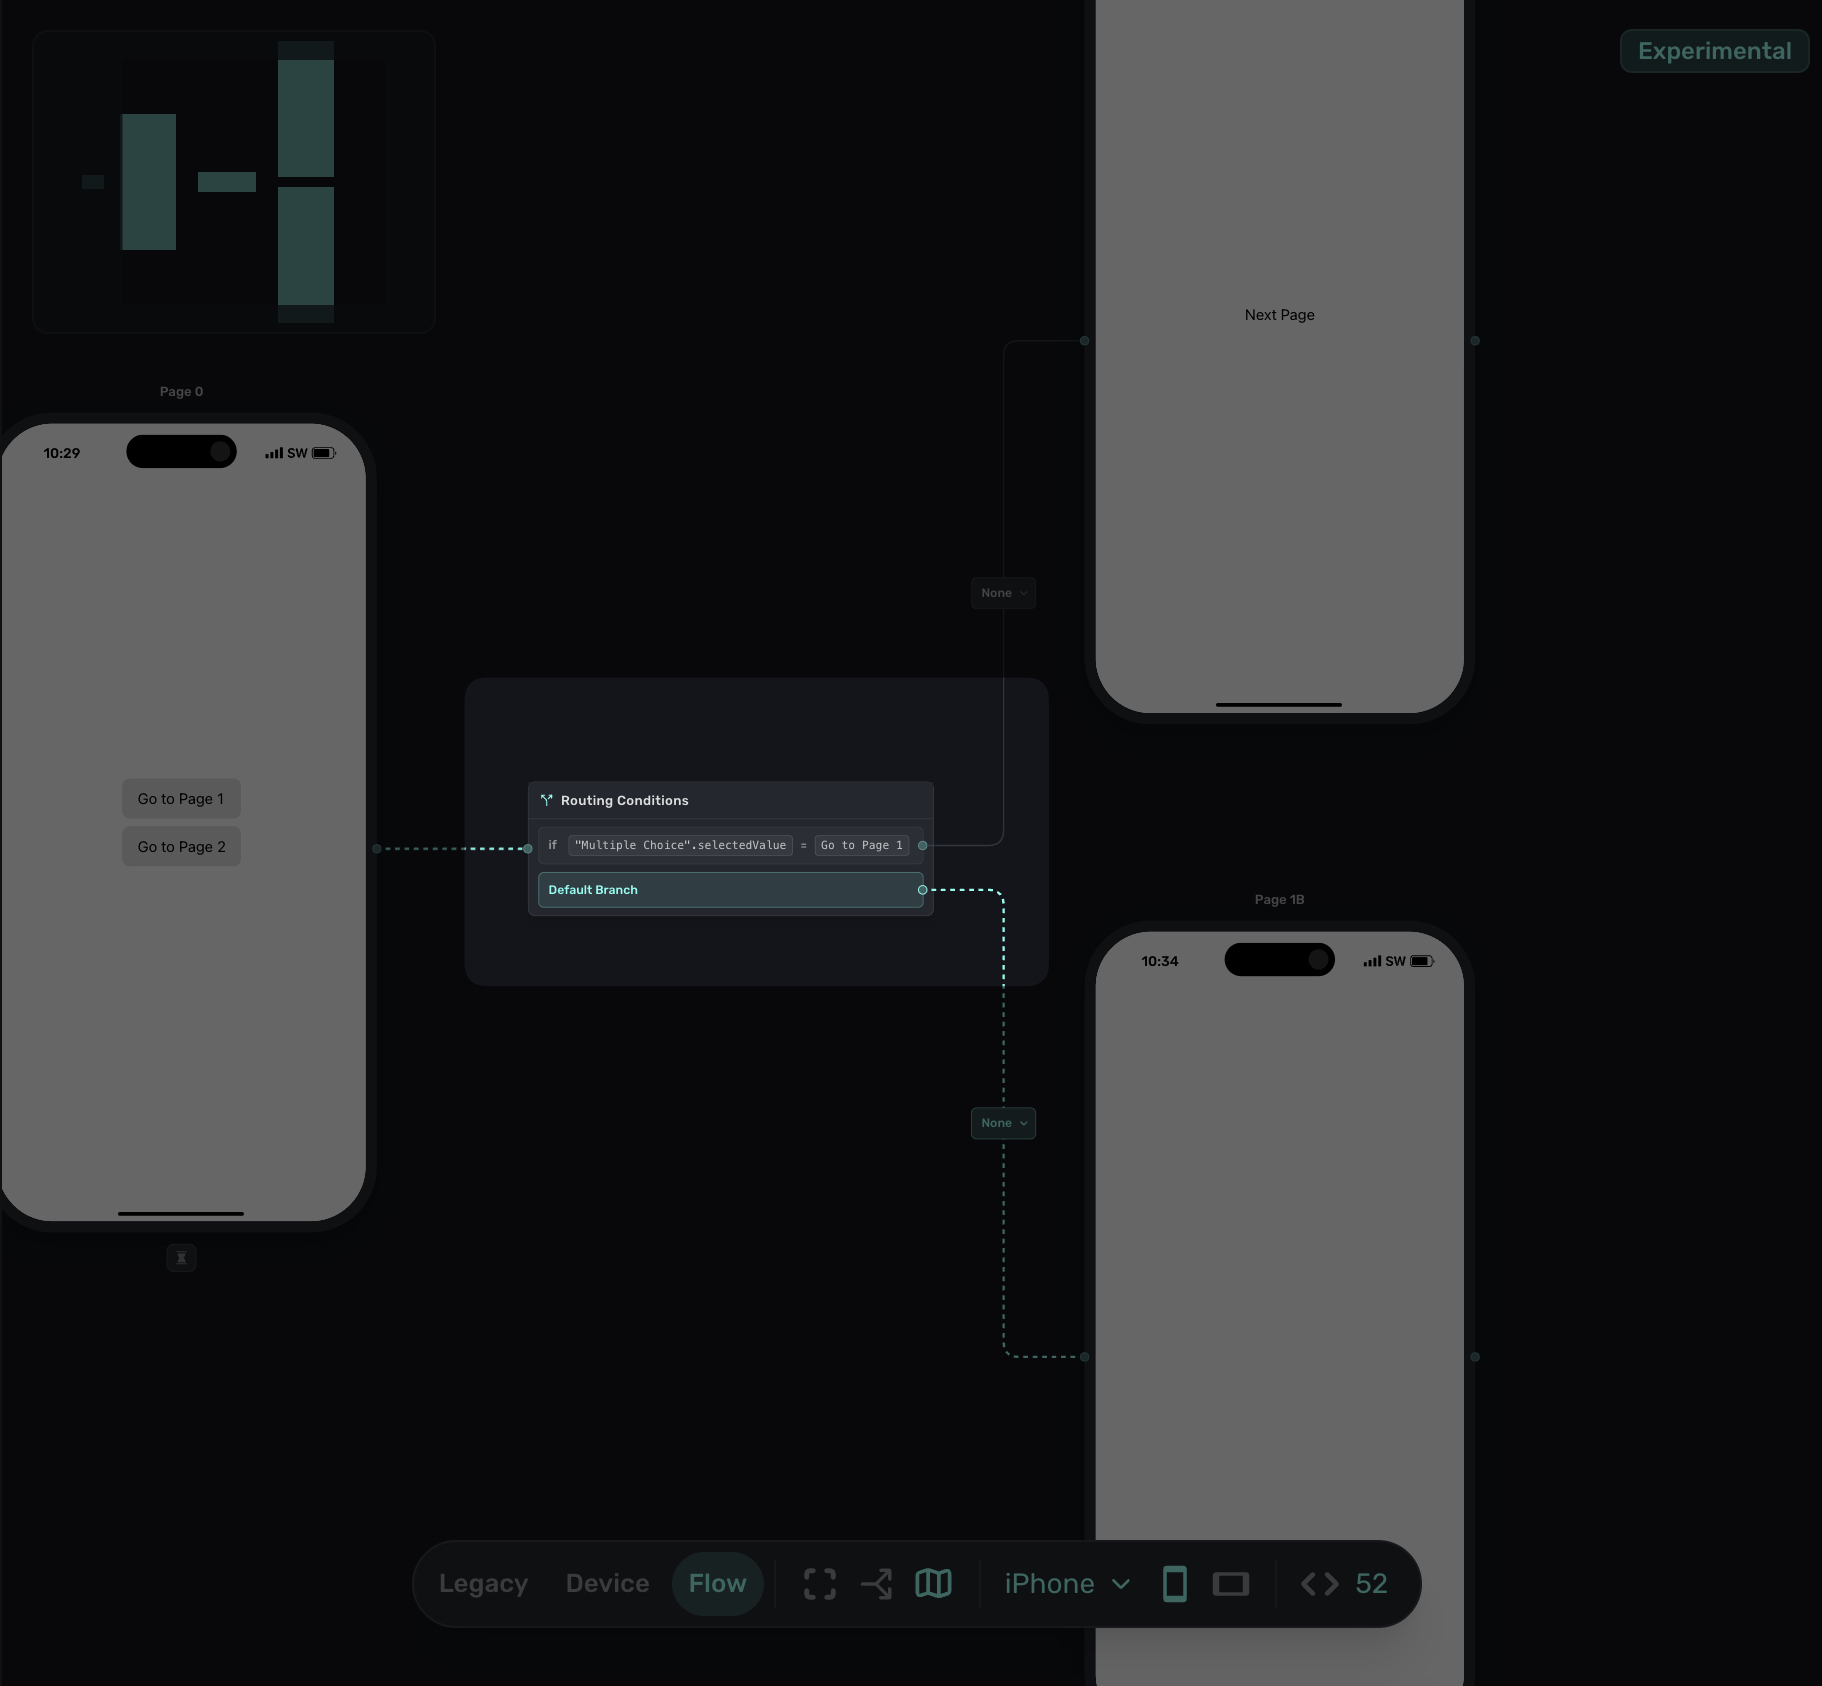
Branching
Routes can be conditional, meaning users can see different pages based on their input or attributes. This is the core of personalized flows. You might change the page that shows next based off a multiple choice answer, or certain component tapped, etc.
To add branching:
- Connect a route in the Canvas to a page.
- Then, from the same source page, click and drag to add another route to a different destination page.
- Then, configure the rules from the resulting popup.
In this example, a route is already in place to go from the left-most page to the middle one. Adding another route from the same page to a new page creates a branch. The Flow editor recognizes that the route can now end up in more than one place:
For example, if you have a multiple choice element asking about user goals:
- Route 1: If user selected "Grow subscriptions" → Go to Growth Tips page.
- Route 2: If user selected "Reduce churn" → Go to Retention Tips page.
- Default route: Go to General Tips page.
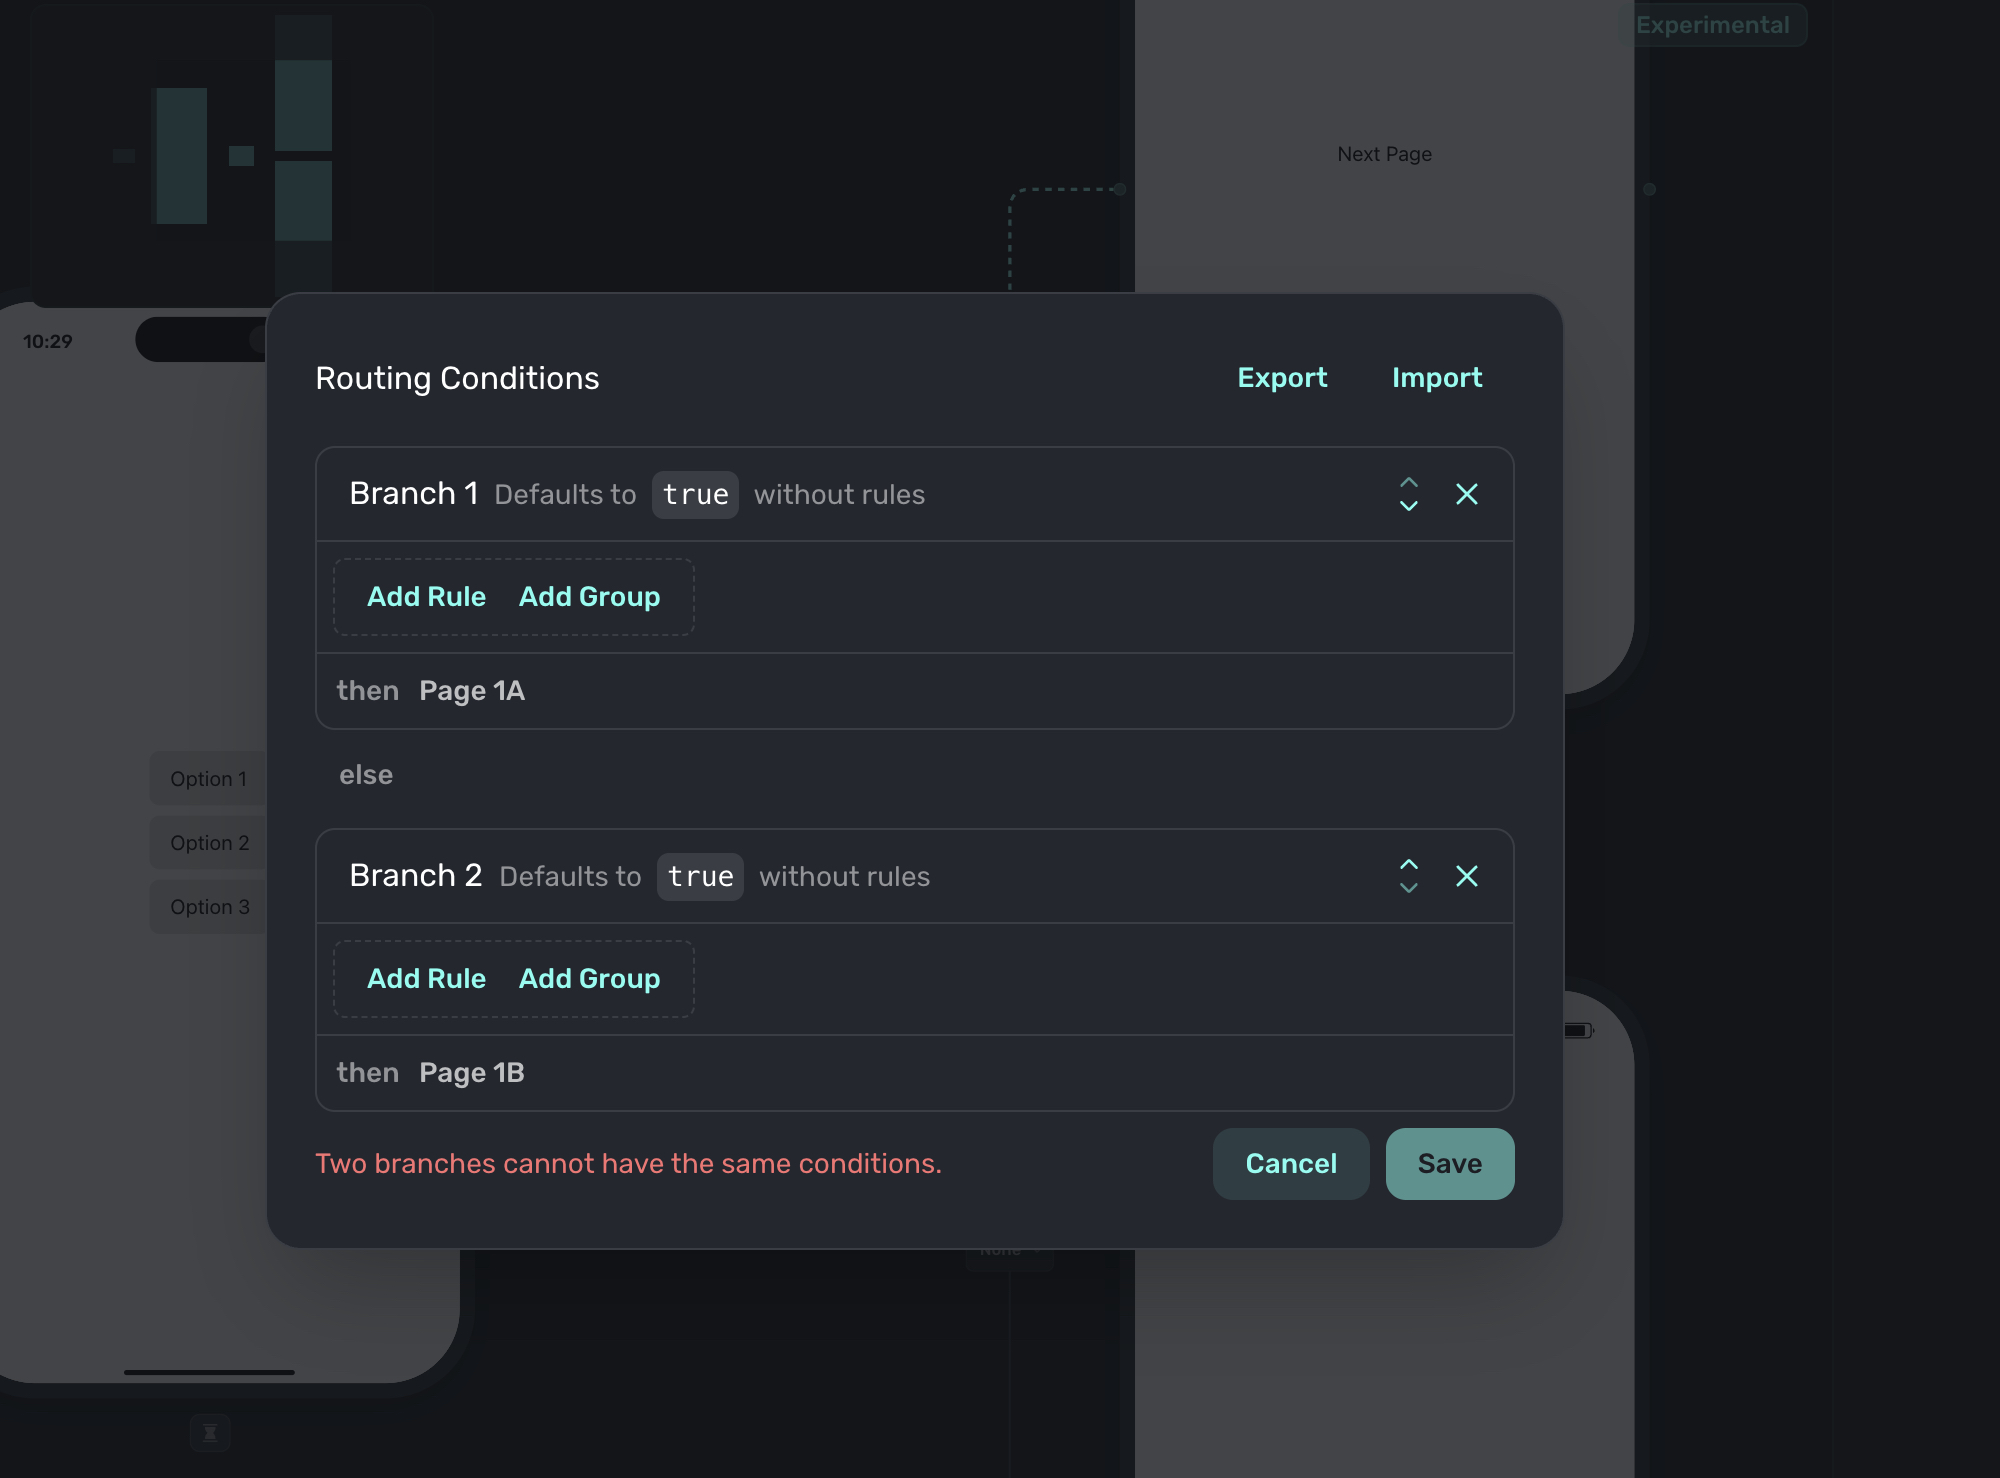
Editing branch rules
A branch dictates navigation by its routing conditions, and these are edited once a branch is made:
If you are familiar with dynamic values, rules are created exactly the same way.
These routing conditions can be based on things like:
- User attributes: Properties you've set on the user (e.g., subscription status, country).
- User input: Selections from Flow Elements like multiple choice or text entry.
- Combinations: Use AND/OR logic to combine multiple conditions.
When building conditions, you can use operators like equals, not equals, contains, and more. Two additional operators are available for checking whether a value exists at all:
- is empty: True when the value is not set (null, undefined, or an empty string). Useful for checking if a user hasn't made a selection yet or if an input field was skipped.
- is not empty: True when the value has any content. Useful for branching only after a user has provided input.
These operators don't require a comparison value. They check the variable itself.
Multiple choice branch example
Here's an example using a multiple choice component to create a branch. When choosing a condition, in the popup select Element and choose the multiple choice response to dictate the flow (this assumes you have added a multiple choice component on the flow already):
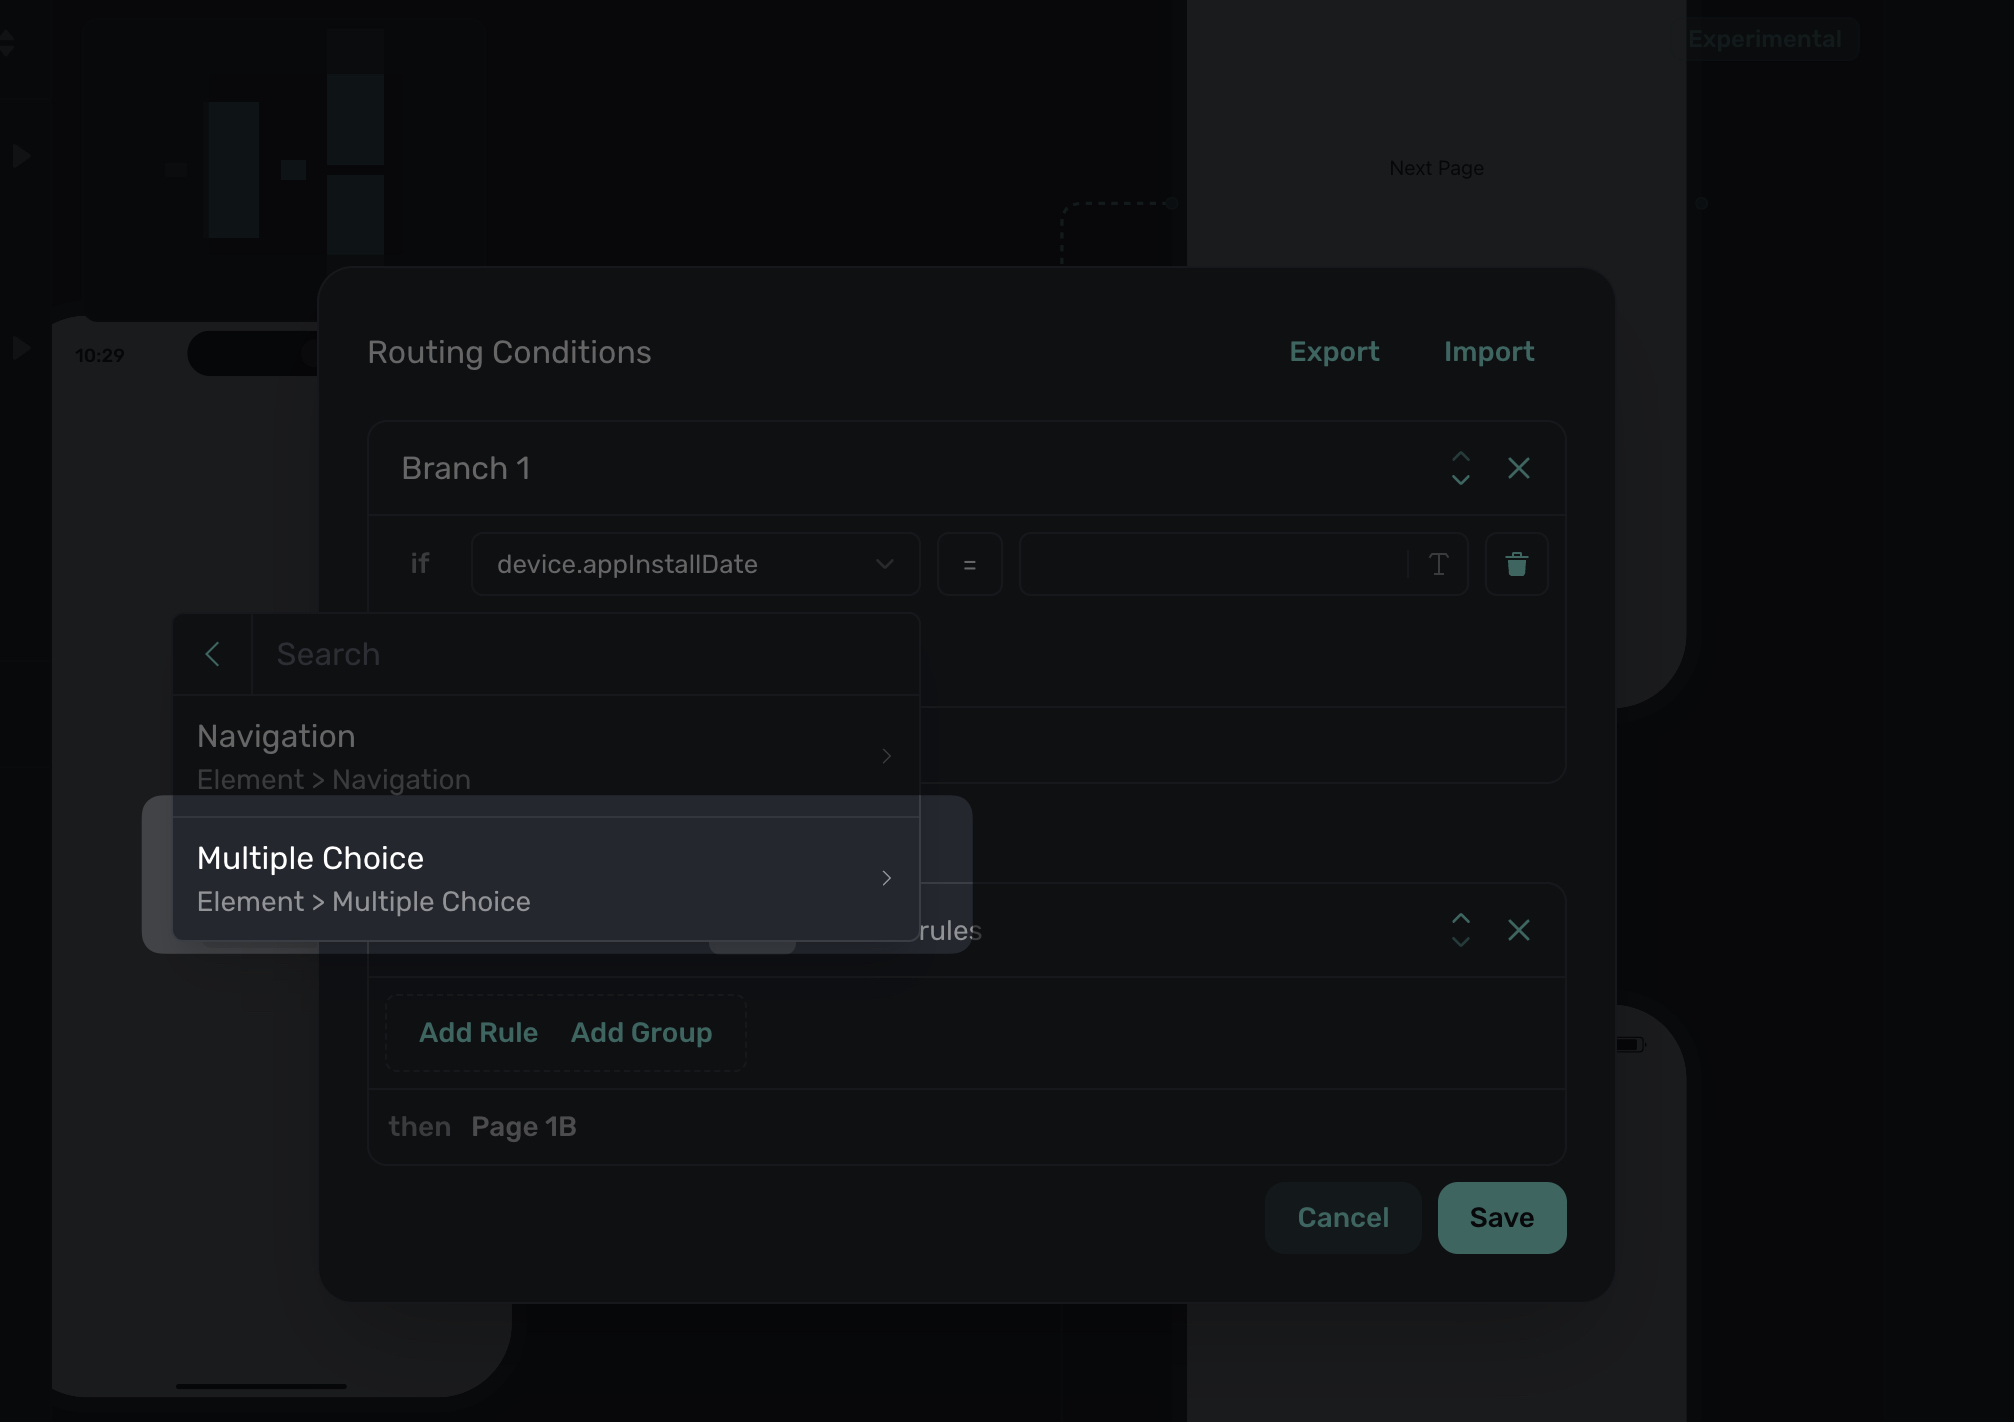
Interactive elements that can control routing conditions will be available under the Element category when editing the rule. In the screenshot above, it's shown since a multiple choice component is used in the pages involved in the branch. You can see that here:
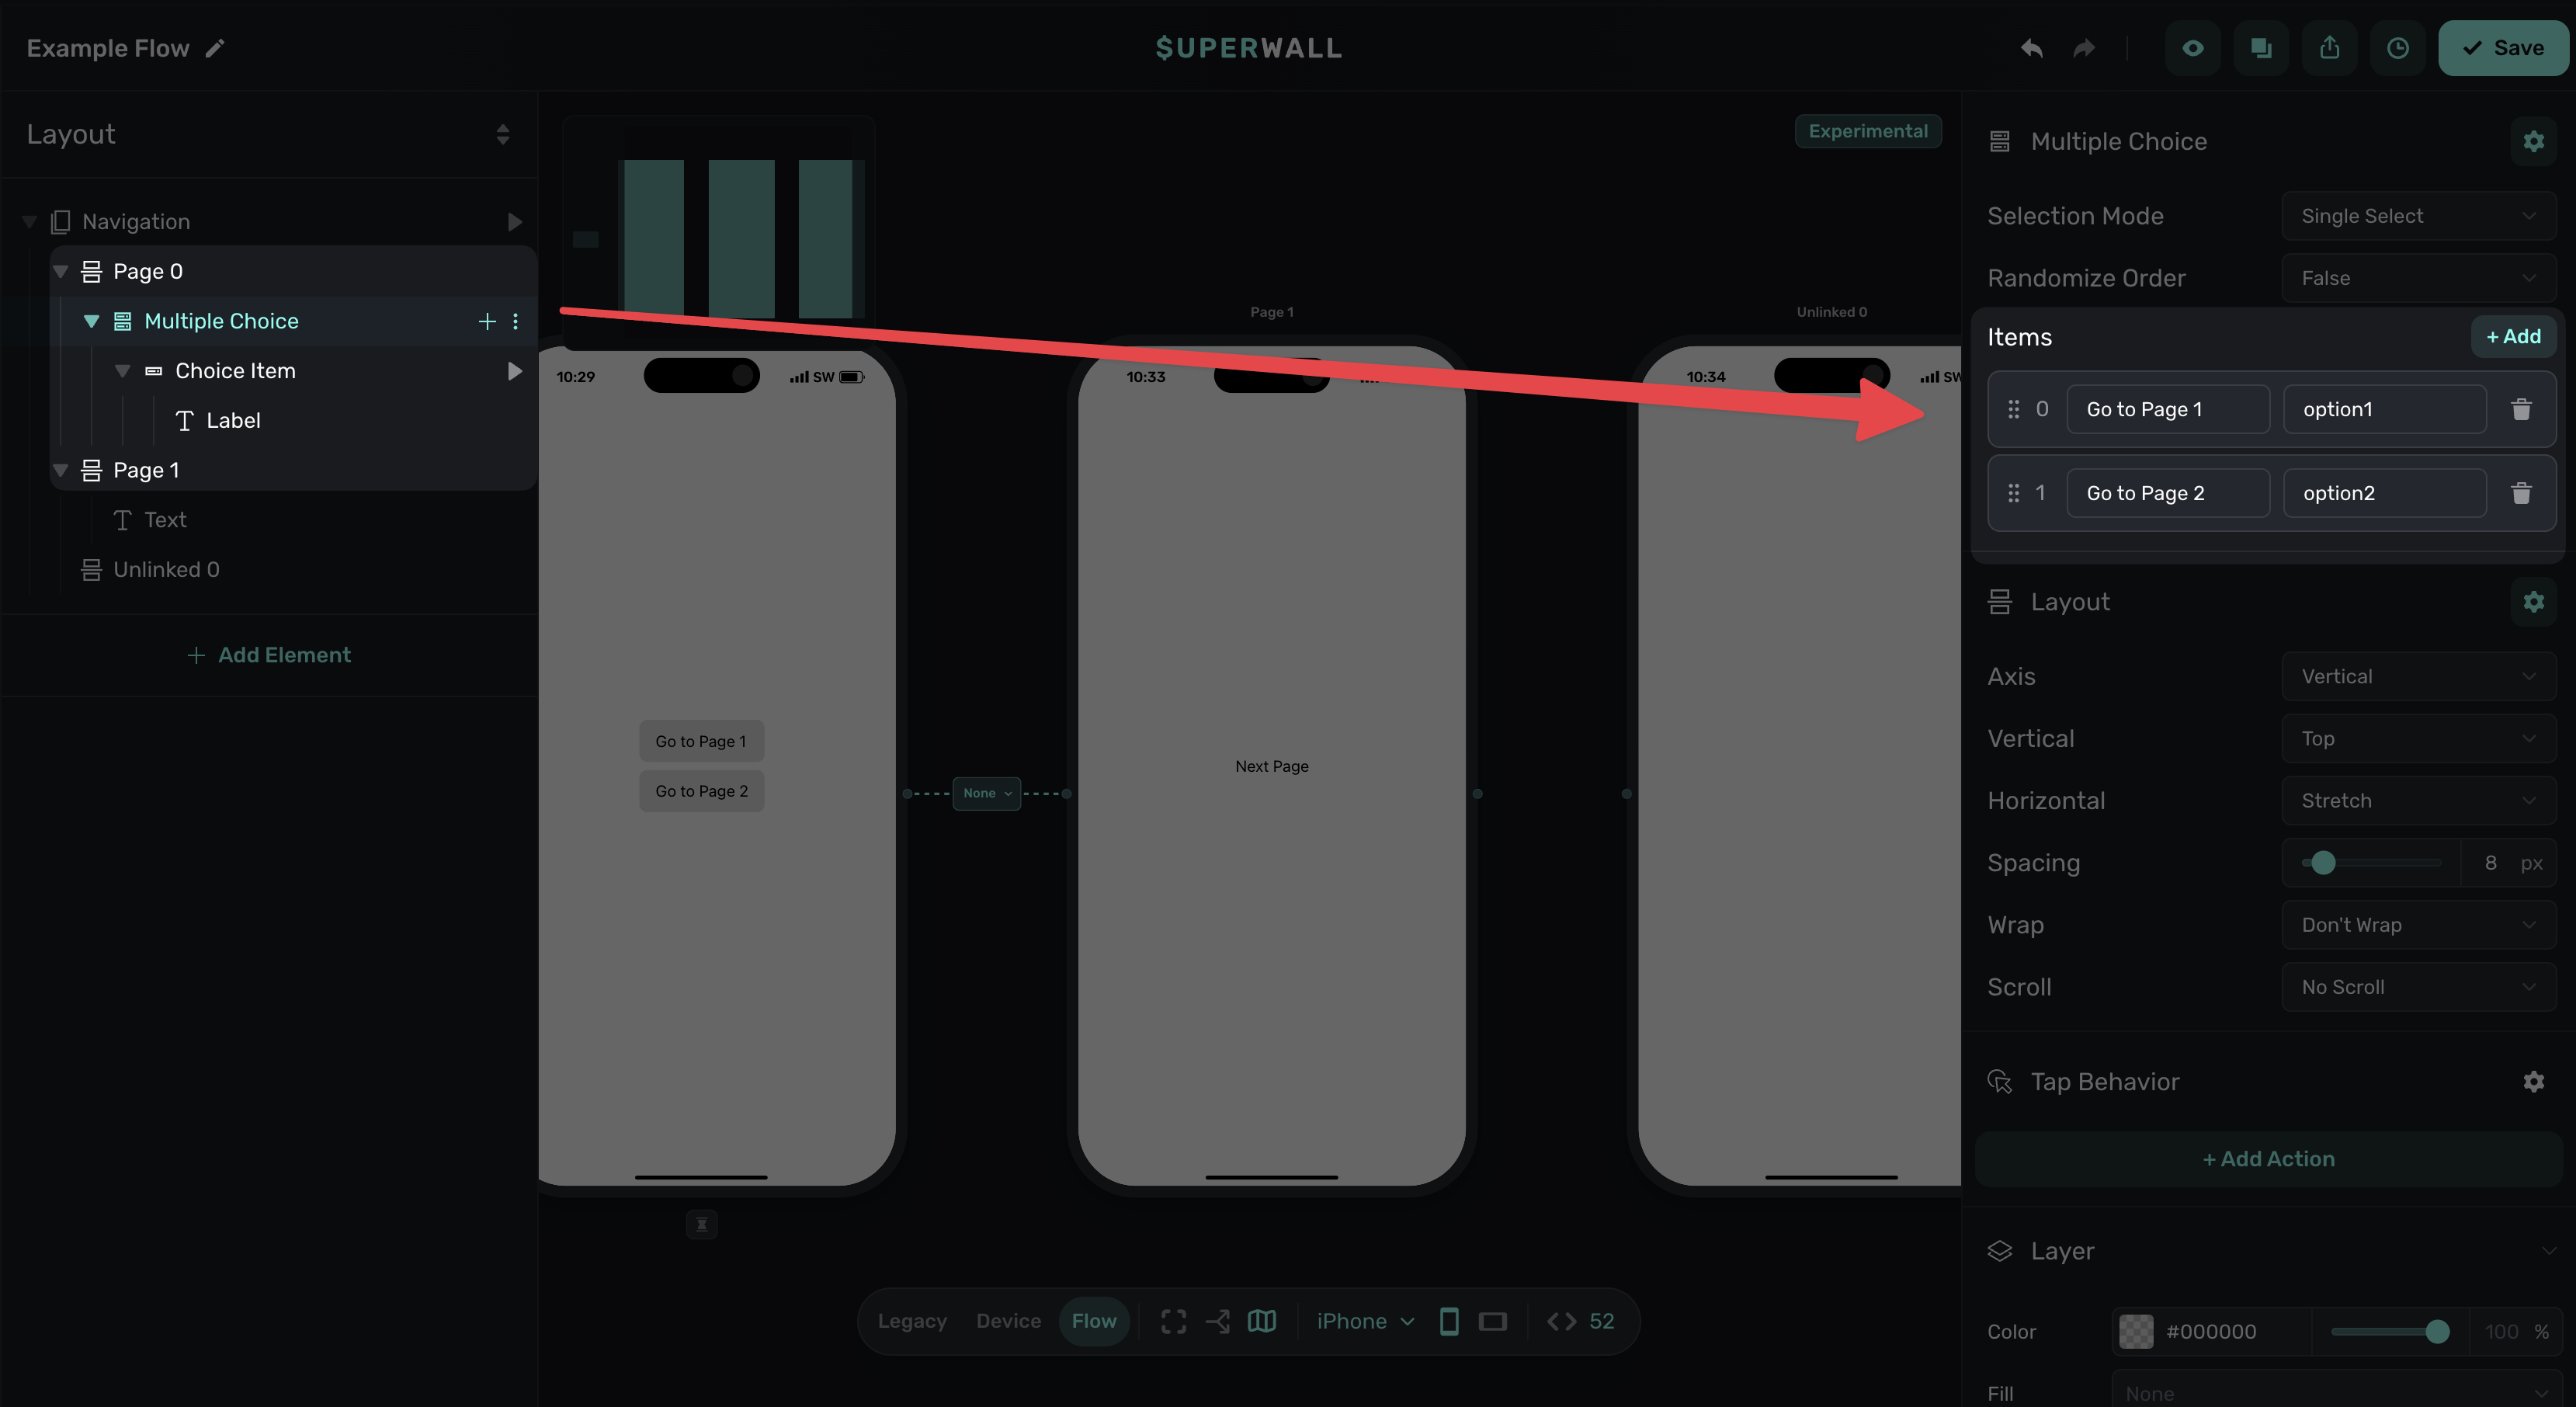
The multiple choice responses will automatically populate in the rule editor too:
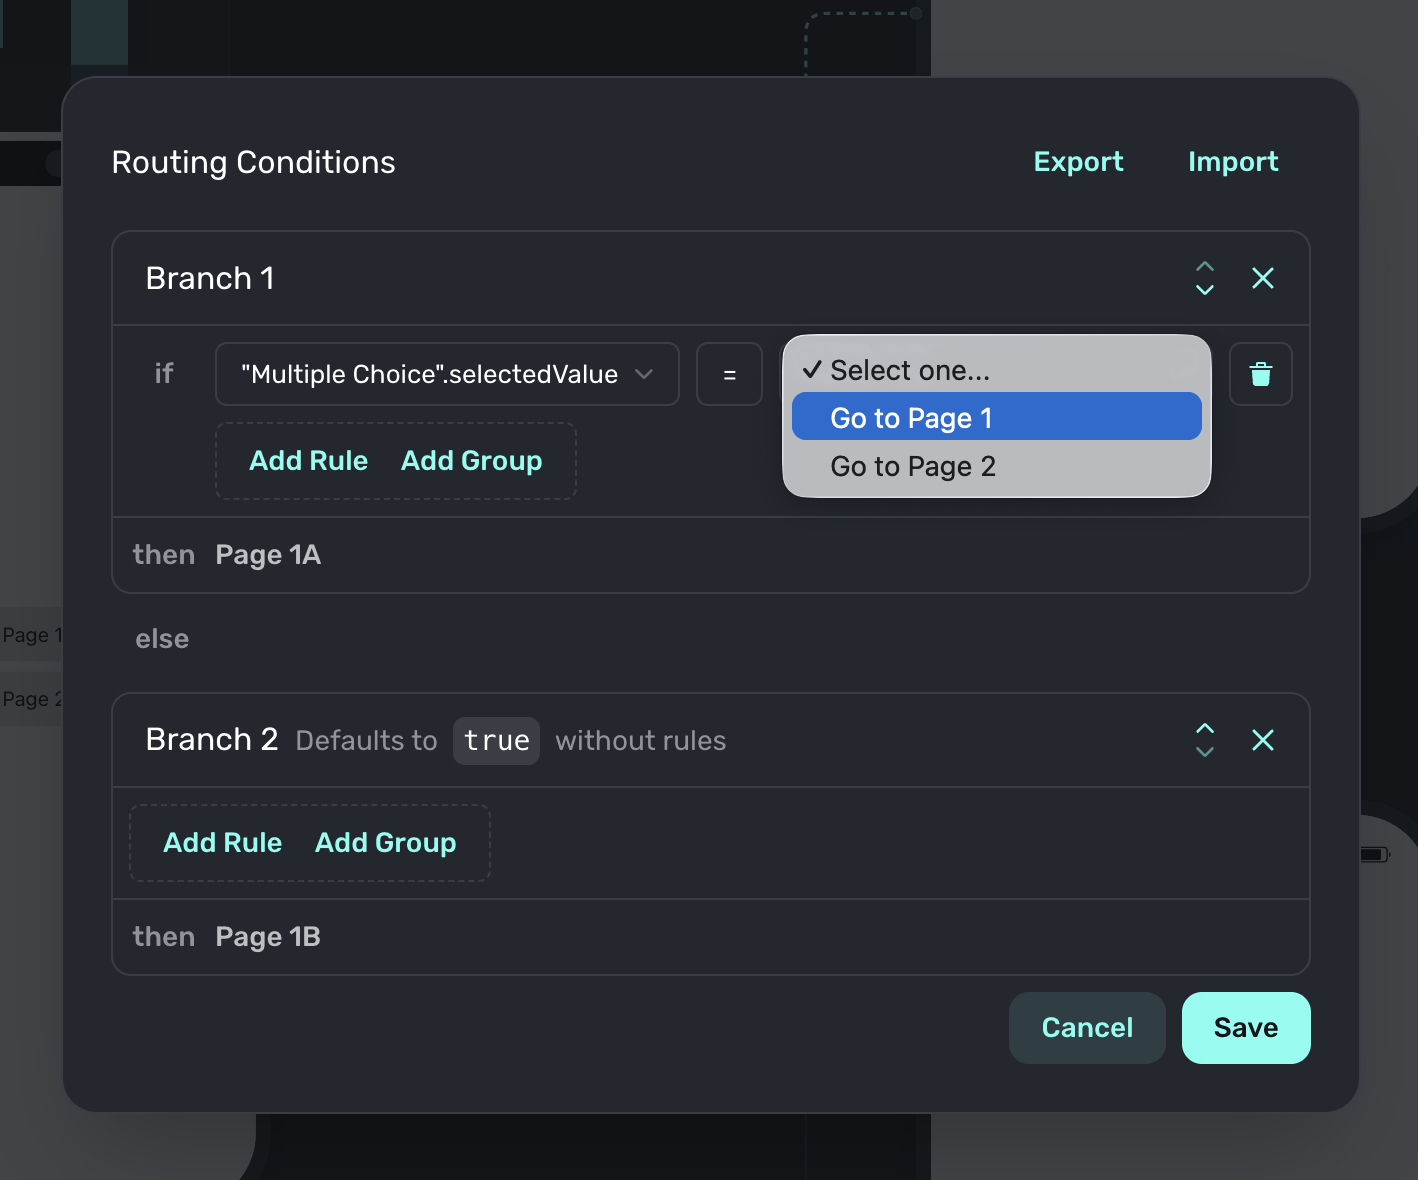
When you are done, click on the save button and your branch will be saved. The canvas will update to reflect the branch:
To edit a branch, simply click on it from within the canvas to bring the rule editor back up.
Connection warnings
The editor validates your flow connections and shows warnings when it detects potential problems. For example, if a page is connected to the next page but no element on the source page has a "Navigate Page" tap behavior, you'll see a warning indicating that the destination page may be unreachable.
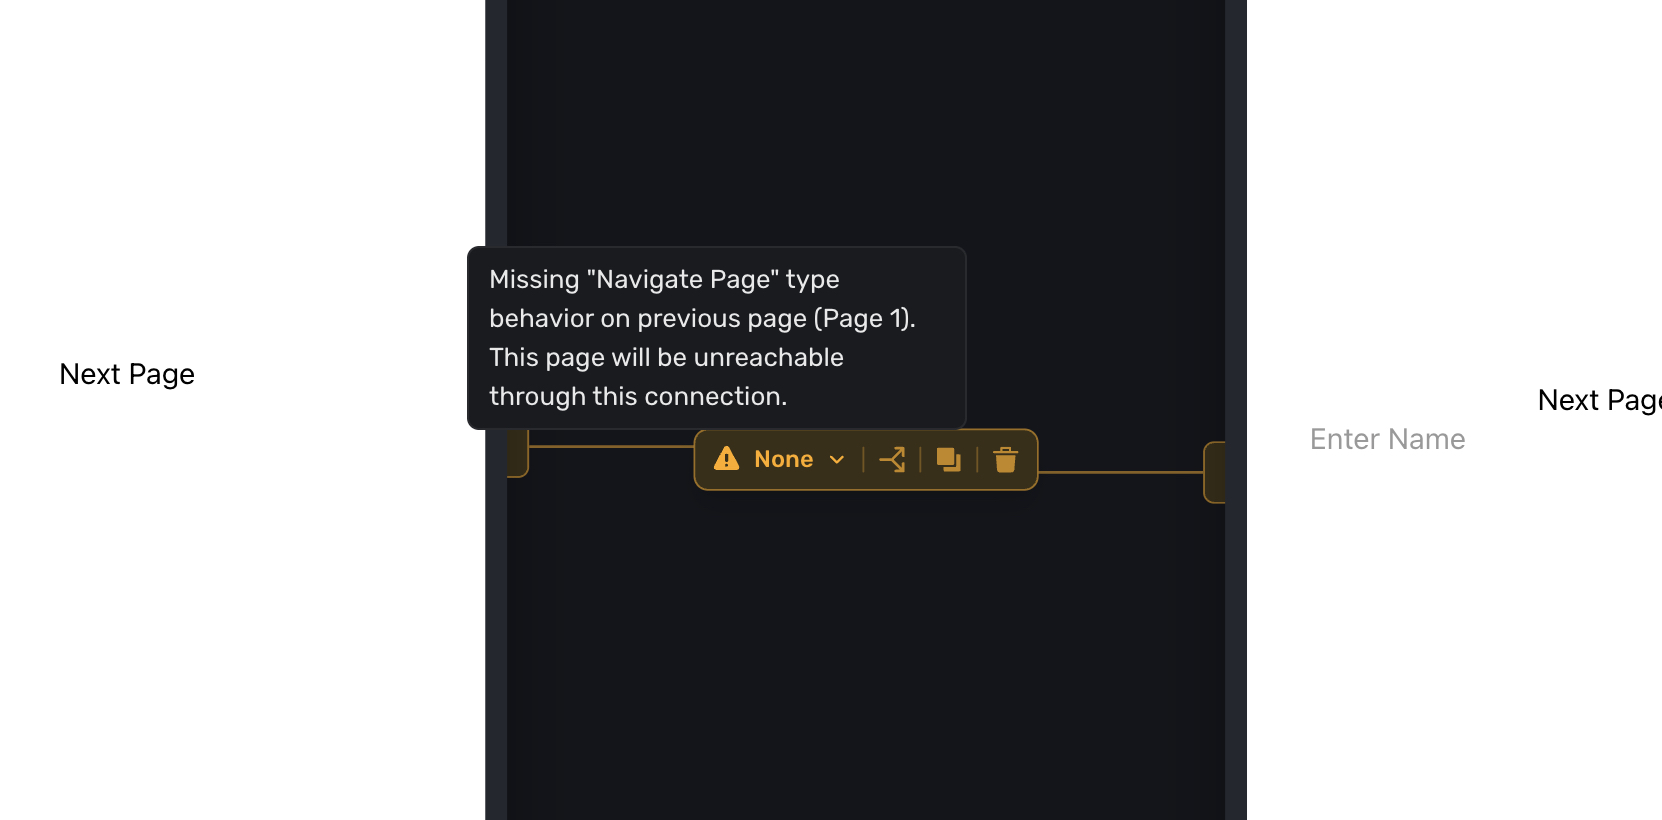
If you see a warning, check that the source page has at least one element with a Navigate Page tap behavior set to Next so users can actually reach the connected page.
Branching by tapped element
Sometimes you want different buttons on the same page to navigate to different destinations without a traditional condition. For example, a footer with "Continue" and "Skip Setup" buttons where each should go to a different page.
To set this up, use navigationNode.tappedElement as the routing condition. This lets you create a route based on which element triggered the "Navigate Page" action:
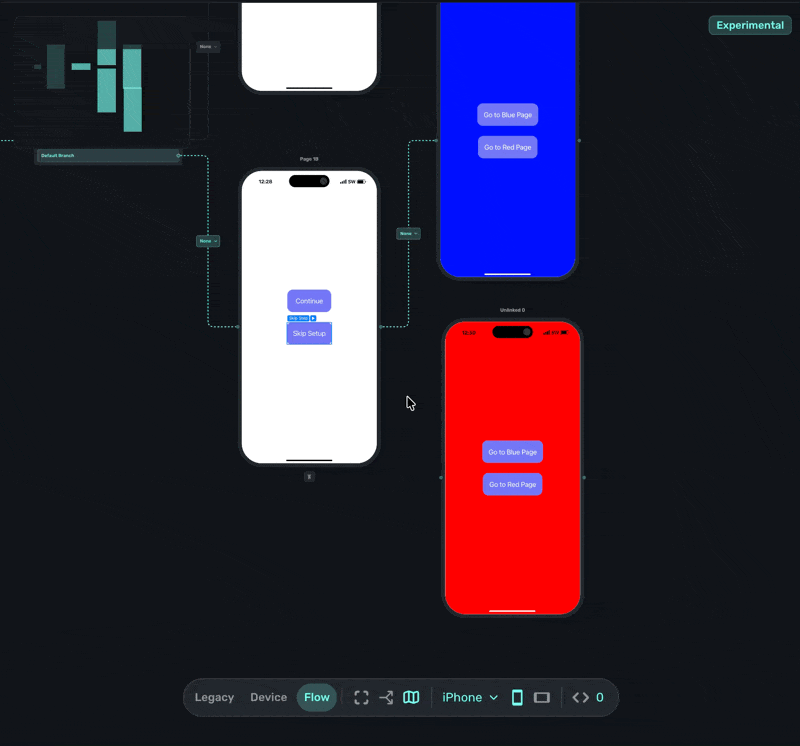
To configure this:
- Create a branch from your page to multiple destinations.
- In the rule editor, select Element as the condition type.
- Choose Navigation.tappedElement from the dropdown.
- Set it equal to the specific element that should trigger this route.
This approach is useful when you have multiple navigation buttons on a single page and each should lead somewhere different. The routing condition checks which button was actually tapped rather than relying on stored user input.
Start simple. Get your basic flow working first, then add branching once you're comfortable with the structure.
How is this guide?