Variables
To add or edit variables, click the Variables button from the sidebar:
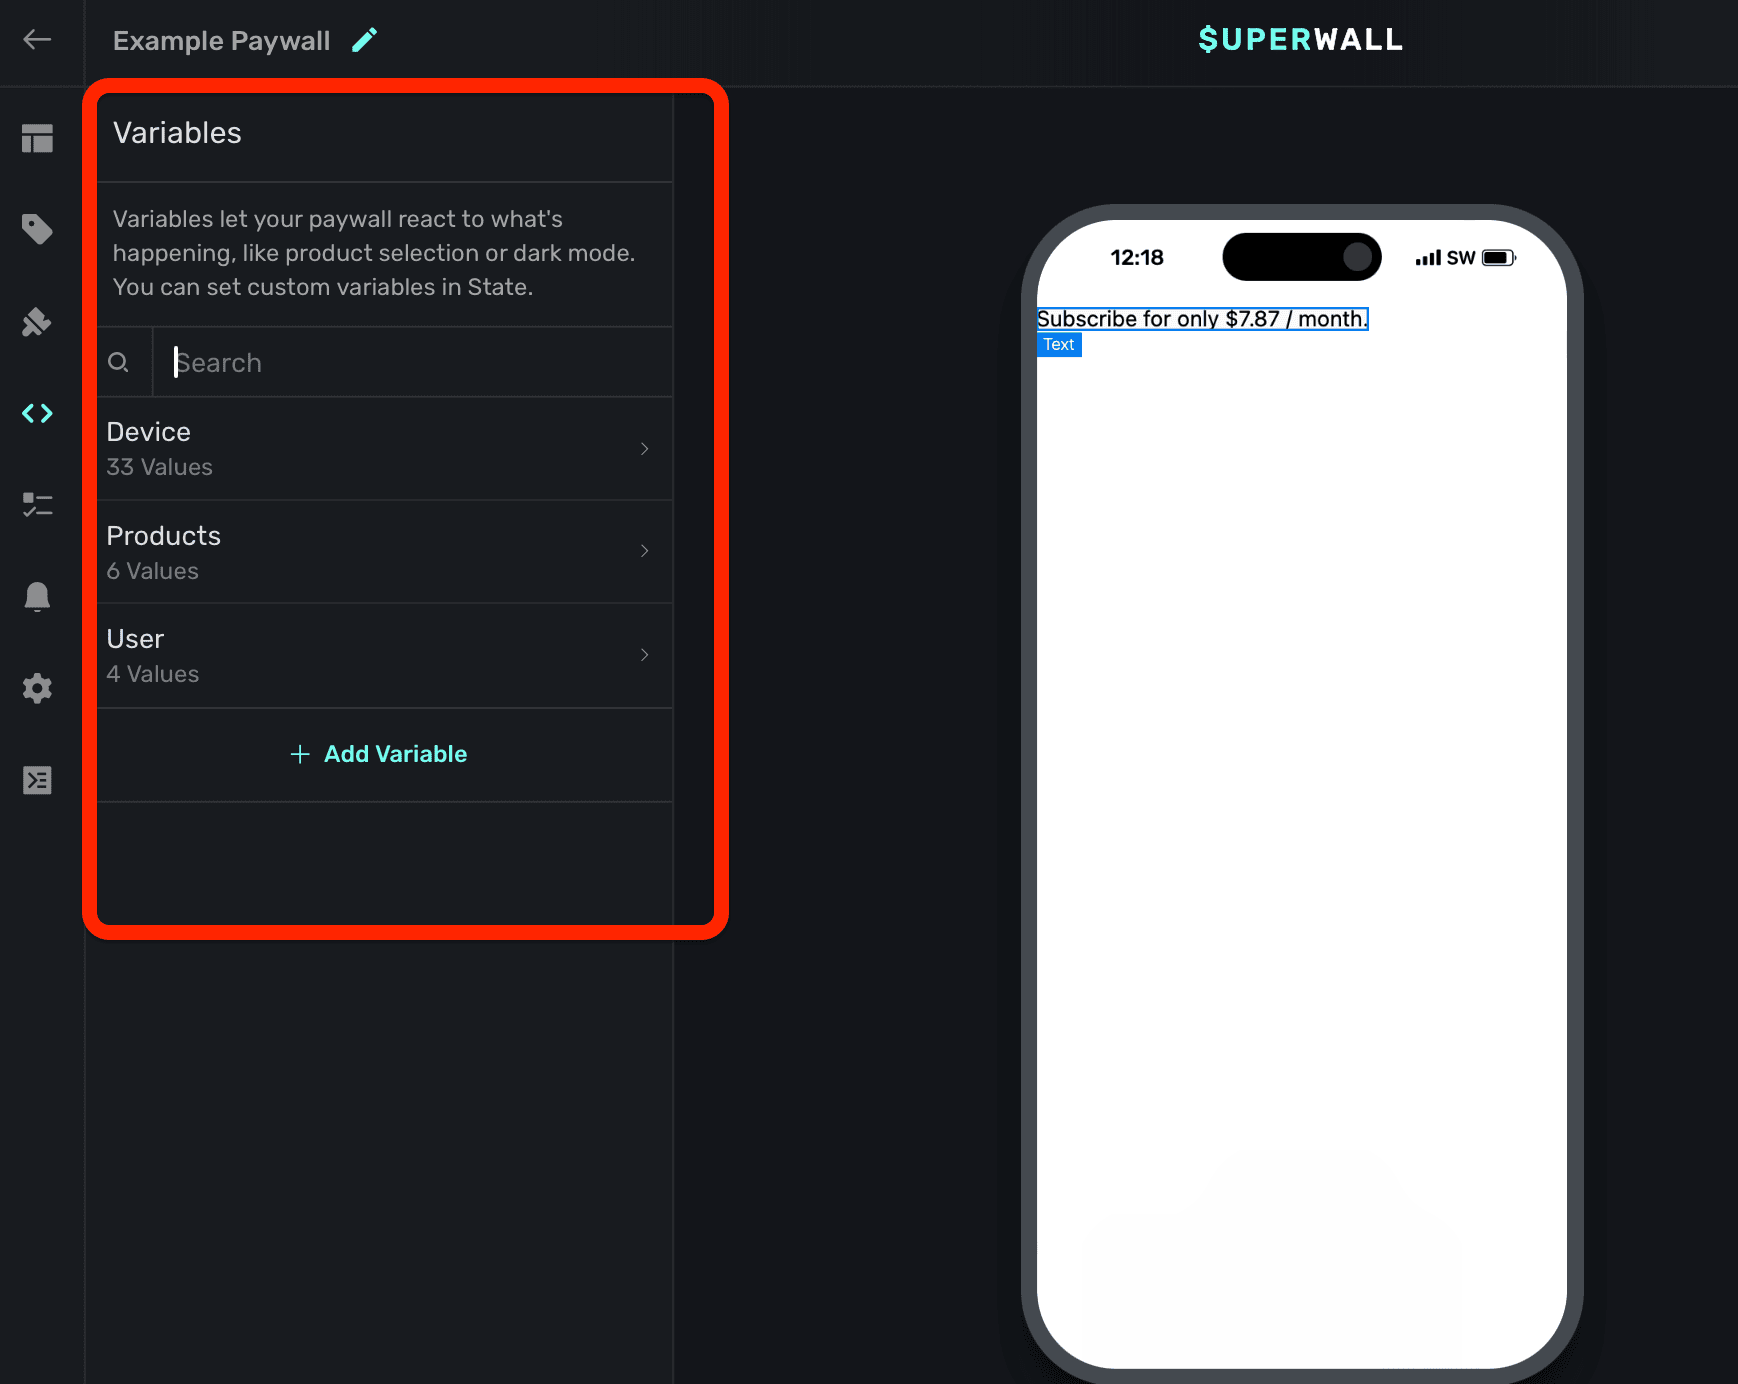
Variables allow you to reuse common values, adapt to the device's characteristics (such as size or color scheme), and do things like dynamically hide or how components. All of these scenarios can be achieved using variables in conjunction with our dynamic values editor:
- Presenting or hiding a bottom sheet of products.
- Changing the padding of several elements based on the device's available width.
- Formatting the price of a product based on different parameters, such as trial availability.
By default, Superwall has three different type of variables for use:
- Device: Relates to the device, the app's install date, bundle ID and more.
- Product: Represents the products added to the paywall, and their properties. In addition, there are variables for the selected product in addition to the primary, secondary or tertiary product.
- User: User-specific values, such as their alias ID.
While those will allow you to cover several cases, you can also add your own custom variables too.
Variables dealing with any product period, such as someProduct.period, someProduct.periodly,
and other similar variables, can localize automatically now. Learn more here.
Using Variables
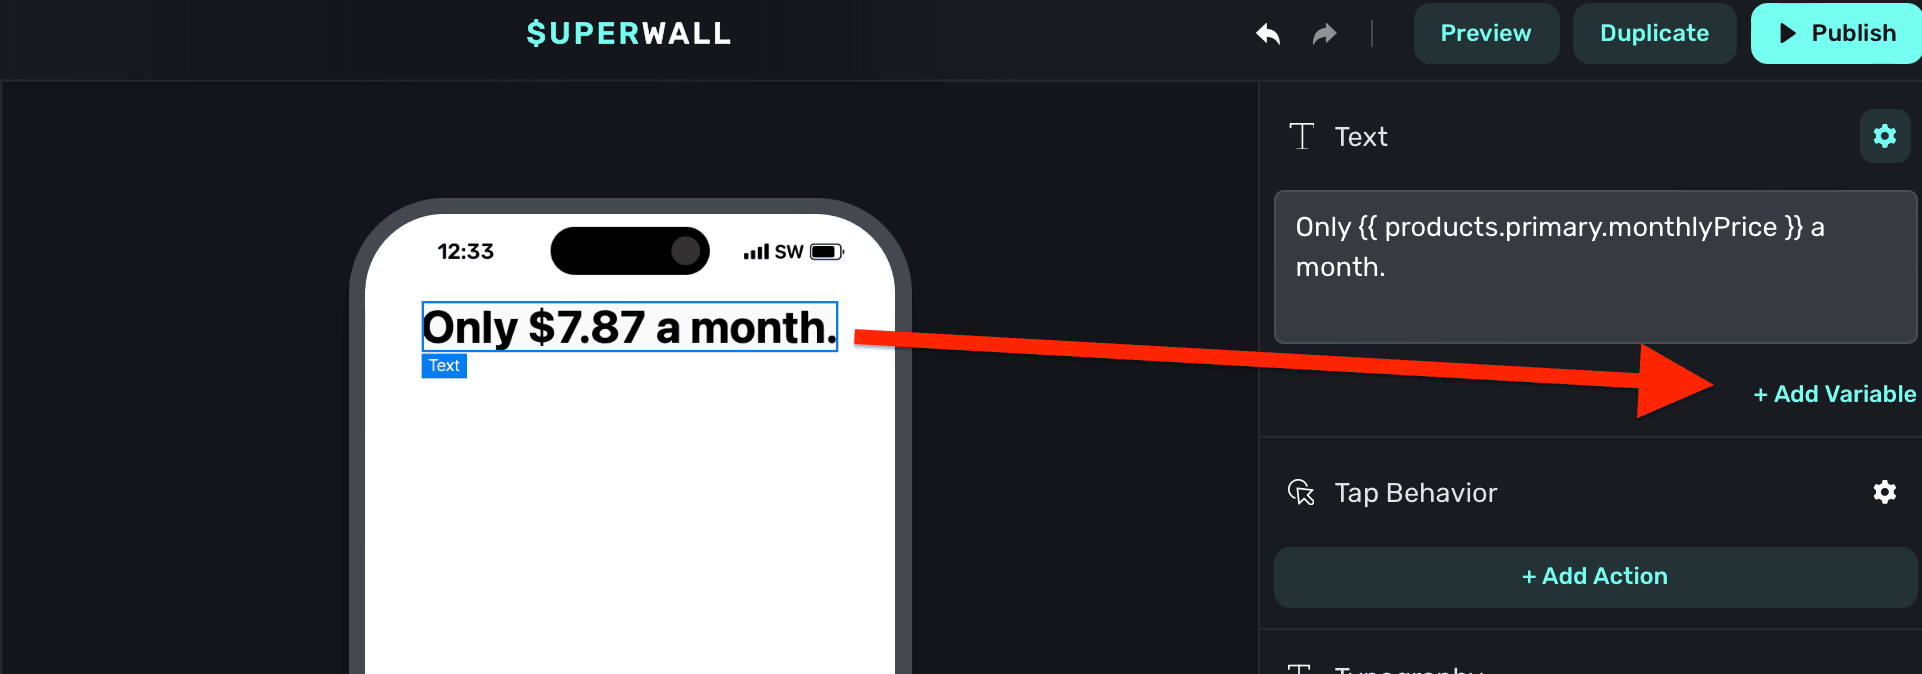
You primarily use variables in the component editor and with dynamic values. When using a variable in text, follow the Liquid syntax to reference one: {{ theVariable }}. For example, to reference a variable in some text, you would:
- Select the text component.
- Under Text -> click "+ Add Variable".
- Then, drill down or search for the variable or its corresponding property.
- Click on it, and it'll be added to your text and correctly formatted.
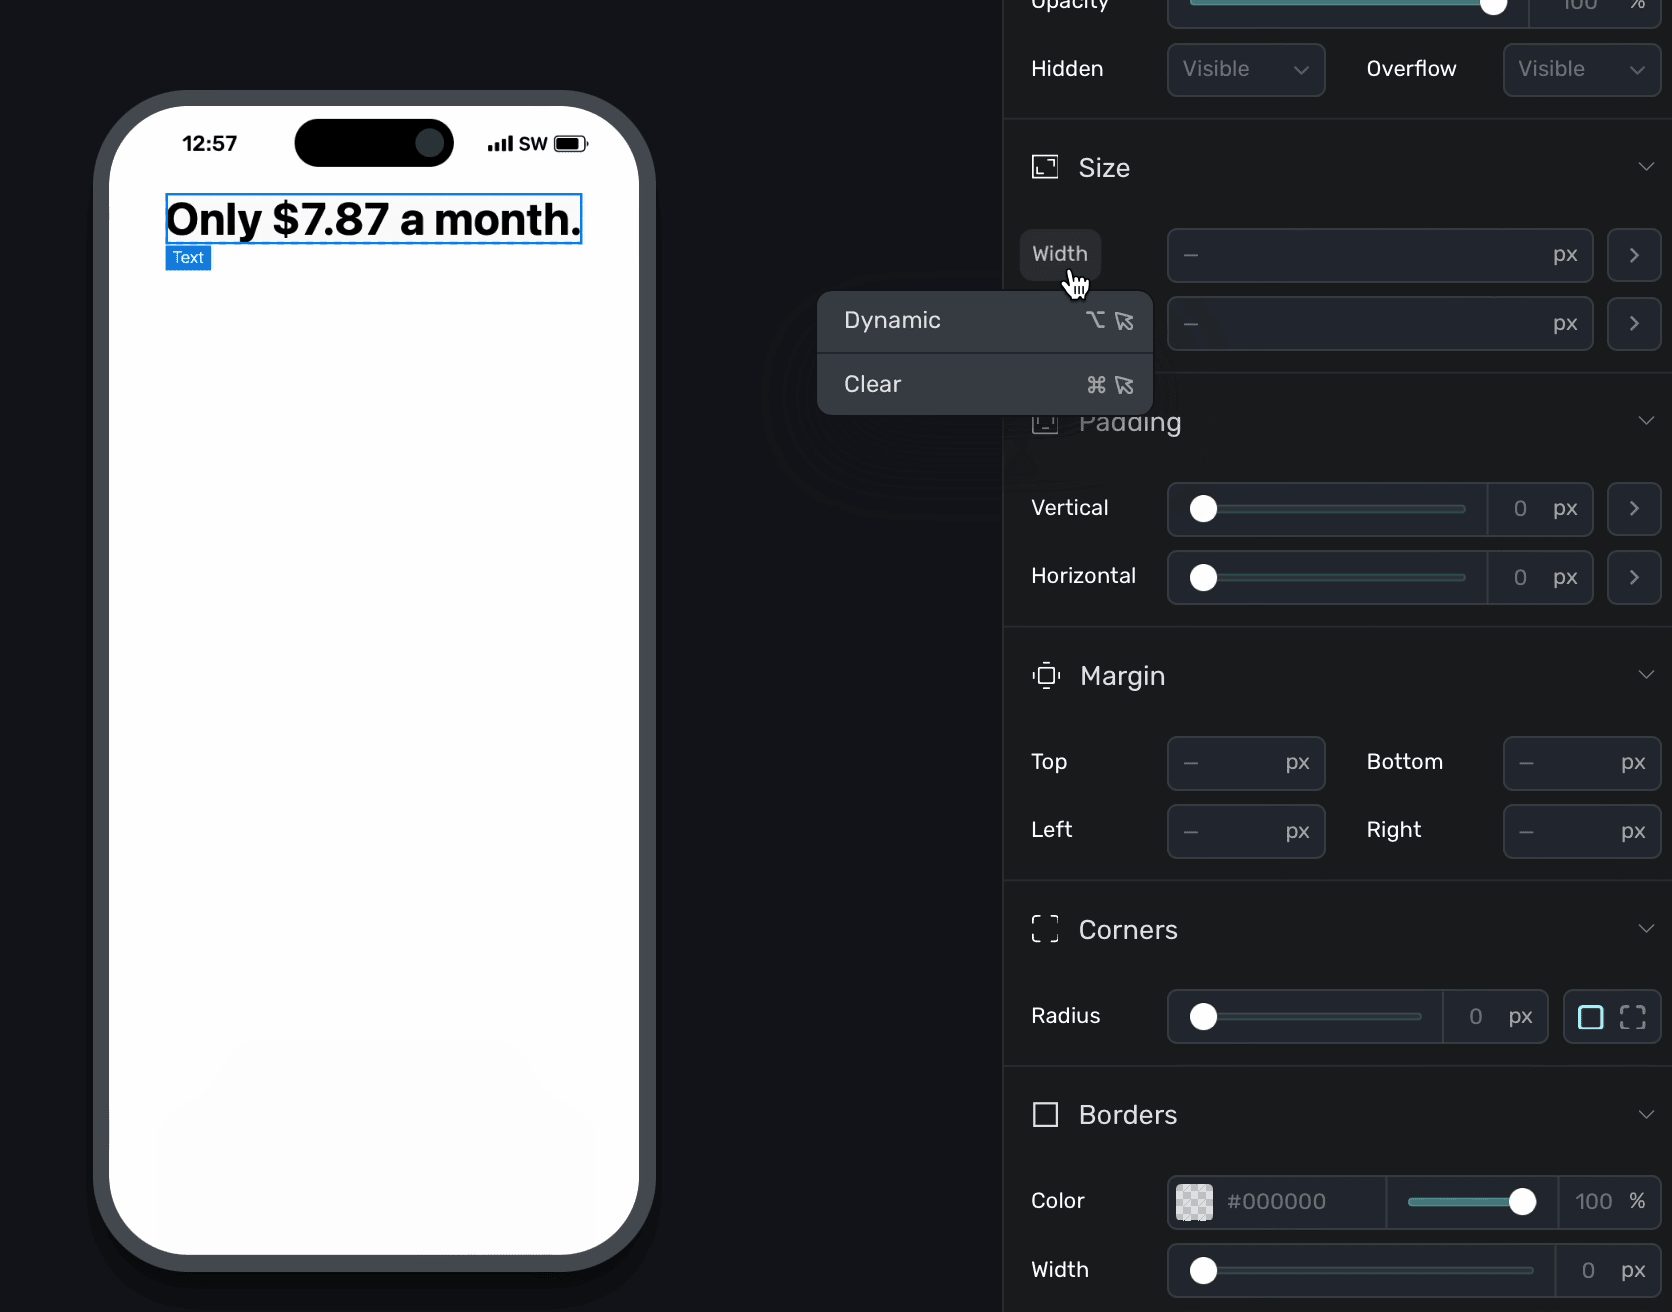
To use a variable with a component property, click on the property and choose Dynamic:
The dynamic values editor will appear. Next to then:, choose your variable and click Save:
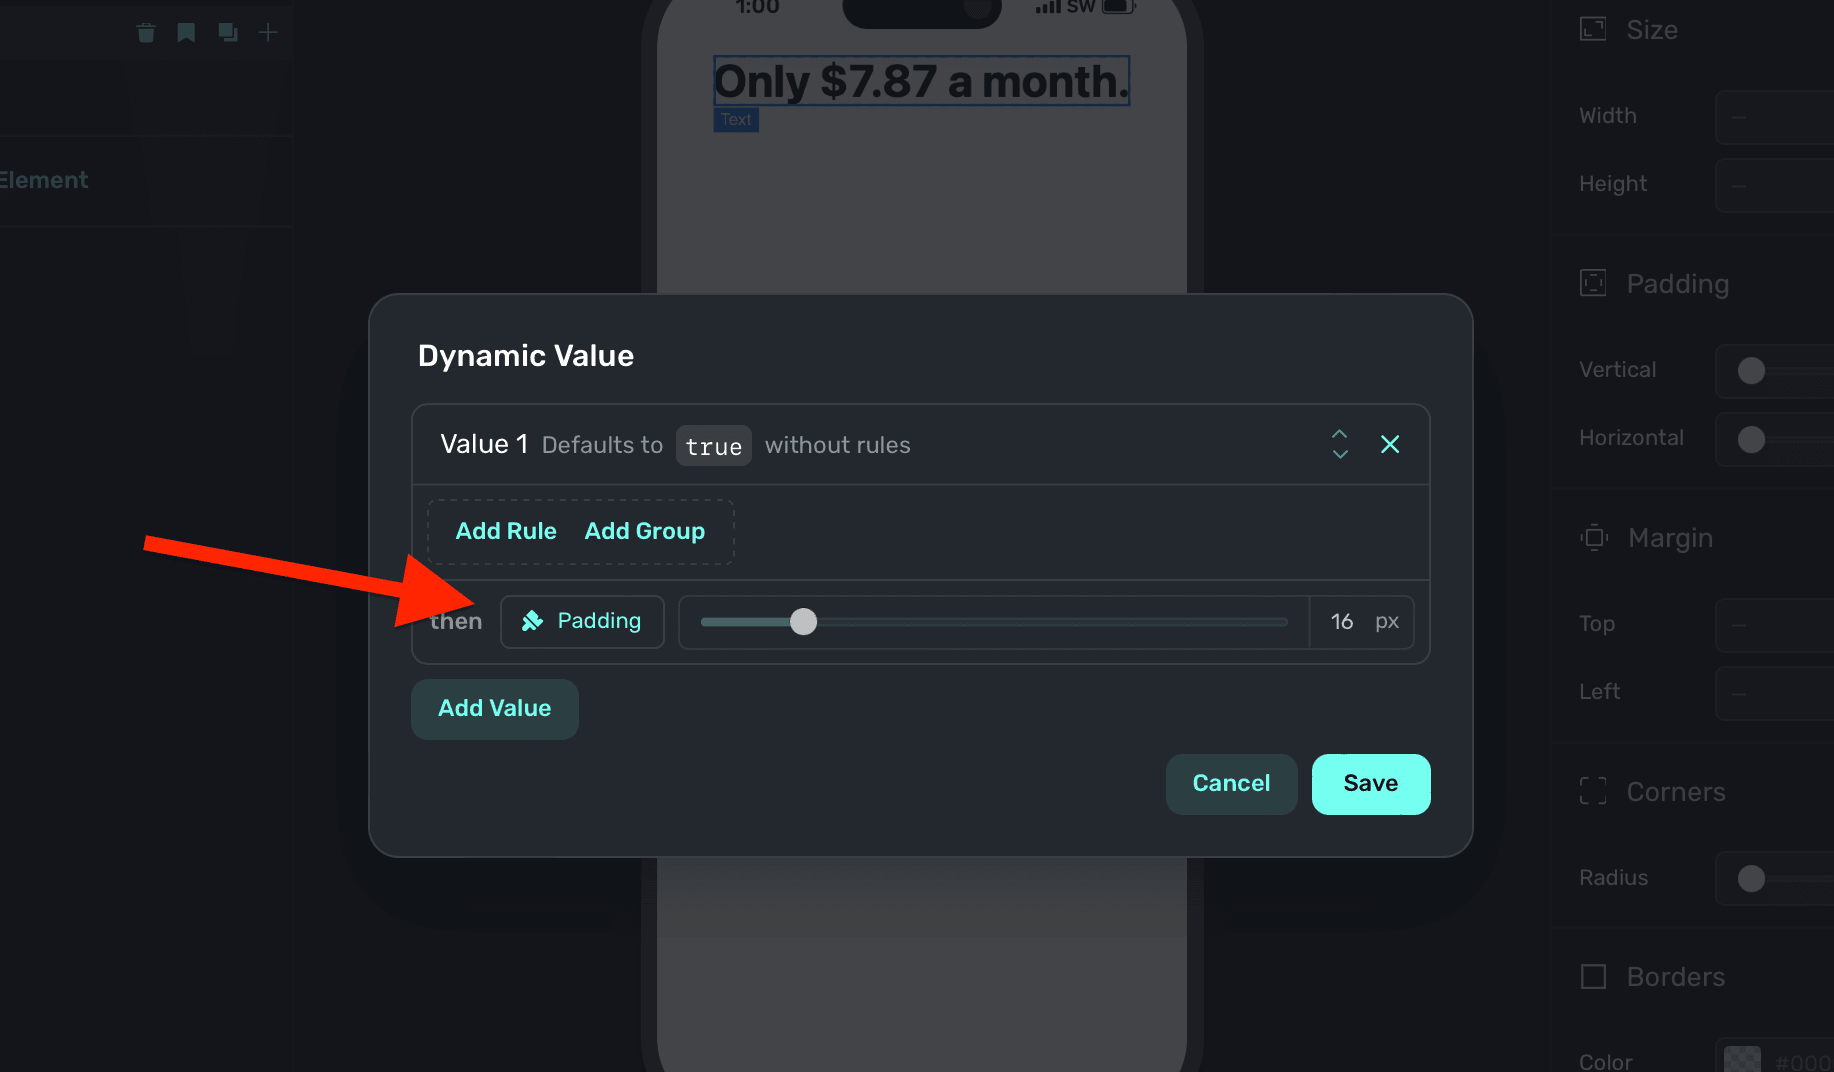
Above, the "padding" variable was used. You can ignore the if/then rules above if you simply want to apply a variable, but to dynamically enable or disable them — you can set conditions accordingly. Read the docs over dynamic values to learn more.
You can also hover a property and hold down the Option/Alt key to bring up the dynamic values editor.
Clearing variables
To remove a variable that's in use, click the property or gear icon (which will be purple when a variable is being used) and selected Clear.
Stock variable documentation
Below are all of the stock variables and their types. You don't have to memorize any of these — when the variable picker shows, each of the correct liquid syntax appears above every variable, and it be will auto-inserted for you when selected.
| Property | Type | Example |
|---|---|---|
| App Install Date | Text | 2024-04-11 02:40.918000 |
| App User Id | Text | $SuperwallAlias |
| App Version | Text | 1.0.2 |
| Bundle Id | Text | com.yourOrg.yourApp |
| Days Since Install | Number | 0 |
| Days Since Last Paywall View | Number | |
| Device Currency Code | Text | AED |
| Device Currency Symbol | Text | AED |
| Device Language Code | Text | en |
| Device Locale | Text | en_AE |
| Device Model | Text | iPhone14 |
| Interface Style | Text | light |
| Interface Type | Text | iphone, ipad, mac. Returns "mac" for Mac Catalyst, "ipad" for iPad apps on mac. |
| Is Low Power Mode Enabled | Number | 0 |
| Is Mac | Number | 0 |
| Local Date | Text | 2024-05-02 |
| Local Date Time | Text | 2024-05-02T21:31 |
| Local Time | Text | 21:31 |
| Minutes Since Install | Number | 7 |
| Minutes Since Last Paywall View | Number | 1 |
| Orientation | String | "landscape" or "portrait" |
| Os Version | Text | 17.4.1 |
| Platform | Text | iOS |
| Public Api Key | Text | pk_ccdfsriotuwiou23435 |
| Radio Type | Text | WiFi |
| Total Paywall Views | Number | 10 |
| Utc Date | Text | 2024-05-02 |
| Utc Date Time | Text | 2024-05-02T17:31 |
| Utc Time | Text | 17:31 |
| Vendor Id | Text | CC93GCD-ESB6-4DFF-A165-0963D0257221 |
| View Port Breakpoint | Text | X-Small/Small/Medium/Large/Extra Large/ Extra extra large |
| View Port Width | Number | 844 |
| View Port Height | Number | 390 |
Reference any of the variables above by using the device variable. For example, if you were creating a filter or dynamic value based off whether or not the device was a Mac, you'd write {{ device.isMac }}.
| Property | Type | Example |
|---|---|---|
| Currency Code | Text | USD |
| Currency Symbol | Text | $ |
| Daily Price | Text | $0.26 |
| Identifier | Text | efc.1m799.3dt |
| Lanauge Code | Text | en |
| Locale | Text | en_US@currency=USD |
| Localized Period | Text | 1m |
| Monthly Price | Text | $10.00 |
| Period | Text | month |
| Period Alt | Text | 1m |
| Period Days | Text | 30 |
| Period Months | Text | 1 |
| Period Weeks | Text | 4 |
| Period Years | Text | 0 |
| Periodly | Text | monthly |
| Price | Text | $7.99 |
| Raw Price | Text | 7.99 |
| Raw Trial Period Price | Text | 0 |
| Trial Period Daily Price | Text | $0.00 |
| Trial Period Days | Text | 0 |
| Trial Period End Date | Text | May 2, 2024 |
| Trial Period Monthly Price | Text | $0.00 |
| Trial Period Months | Text | 0 |
| Trial Period Price | Text | $0.00 |
| Trial Period Text | Text | 7-days |
| Trial Period Weekly Price | Text | $1.00 |
| Trial Period Weeks | Text | 1 |
| Trial Period Yearly Price | Text | $0.00 |
| Trial Period Years | Text | 0 |
| Weekly Price | Text | $1.83 |
| Yearly Price | Text | $100.00 |
The values above apply to any referenced product. There is the notion of a primary, secondary, tertiary and selected product. Whichever you use, you can use any of the above variables with it.
For example, to reference the price of the selected product (i.e. one the user has clicked or tapped on within the paywall) — you could write The selected product cost {{ products.selected.price }}.
There are also two more stock variables which deal with products, but aren't a part of a single product variable itself. They are referenced via the products variable:
| Property | Type | Example |
|---|---|---|
| Has Introductory Offer | Bool | True/False |
| Selected Index | Number | 0 |
Use products.hasIntroductoryOffer to detect whether or not a user has a trial available. Further, products.selectedIndex represents the index of a selected products (i.e. primary would equal 0).
| Property | Type | Example |
|---|---|---|
| Alias Id | Text | $SuperwallAlias |
| Application Installed At Id | Text | 2024-04-15T04:59.163Z |
| Event Name | Text | custom_value |
| Seed | Number | 0 |
Use any variable above by referencing the user variable first: {{ user.seed }}.
Custom Variables
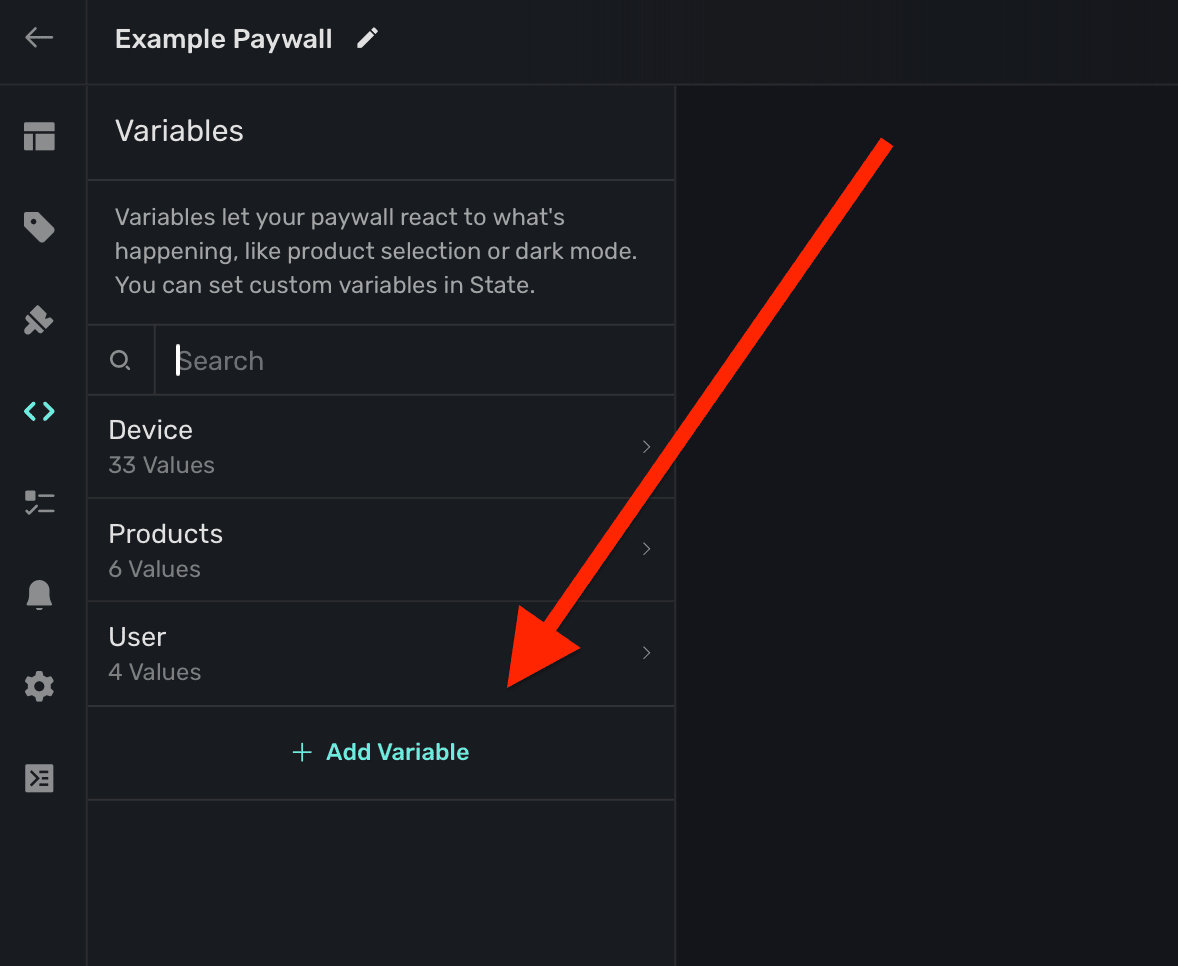
To create your own variable, click + Add Variable in the sidebar under the Variables section:
The variable editor will be presented:
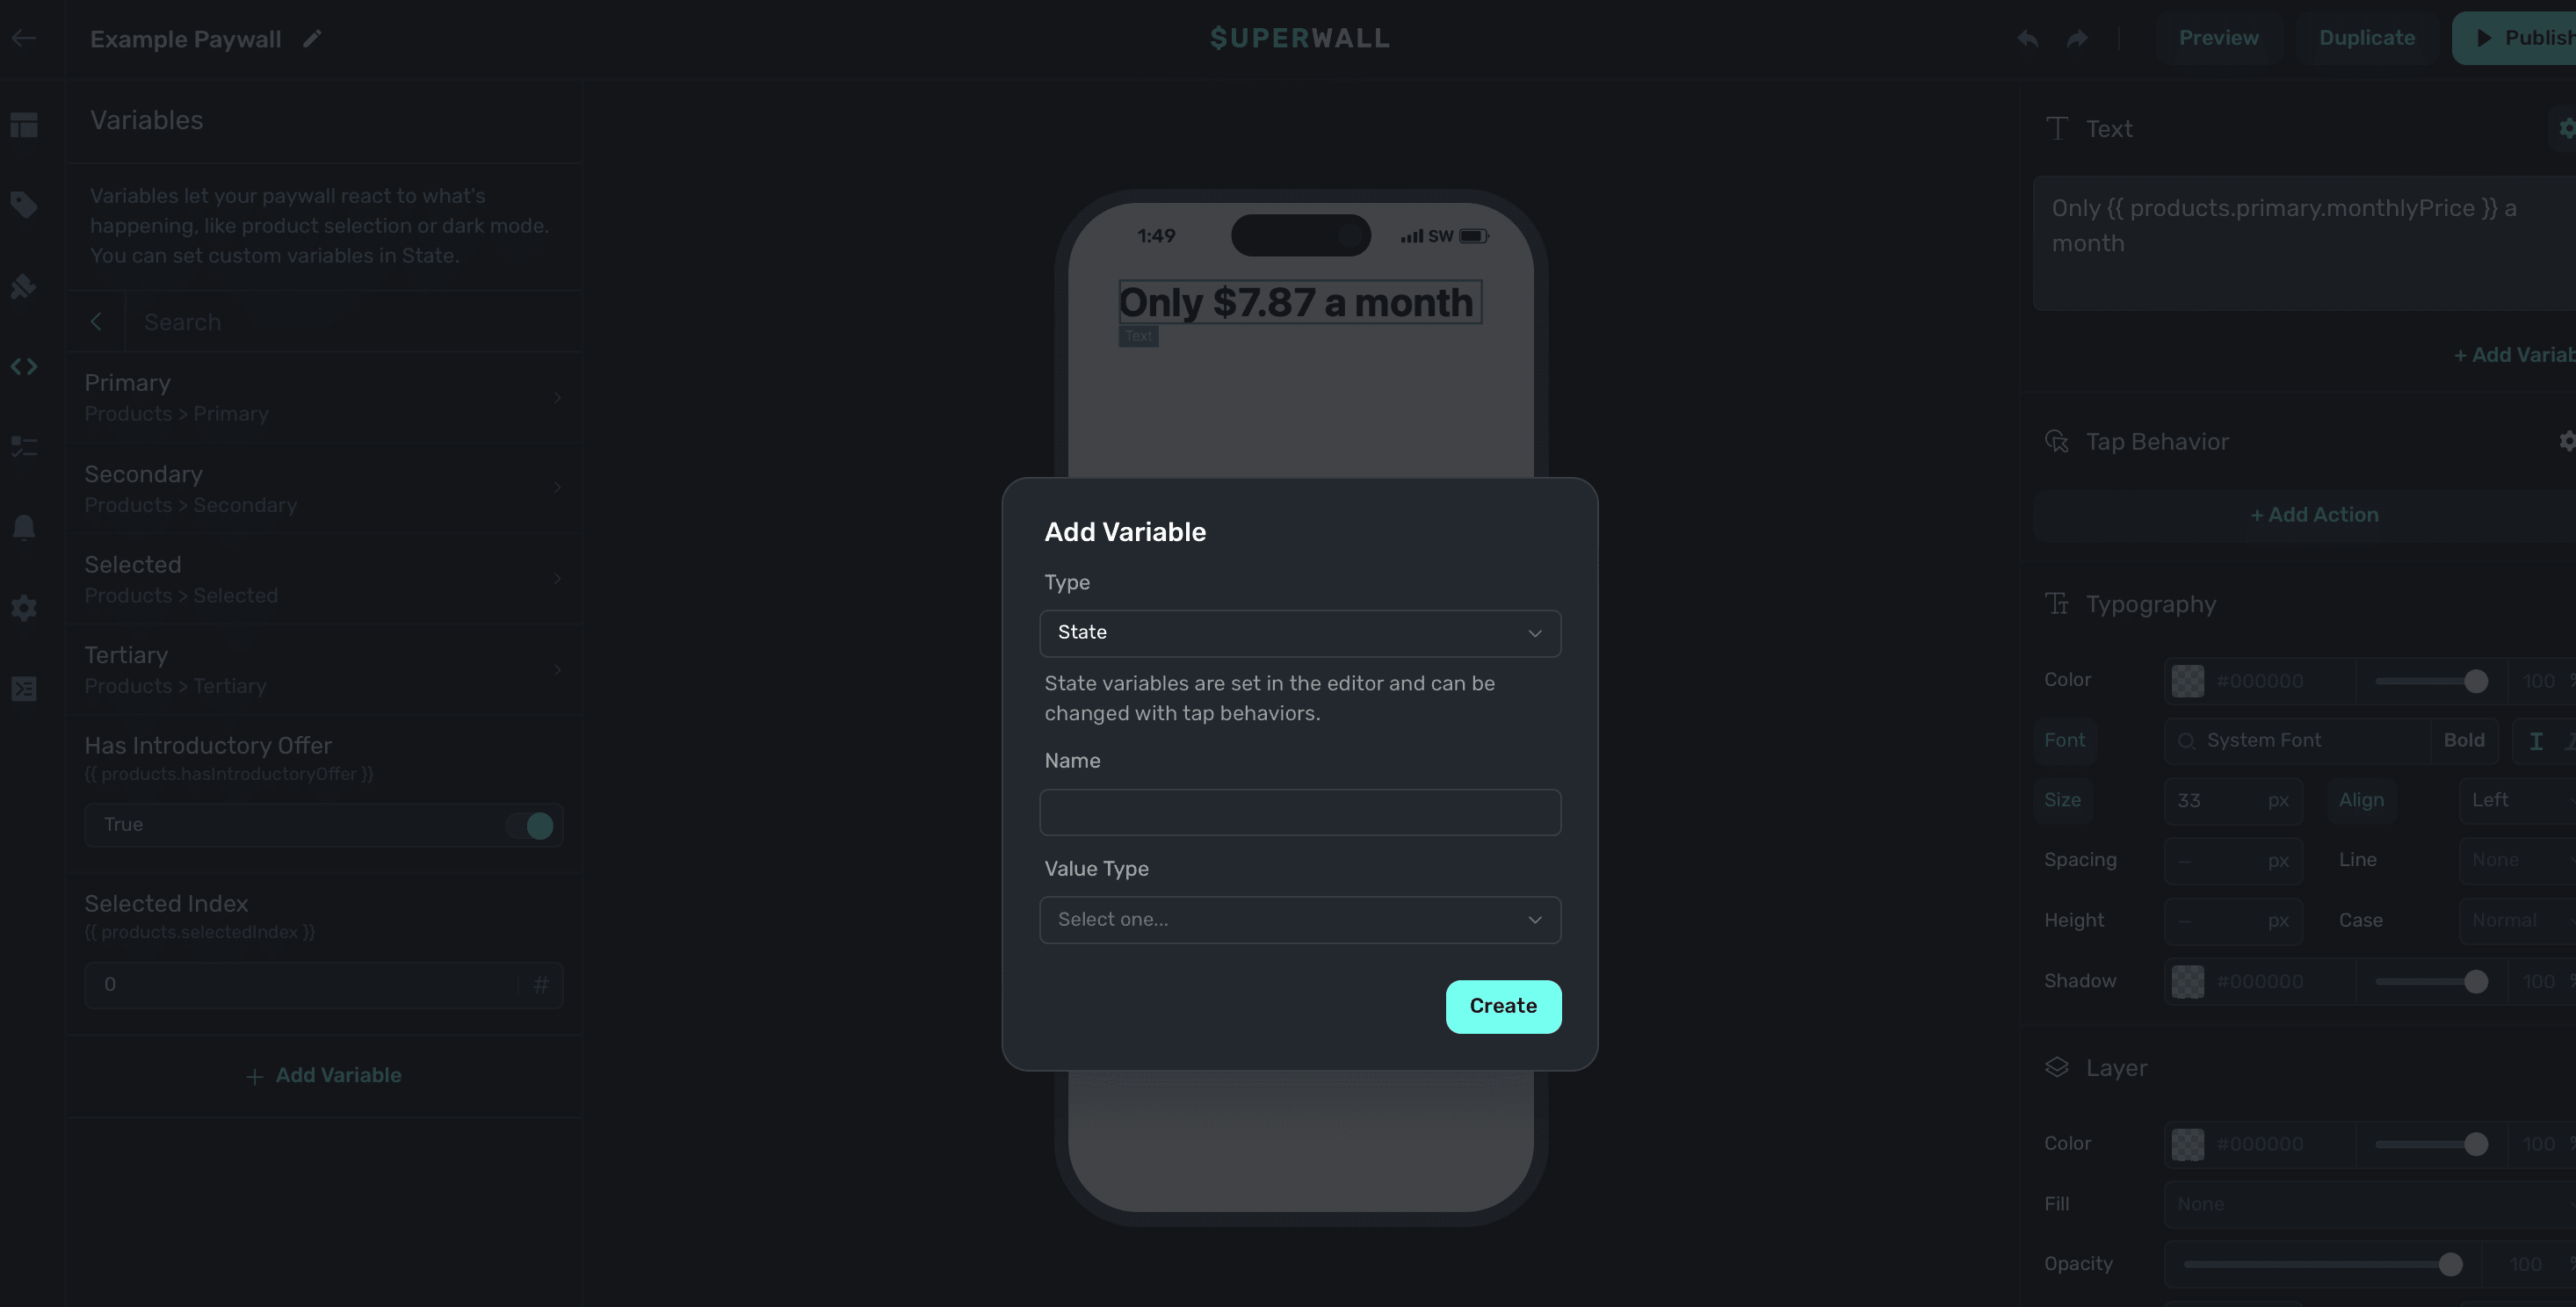
You'll be presented with four fields to fill out:
- Type: The type of variable to create. Choose State if you'd like the variable to be mutated by tap behaviors. Parameter variables are similar, but initial values can be passed in from your app.
- Name: How you will reference the variable. Any name will autocorrect to camel case, i.e. "Cool Variable" will be
coolVariable. - Value Type: The variable type. Choose from
text,number, orboolean. - Initial Value: The initial value of the variable. This only displays once a variable type has been chosen.
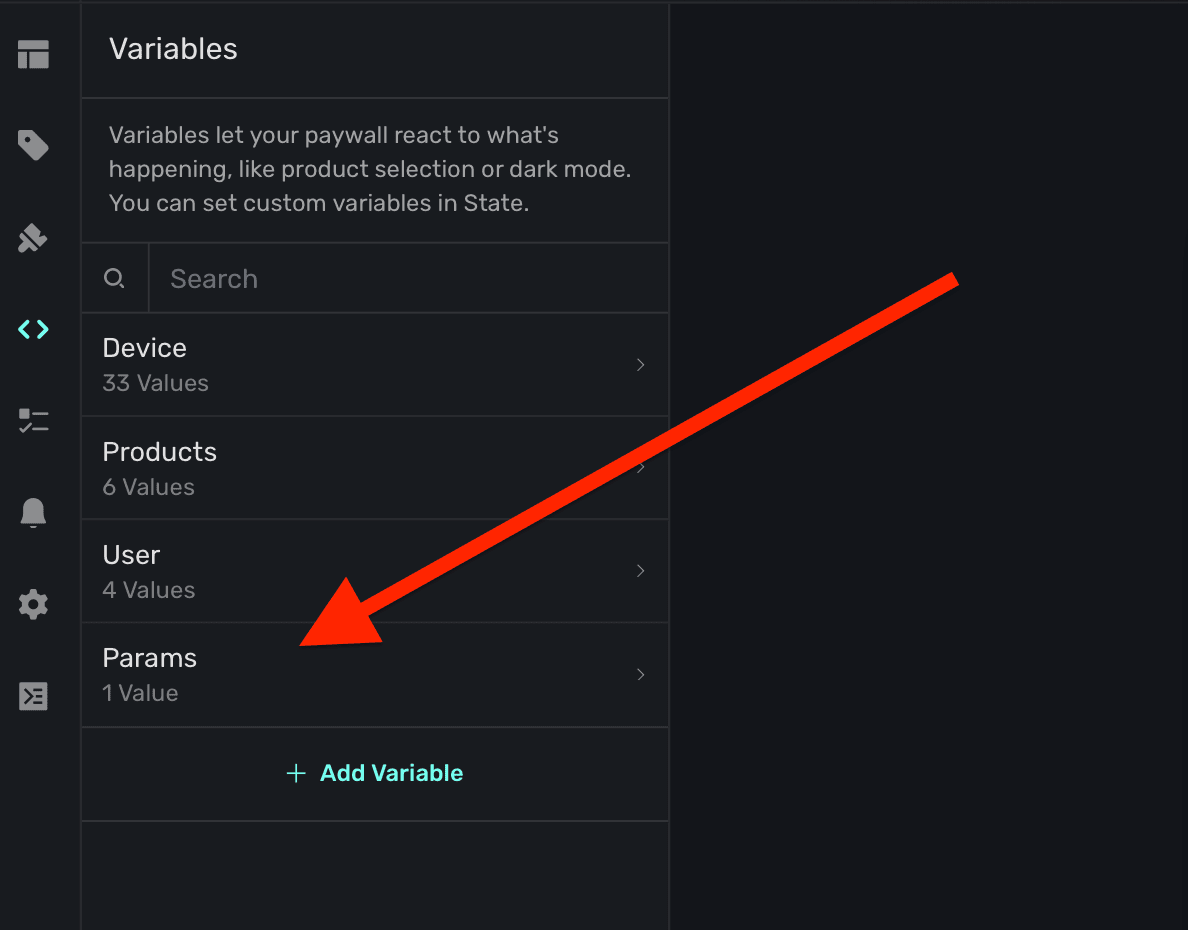
Once you have everything entered, click Save. Your variable will show up in a section in the sidebar under Variables called Params:
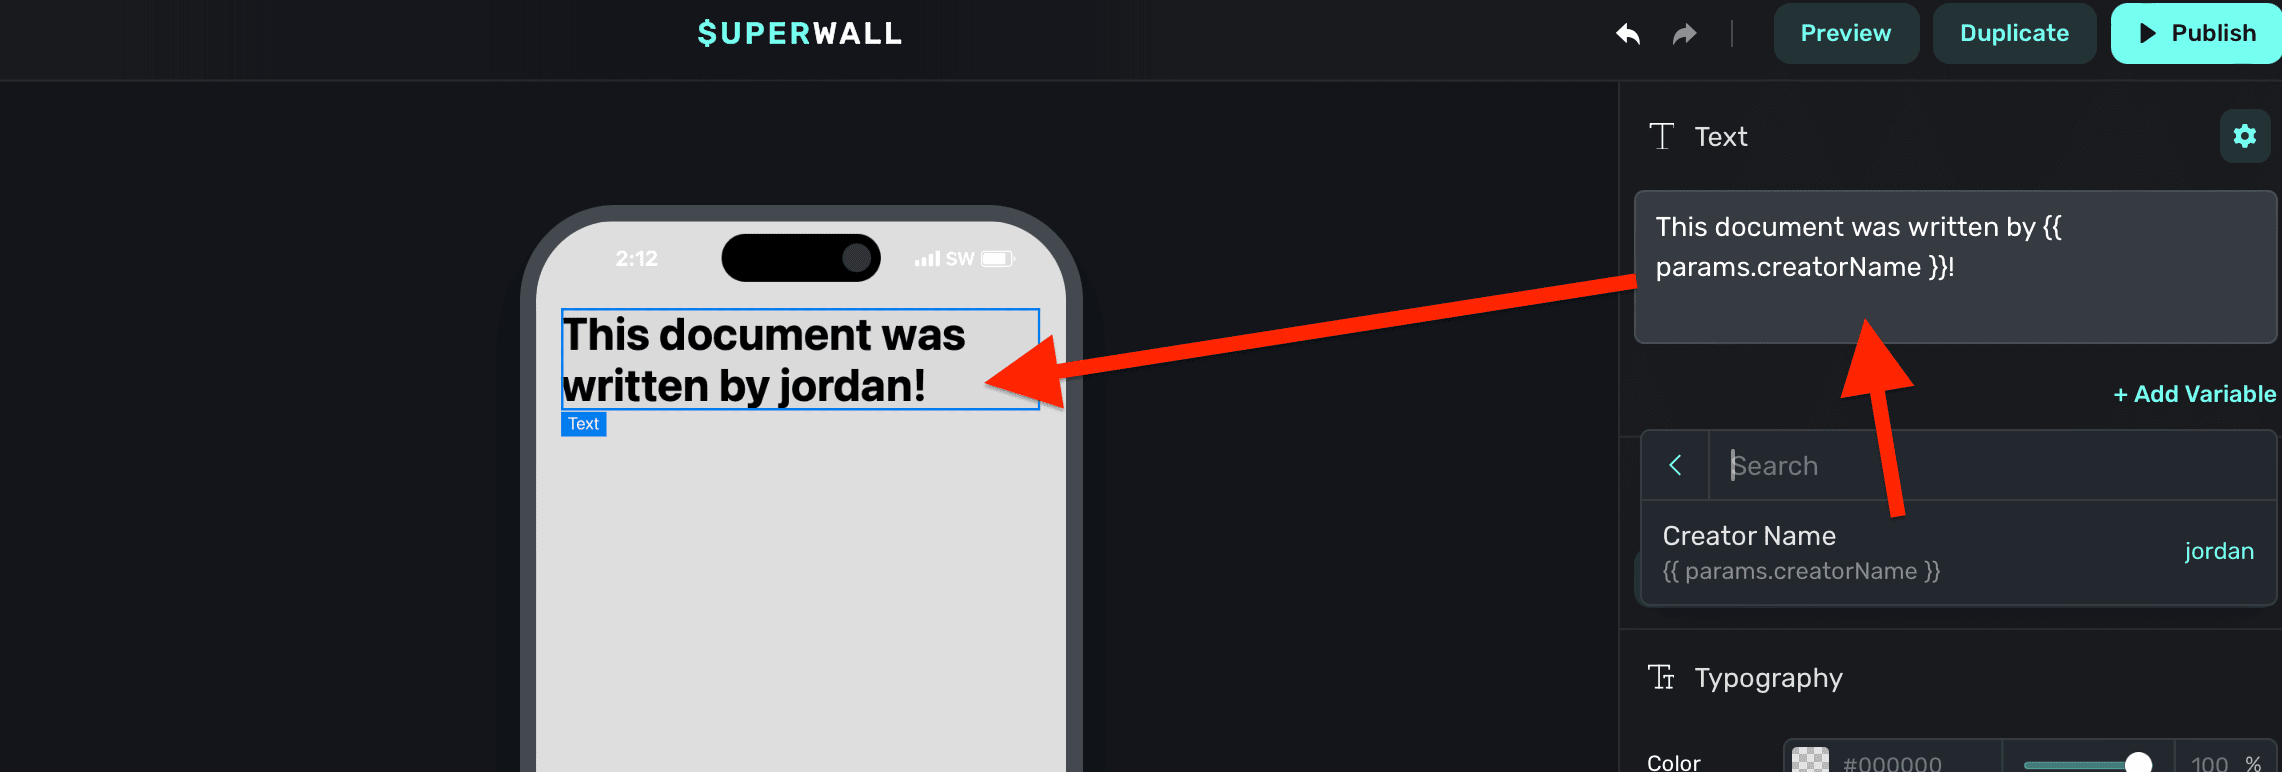
From there, they are able to be referenced the same way as any other variable:
Liquid syntax formatting
In text, you can use Liquid filters to modify output. To use filters, add a pipe after the variable. Then, add in one or more filters:
// Results in 17, the absolute value of -17
{{ -17 | abs }}
For example, to capitalize a text variable, you would write:
// If the name was "jordan", this results in "JORDAN"
{{ user.name | upcase }}
Custom Liquid filters
To make it easier to express dates & countdowns we've added several non-standard filters to our Liquid engine.
date_add_* and date_subtract_*
These filters add or subtract a specified amount of time to/from a date.
| Filter | Description |
|---|---|
date_add_seconds | Adds the specified number of seconds to a date |
date_add_minutes | Adds the specified number of minutes to a date |
date_add_hours | Adds the specified number of hours to a date |
date_add_days | Adds the specified number of days to a date |
date_add_weeks | Adds the specified number of weeks to a date |
date_add_months | Adds the specified number of months to a date |
date_add_years | Adds the specified number of years to a date |
date_subtract_seconds | Subtracts the specified number of seconds from a date |
date_subtract_minutes | Subtracts the specified number of minutes from a date |
date_subtract_hours | Subtracts the specified number of hours from a date |
date_subtract_days | Subtracts the specified number of days from a date |
date_subtract_weeks | Subtracts the specified number of weeks from a date |
date_subtract_months | Subtracts the specified number of months from a date |
date_subtract_years | Subtracts the specified number of years from a date |
Example Usage:
{{ "2024-08-06T07:16:26.802Z" | date_add_minutes: 30 | date: "%s" }}Output: 1722929186
countdown_*_partial
These filters calculate the partial difference between two dates in various units. This is usefull for formatting a countdown timer by exach segment.
| Filter | Description |
|---|---|
countdown_minutes_partial | Returns the remaining minutes in the current hour |
countdown_hours_partial | Returns the remaining hours in the current day |
countdown_days_partial | Returns the remaining days in the current week |
countdown_weeks_partial | Returns the remaining weeks in the current month (assuming 4 weeks per month) |
countdown_months_partial | Returns the remaining months in the current year |
countdown_years | Returns the full number of years between the two dates |
Example Usage:
{{ "2024-08-06T07:16:26.802Z" | countdown_hours_partial: "2024-08-06T15:30:00.000Z" }}:{{ "2024-08-06T07:16:26.802Z" | countdown_minutes_partial: "2024-08-06T15:30:00.000Z" }}Output: 8:33
countdown_*_total
These filters calculate the total difference between two dates in various units.
| Filter | Description |
|---|---|
countdown_minutes_total | Returns the total number of minutes between two dates |
countdown_hours_total | Returns the total number of hours between two dates |
countdown_days_total | Returns the total number of days between two dates |
countdown_weeks_total | Returns the total number of weeks between two dates |
countdown_months_total | Returns the total number of months between two dates |
countdown_years_total | Returns the total number of years between two dates |
Example Usage:
{{ "2024-08-06T07:16:26.802Z" | countdown_days_total: "2024-08-16T07:16:26.802Z" }}Output: 10
All these filters expect date strings as arguments. Anything that Javascript's default date utility can parse will work. For countdown filters, the first argument is the starting date, and the second argument (where applicable) is the end date.
The countdown_*_total filters calculate the total difference, while the countdown_*_partial
filters calculate the remainder after dividing by the next larger unit (except for years).
For countdown_months_total and countdown_years_total, the calculations account for varying
month lengths and leap years.
All countdown filters assume that the end date is later than the start date. If this isn't always the case in your application, you may need to handle this scenario separately.
Snippets with variables
If you create a group of components built off of variables and conditions, save it as a snippet to reuse. There are several stock snippets built this way. For example the Product Selector snippet:
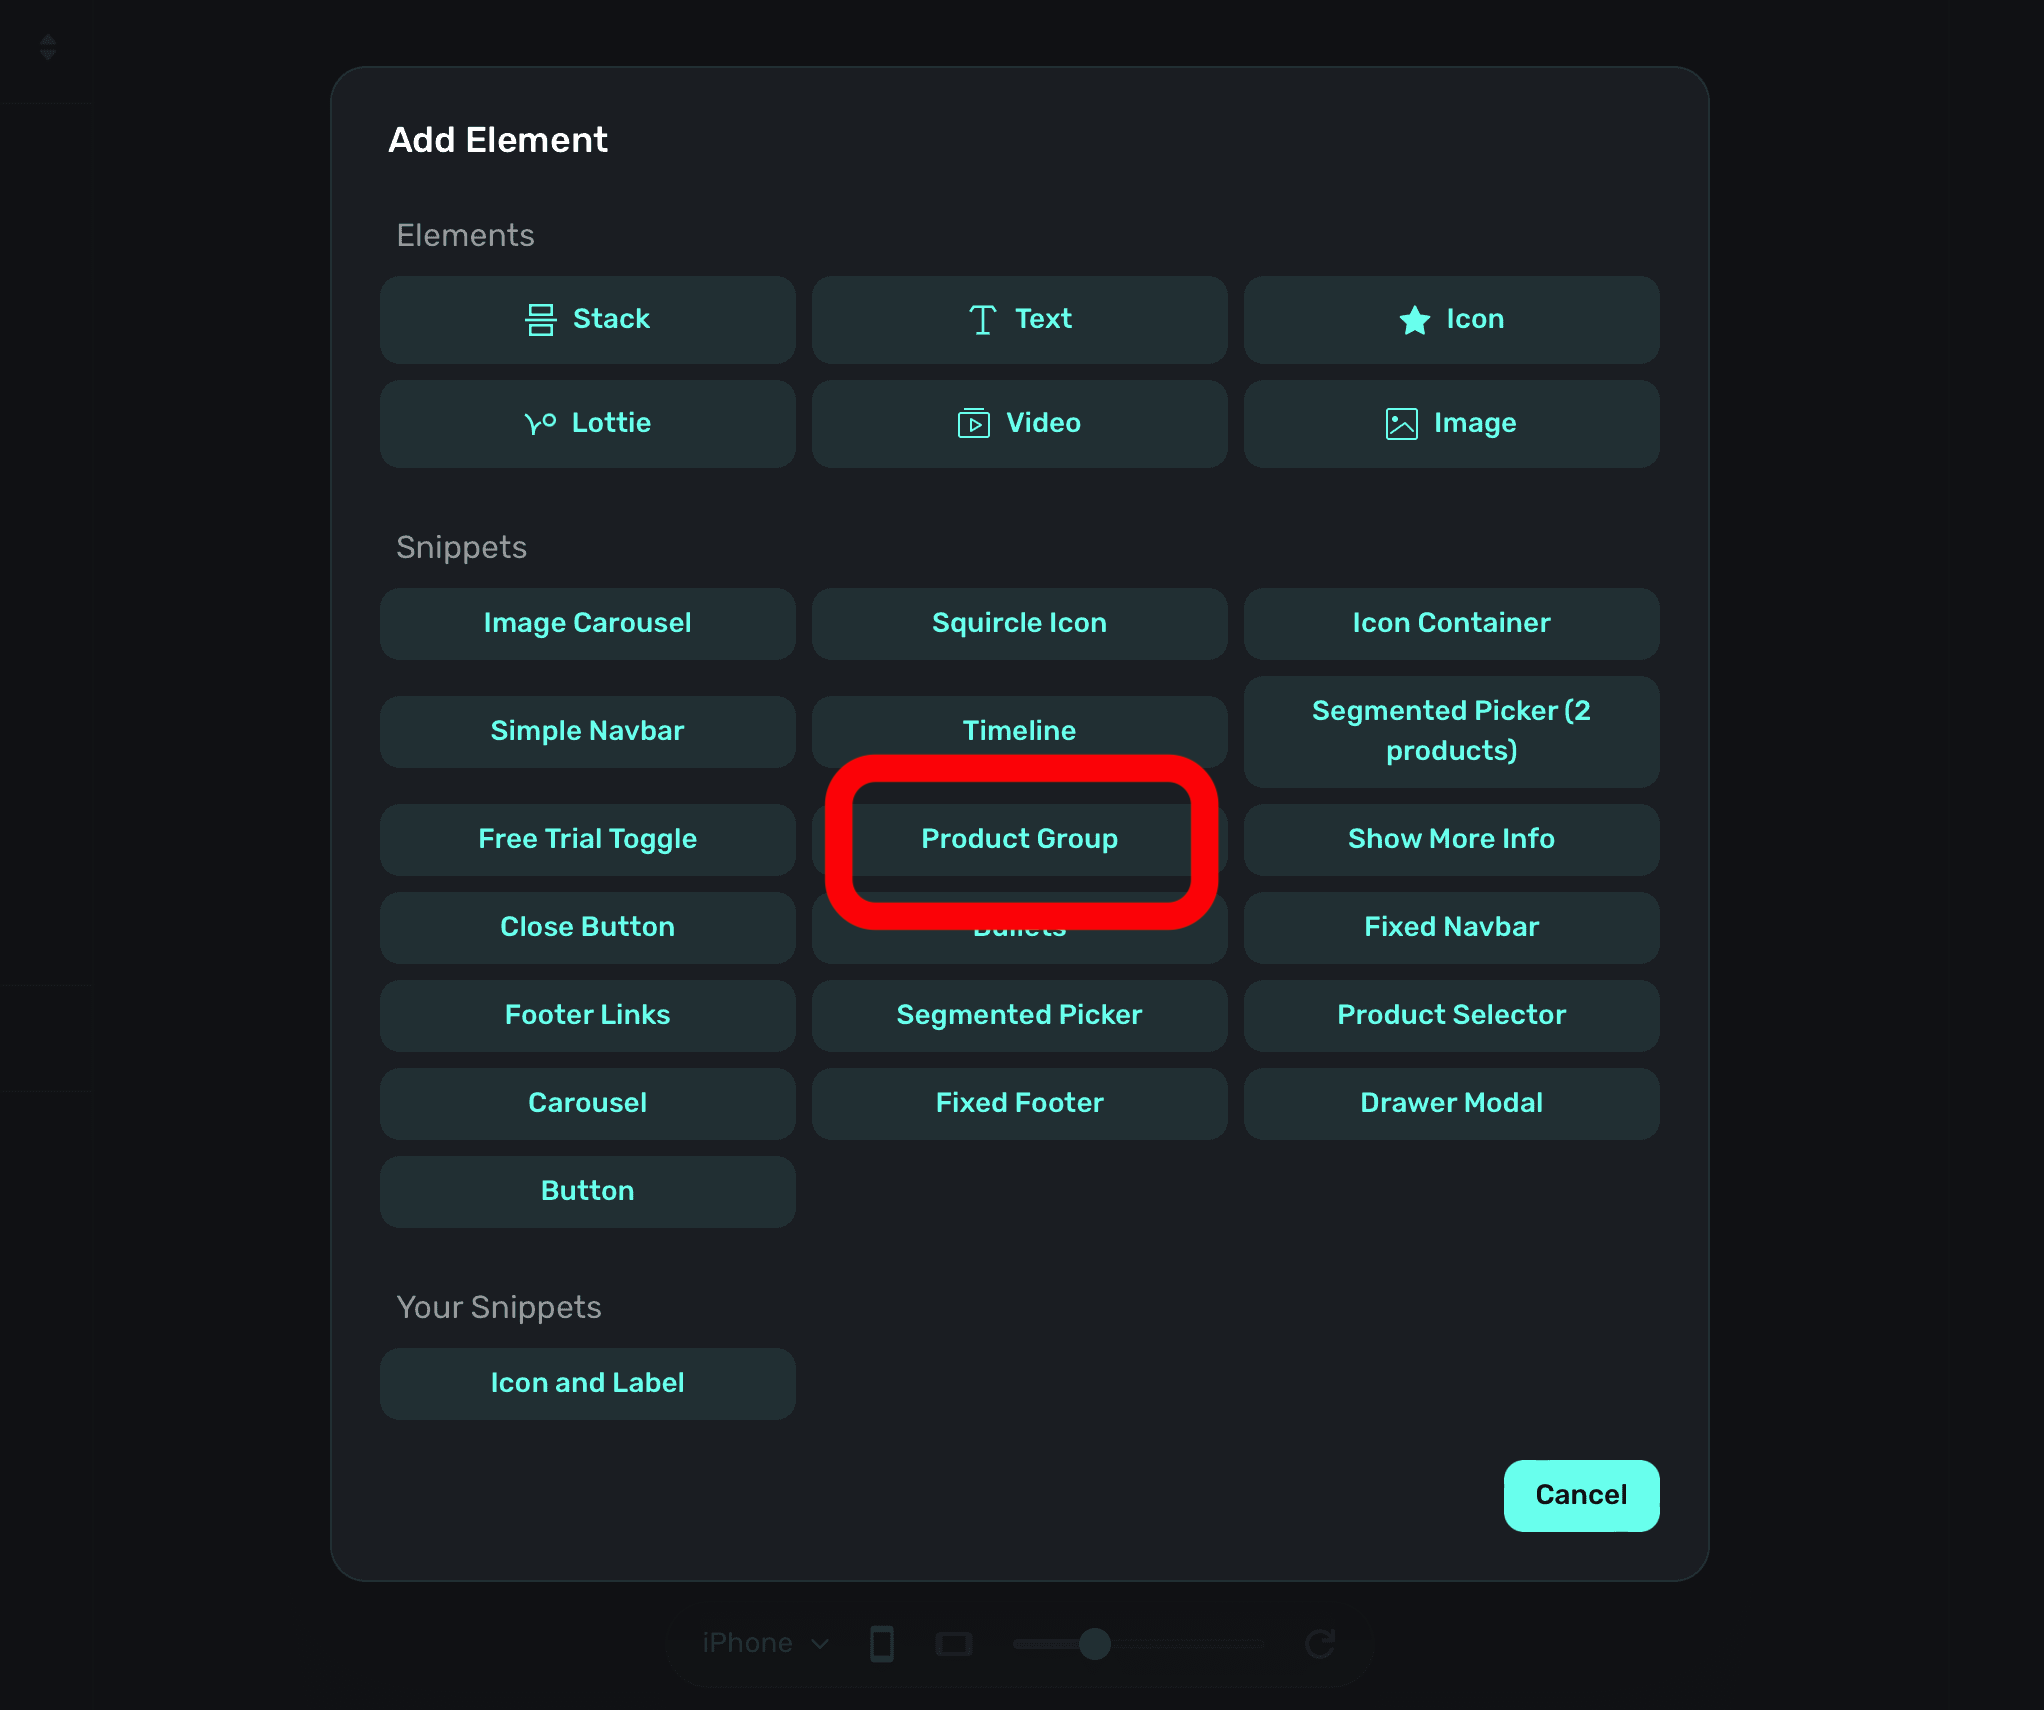
Adding this snippet shows your products in a vertical stack:
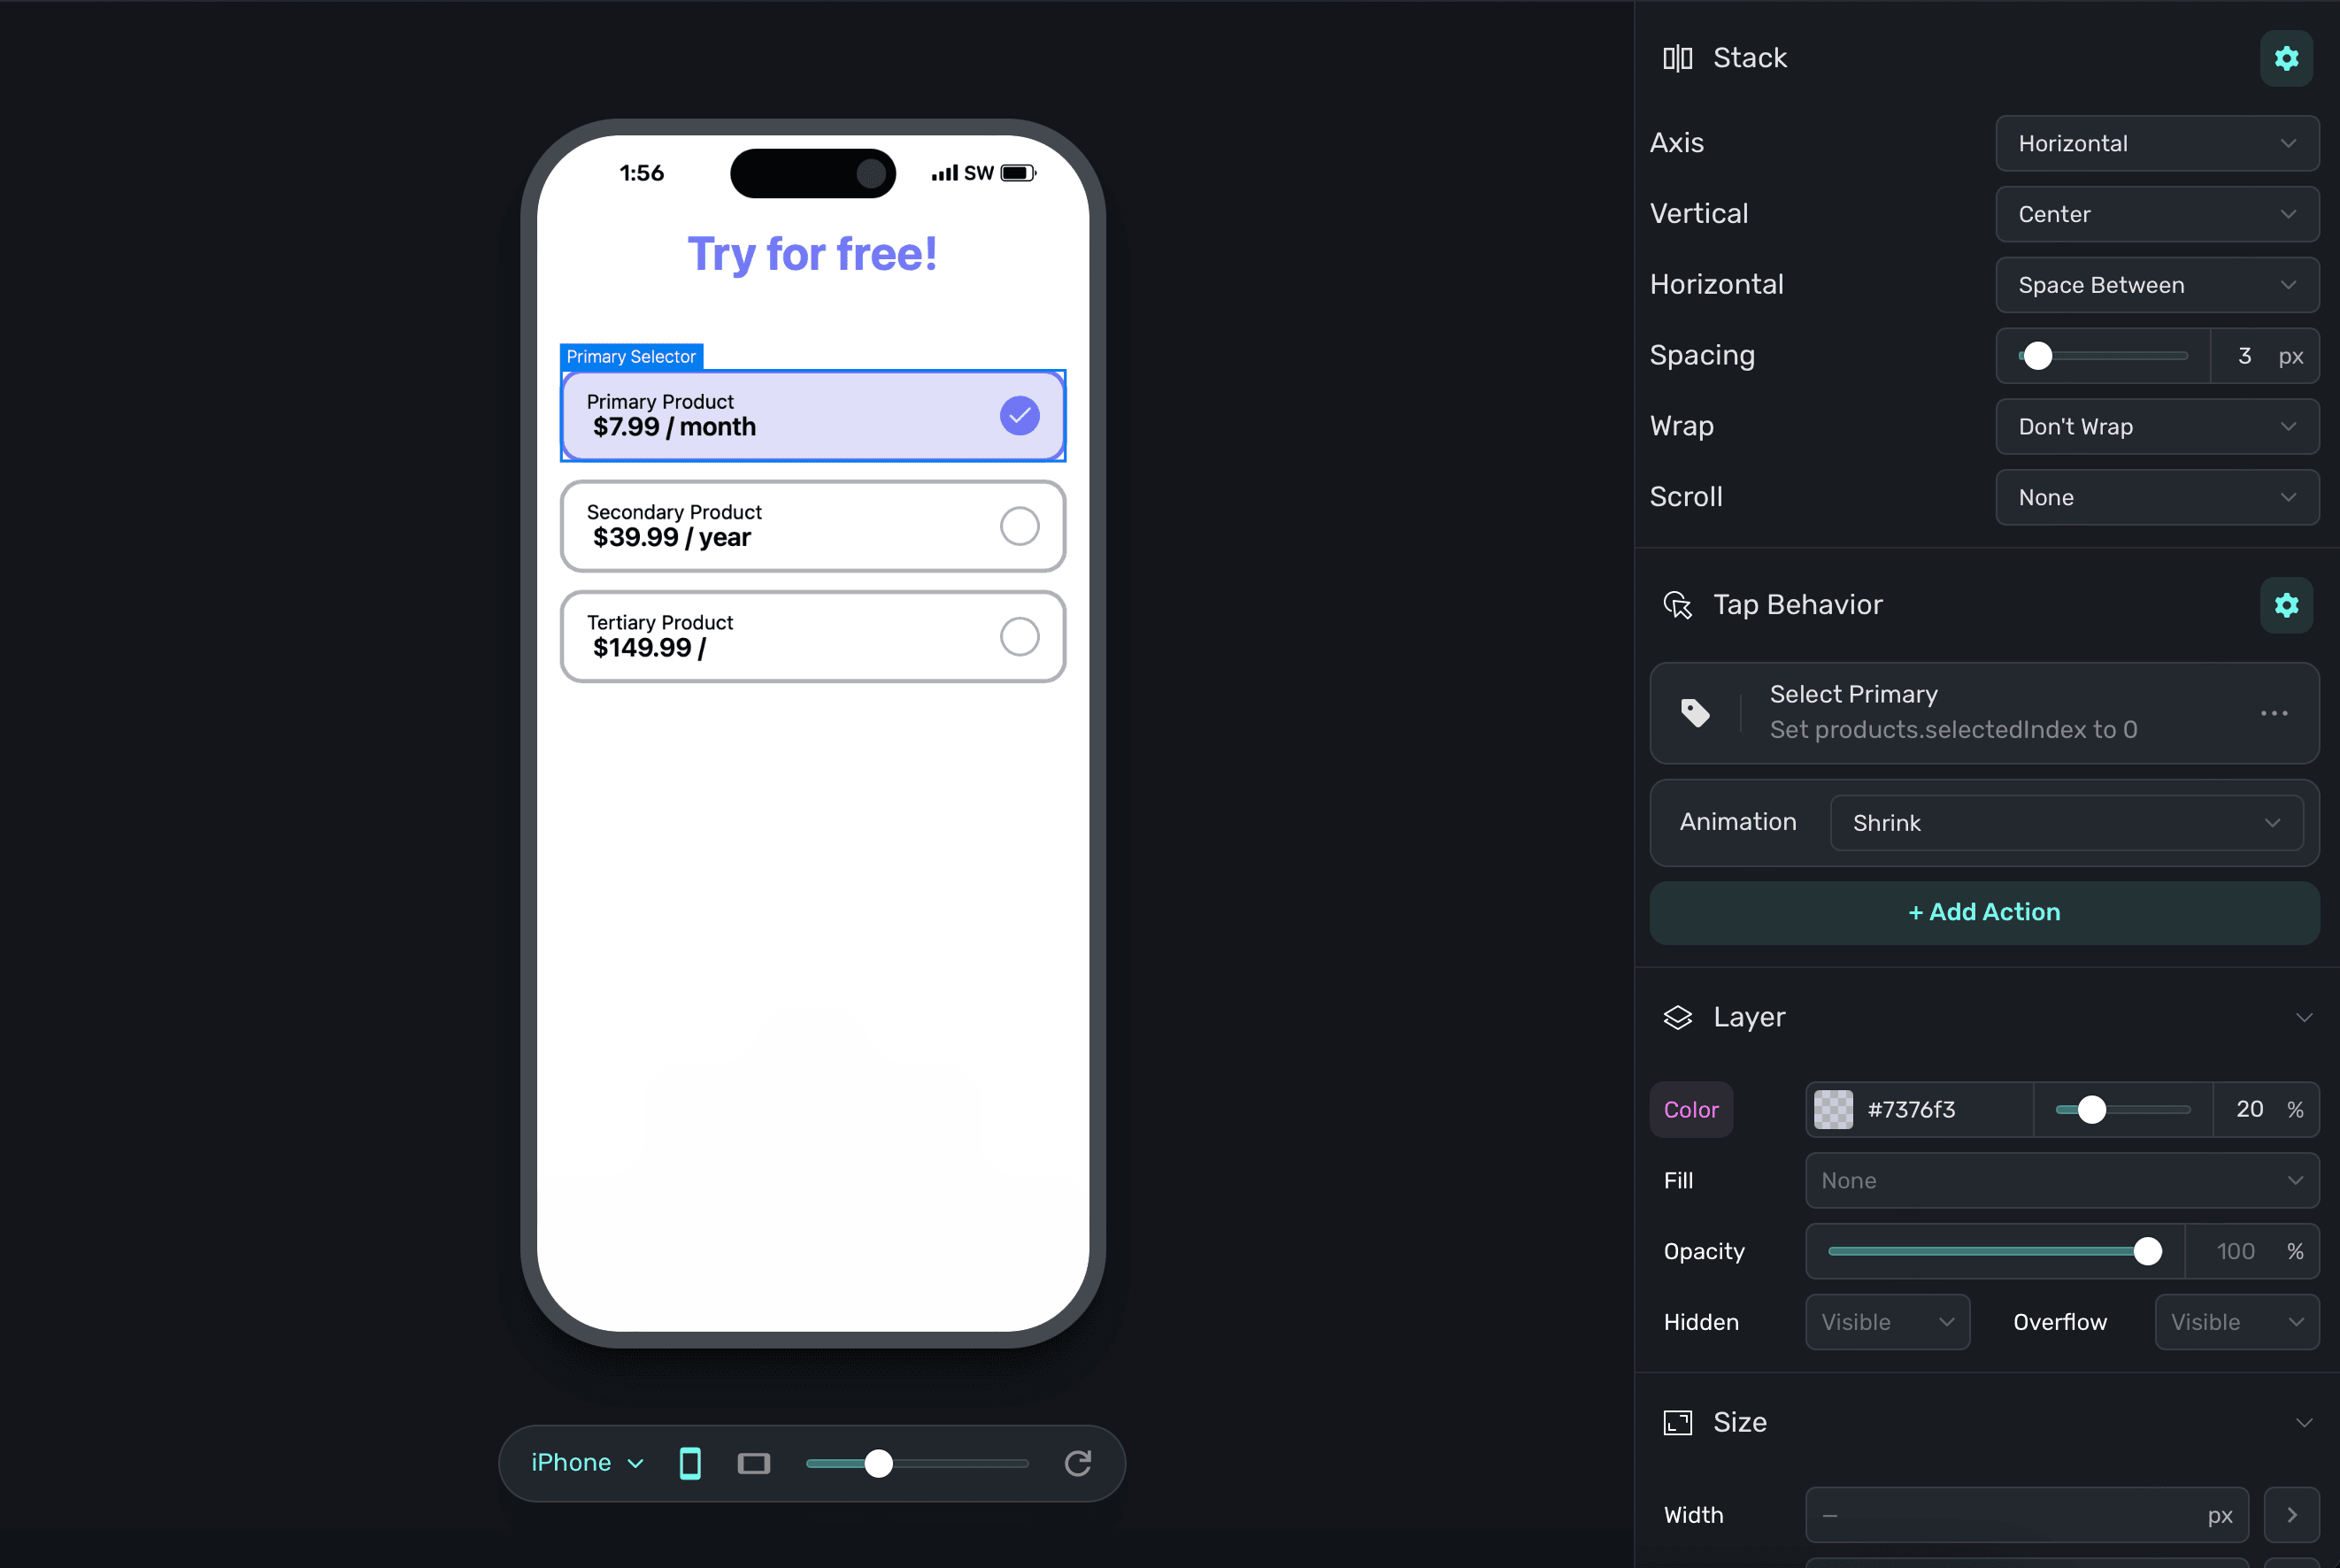
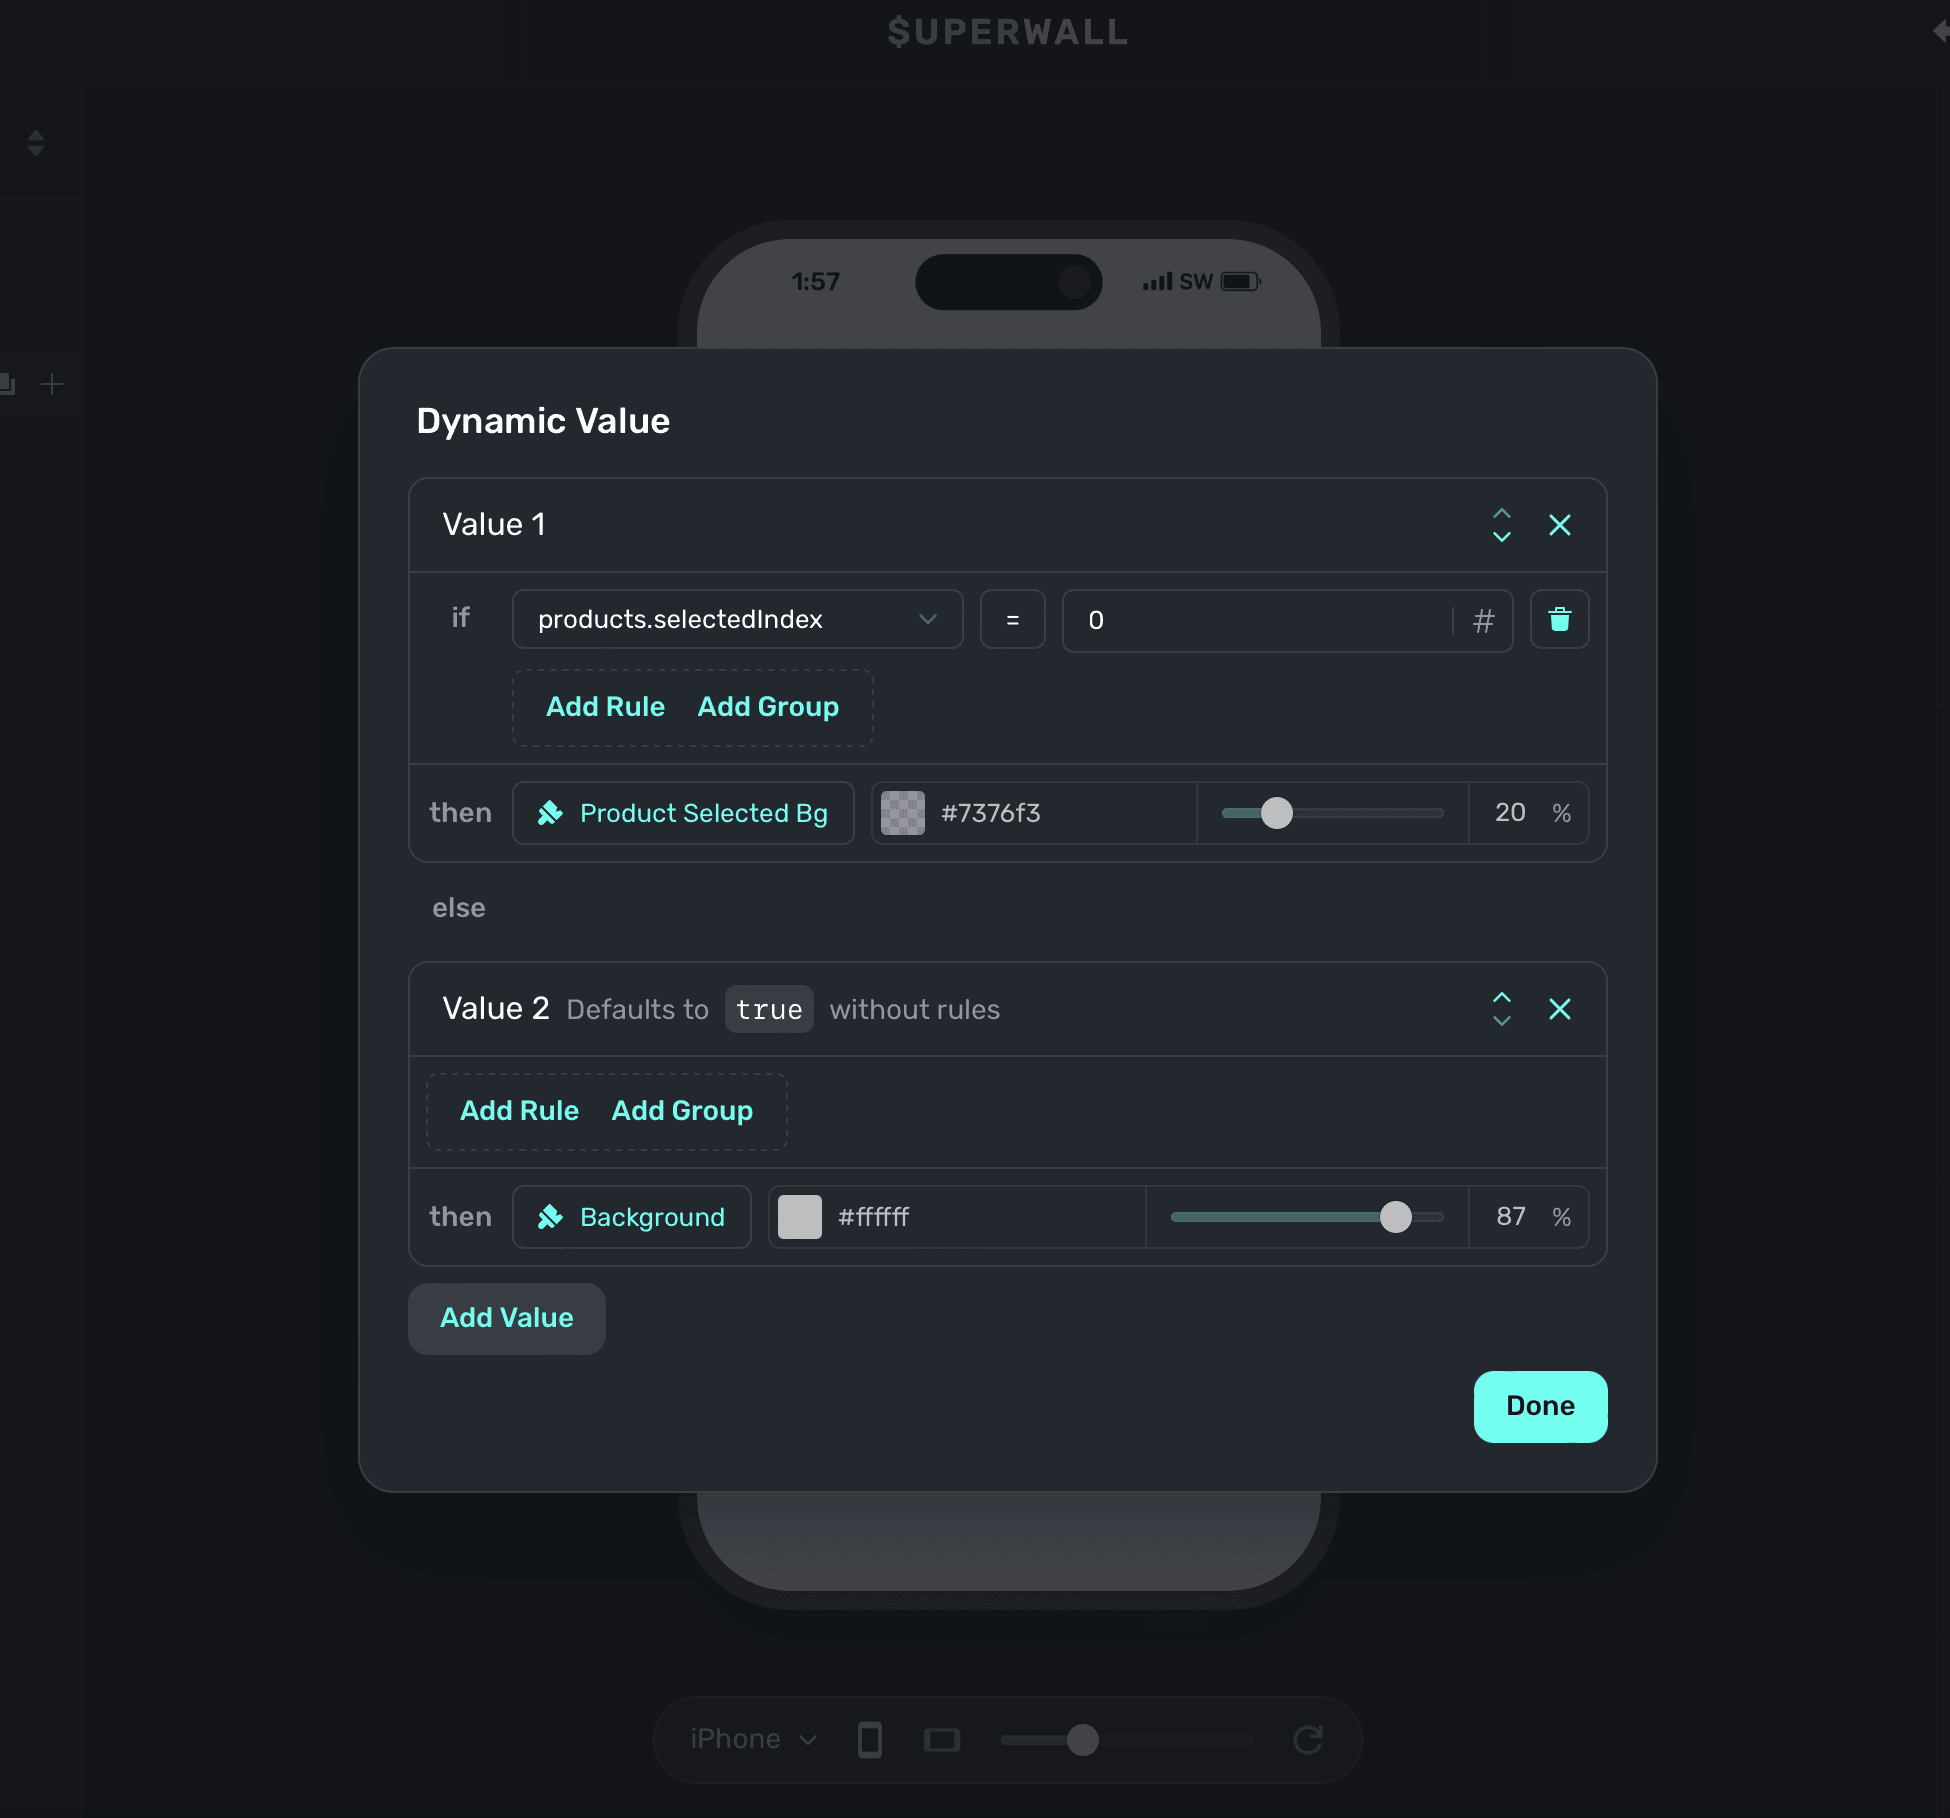
When one is selected, the checkmark next to it is filled in. This is achieved with stock variables (i.e. the selected product) and then changing layer opacity based on if the checkmark's corresponding product is selected or not:
Testing and handling different states
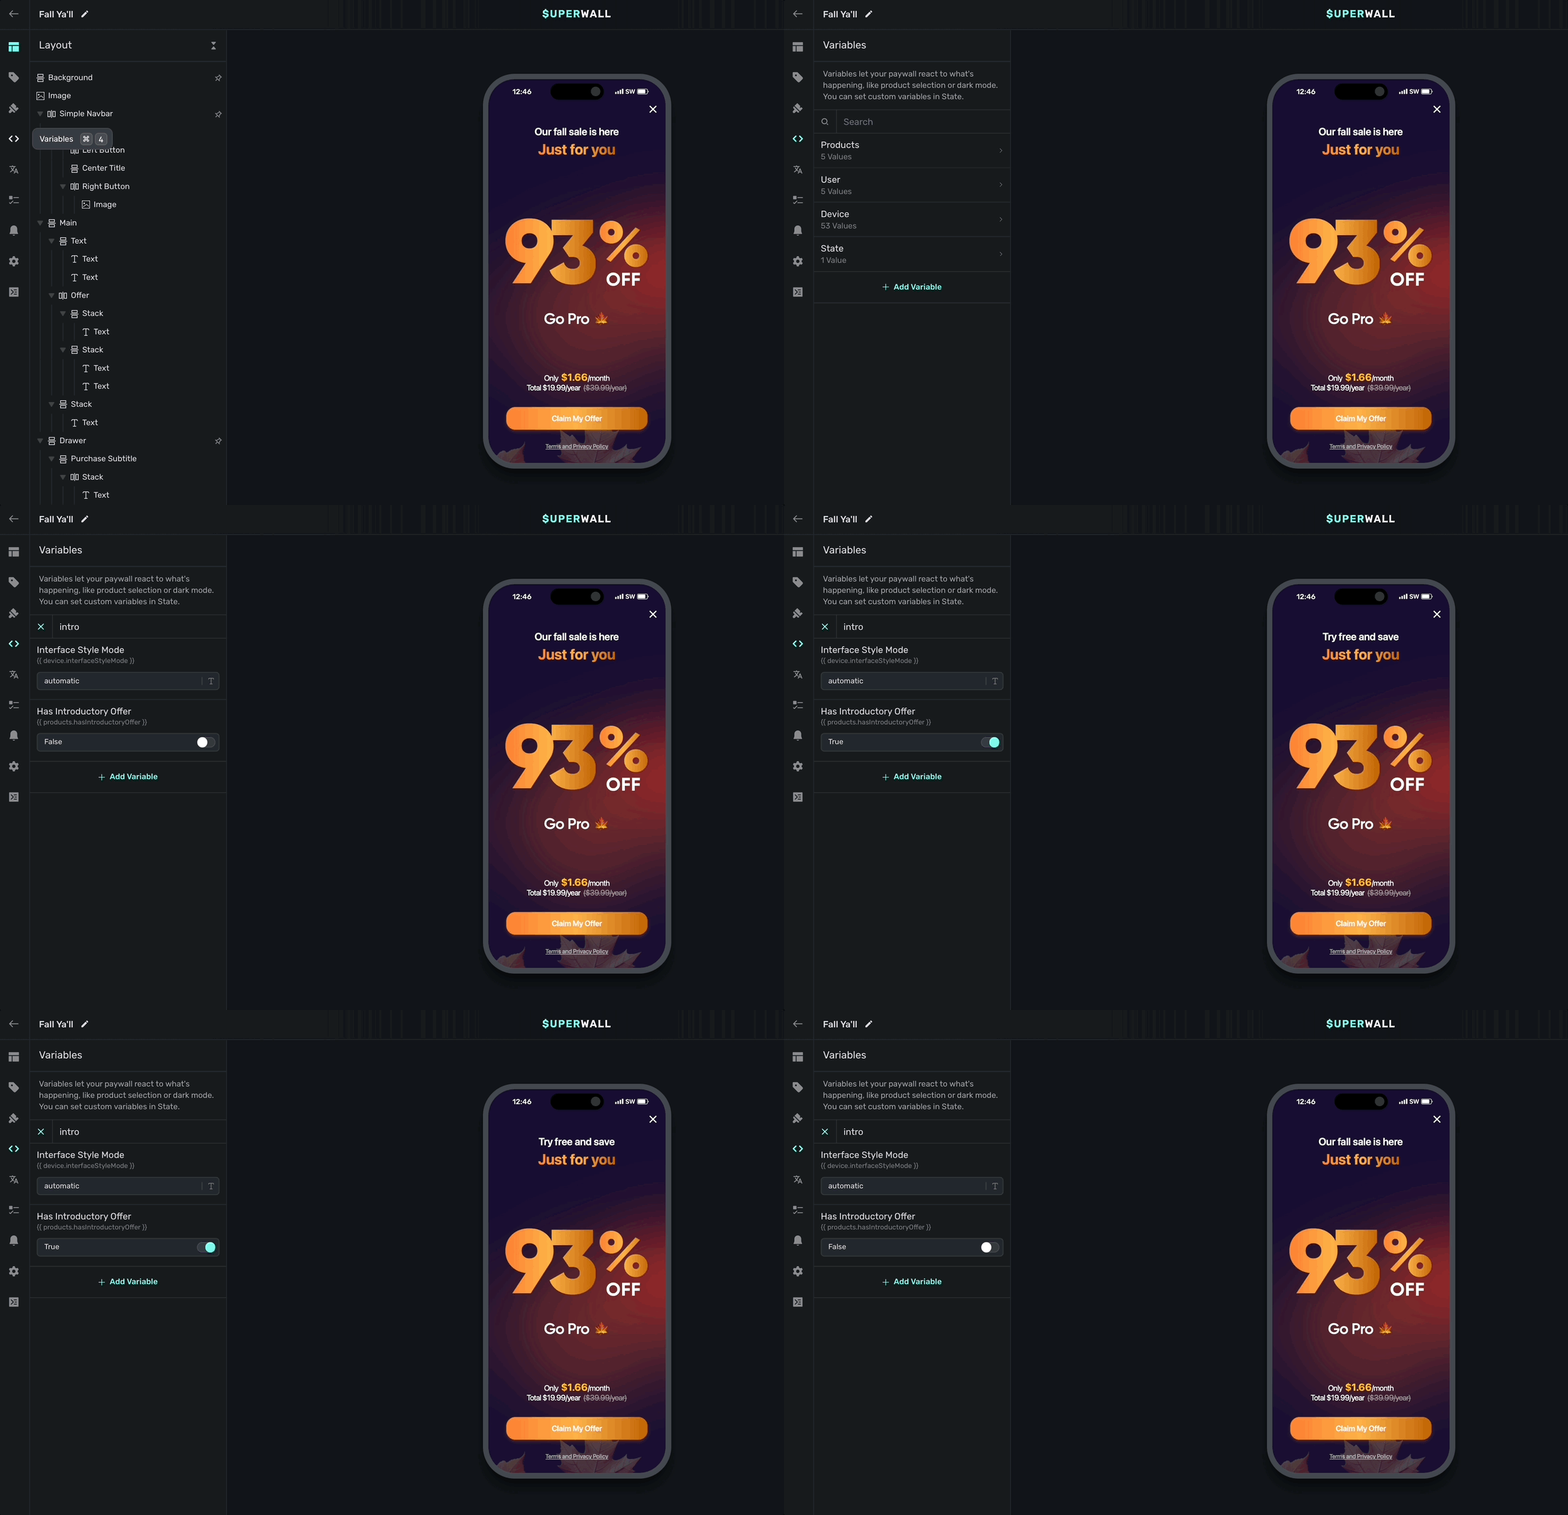
Often times, you'll want to test things like introductory or trial offers, a certain page within a paging design, or keep a modal drawer open to tweak its contents or look. To do that, simply change the variable's value in the editor. On the left sidebar, click Variables and then search for the one you're after and set its value.
Here are some common examples:
- Testing introductory offers: To test trial or introductory offer states, change the
products.hasIntroductoryOffertotrueorfalse. In the example below, the text on the paywall changes based on whether or not a trial is available. To easily test it, you can toggleproducts.hasIntroductoryOffer:
- Testing a particular page in a paging paywall: In this design, there are three distinct pages:
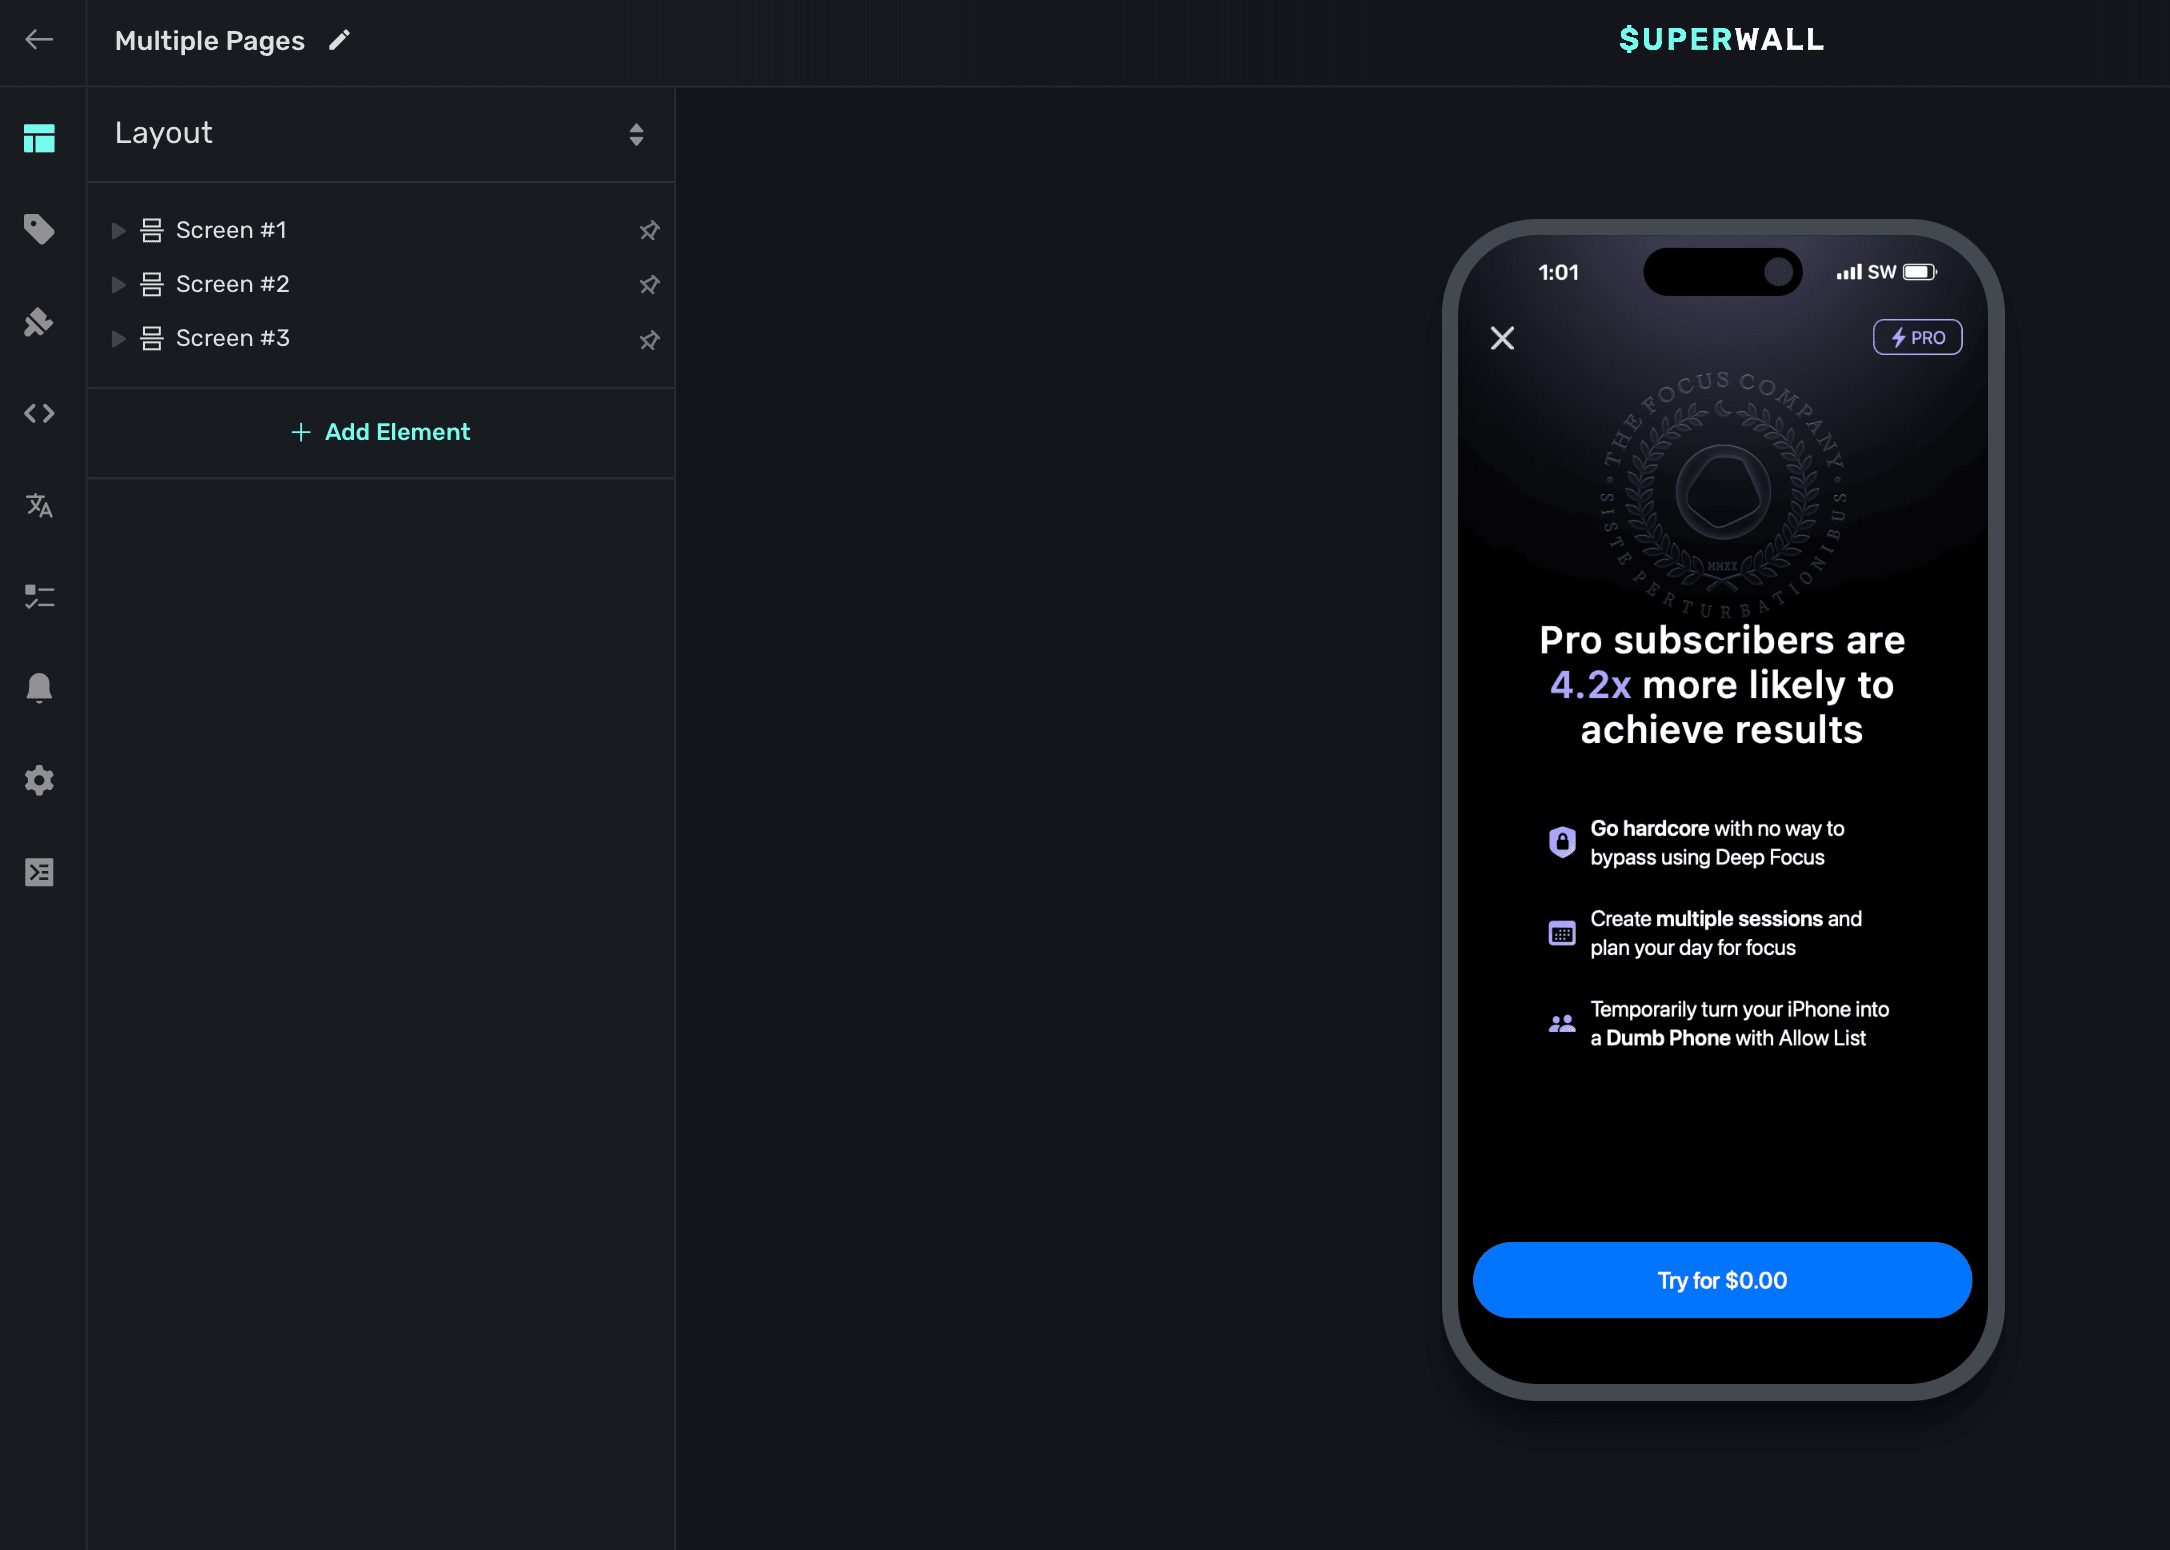
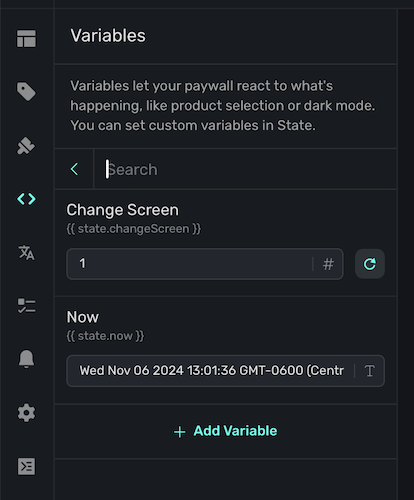
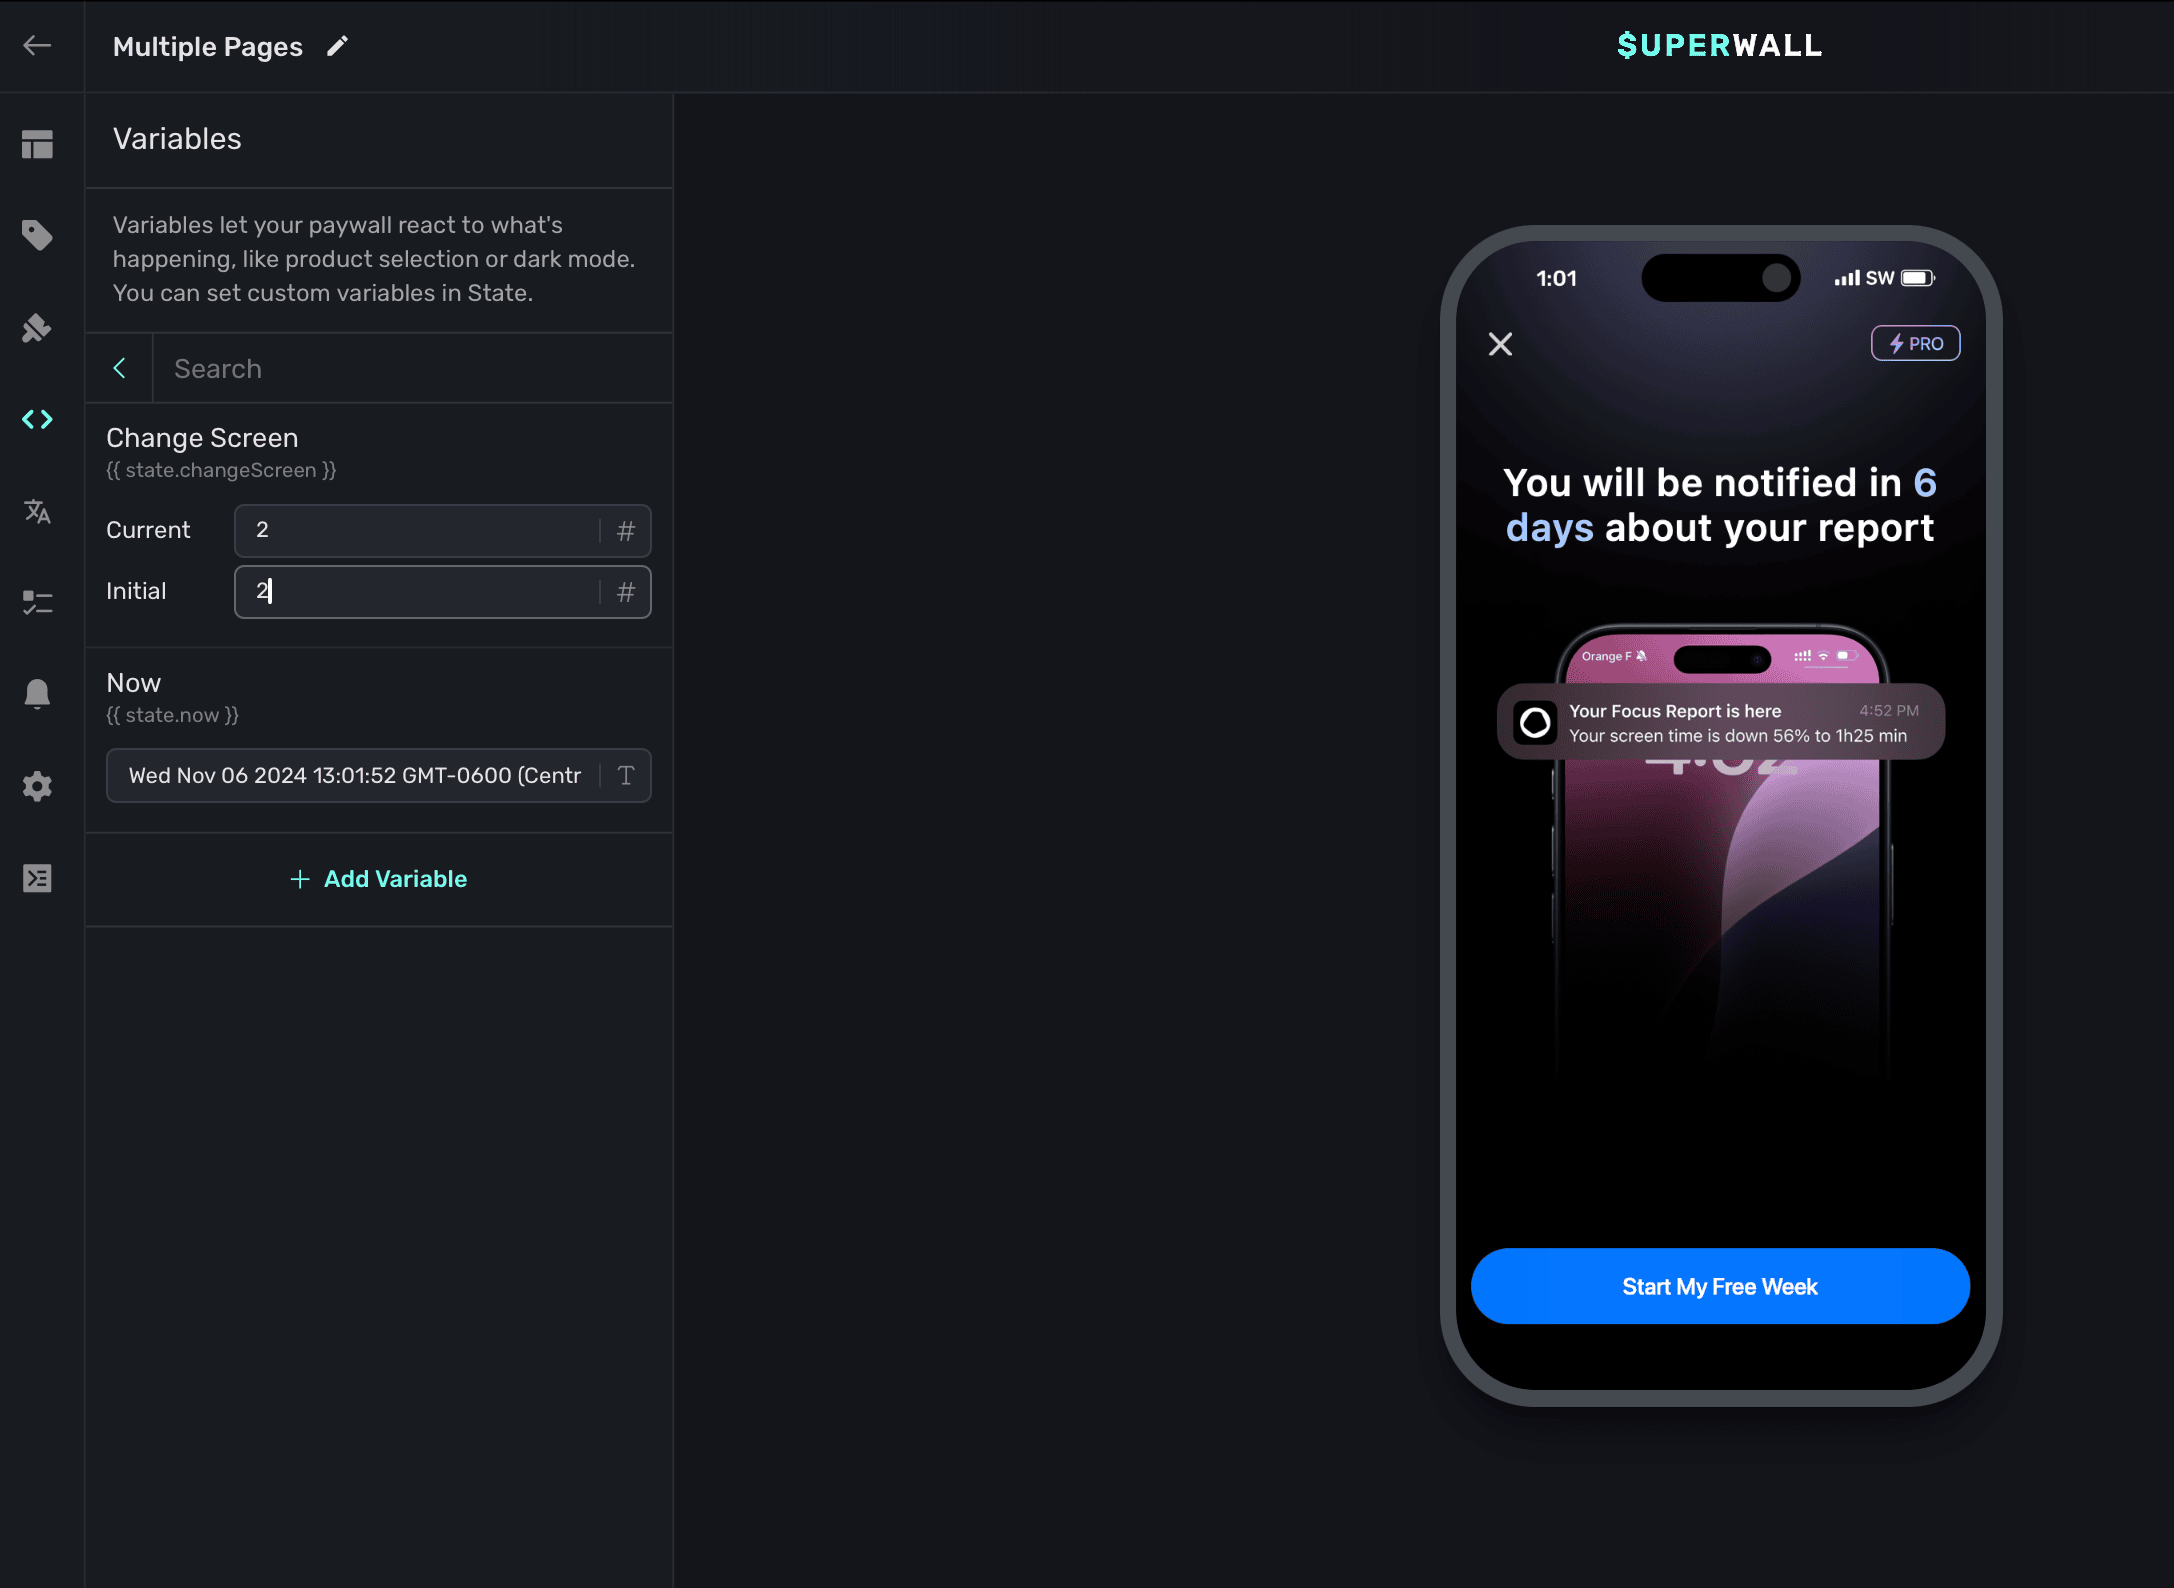
By default, the first one is showing. Though, if you needed to easily edit the second or third page, start by finding the variable that is controlling which page is shown. Typically, it'll be a state variable. Here, it's changeScreen:
By changing it, you can easily pull up each individual page and edit it as needed:
How is this guide?
Edit on GitHub